← Todos los capítulos
Driving Manual · Theory

Chapter 16 - Accidents and First Aid

As a driver, you may encounter an accident on the road - and knowing how to act can save lives. This chapter explains your legal responsibilities, the PAS protocol (Protect, Alert, Aid), and how to handle injuries until professional help arrives.
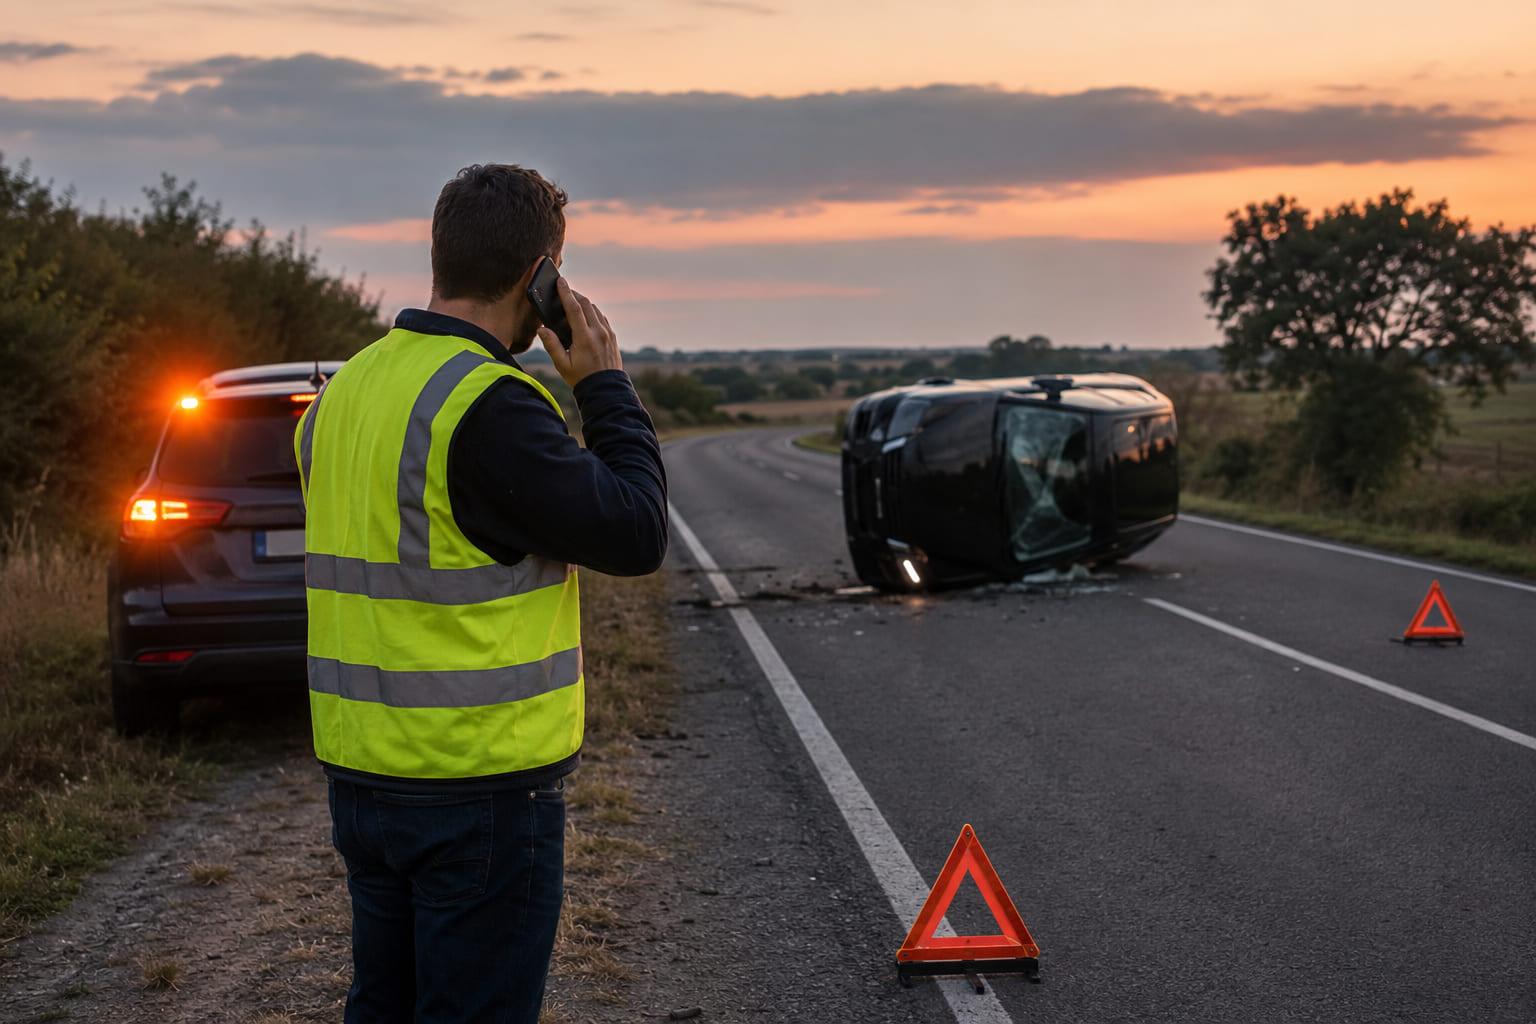
A driver wearing a high-visibility reflective vest stands at the roadside of a rural road, hazard lights flashing on their car, phone pressed to their ear calling 112. In the background, a crashed vehicle is visible on its side with warning triangles placed on the road. Urgent, realistic, but not graphic.
Knowing how to act at an accident scene can be the difference between life and death.

16.1 People at Higher Risk of Traffic Accidents

Studies show certain groups are more likely to be involved in an accident - called Risk Groups. We distinguish the risks faced by pedestrians from those faced by drivers.
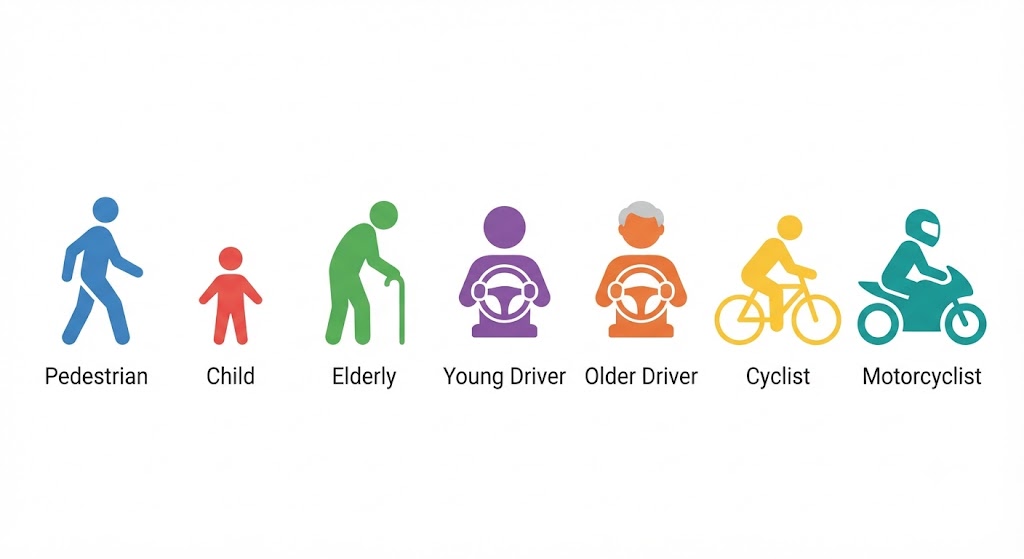
A horizontal row of seven simple figure icons, each labelled below: Pedestrian, Child, Elderly Person, Young Driver, Older Driver (65+), Cyclist, Motorcyclist. Each icon is styled in a distinct colour. The layout reads like a visual taxonomy of the risk groups covered in the section.
Seven risk groups - each faces distinct and specific hazards on the road.

Pedestrians

When a vehicle hits a pedestrian, the pedestrian usually suffers very serious injuries. The risk of death is higher outside the city, where vehicles travel faster. Collisions occur more often where drivers can't see pedestrians clearly because something blocks the view.
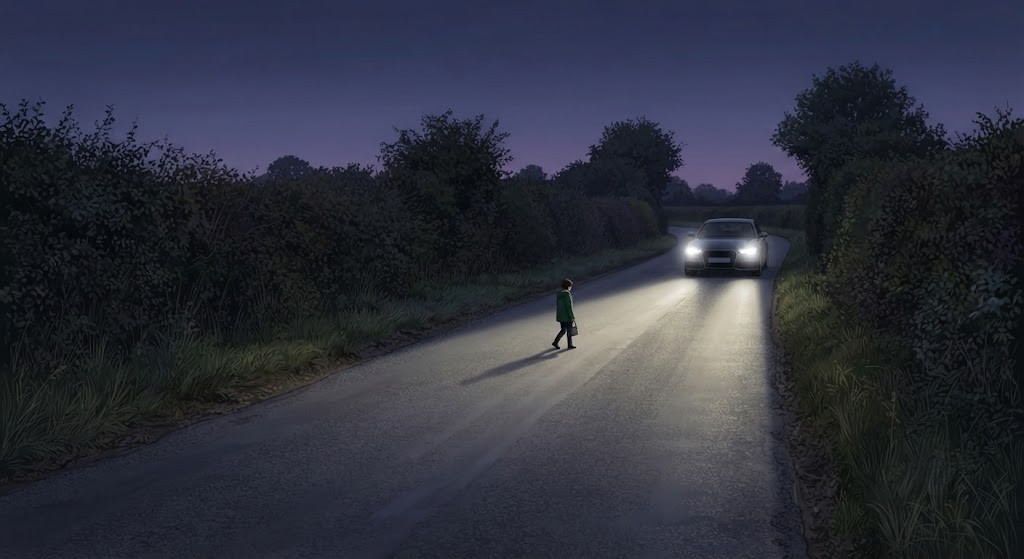
A rural road scene at dusk. A pedestrian is crossing an unmarked section of road. A car is approaching at speed with no pedestrian crossing markings visible, no pavement, and poor lighting. The pedestrian is small relative to the car - illustrating low visibility at rural road speeds.
Risk of death is highest on rural roads - higher speeds and no crossings leave pedestrians almost defenceless.

Precautions for pedestrians

  • Cross at designated pedestrian crossings.
  • Cross only when the pedestrian light is green.
  • Walk only in permitted areas, using roadsides and hard shoulders correctly where applicable.
  • Wait on the pavement to cross - never on the roadway.
  • Always look before stepping off the curb.
  • Make sure no other vehicle is approaching before you get out of your own vehicle.
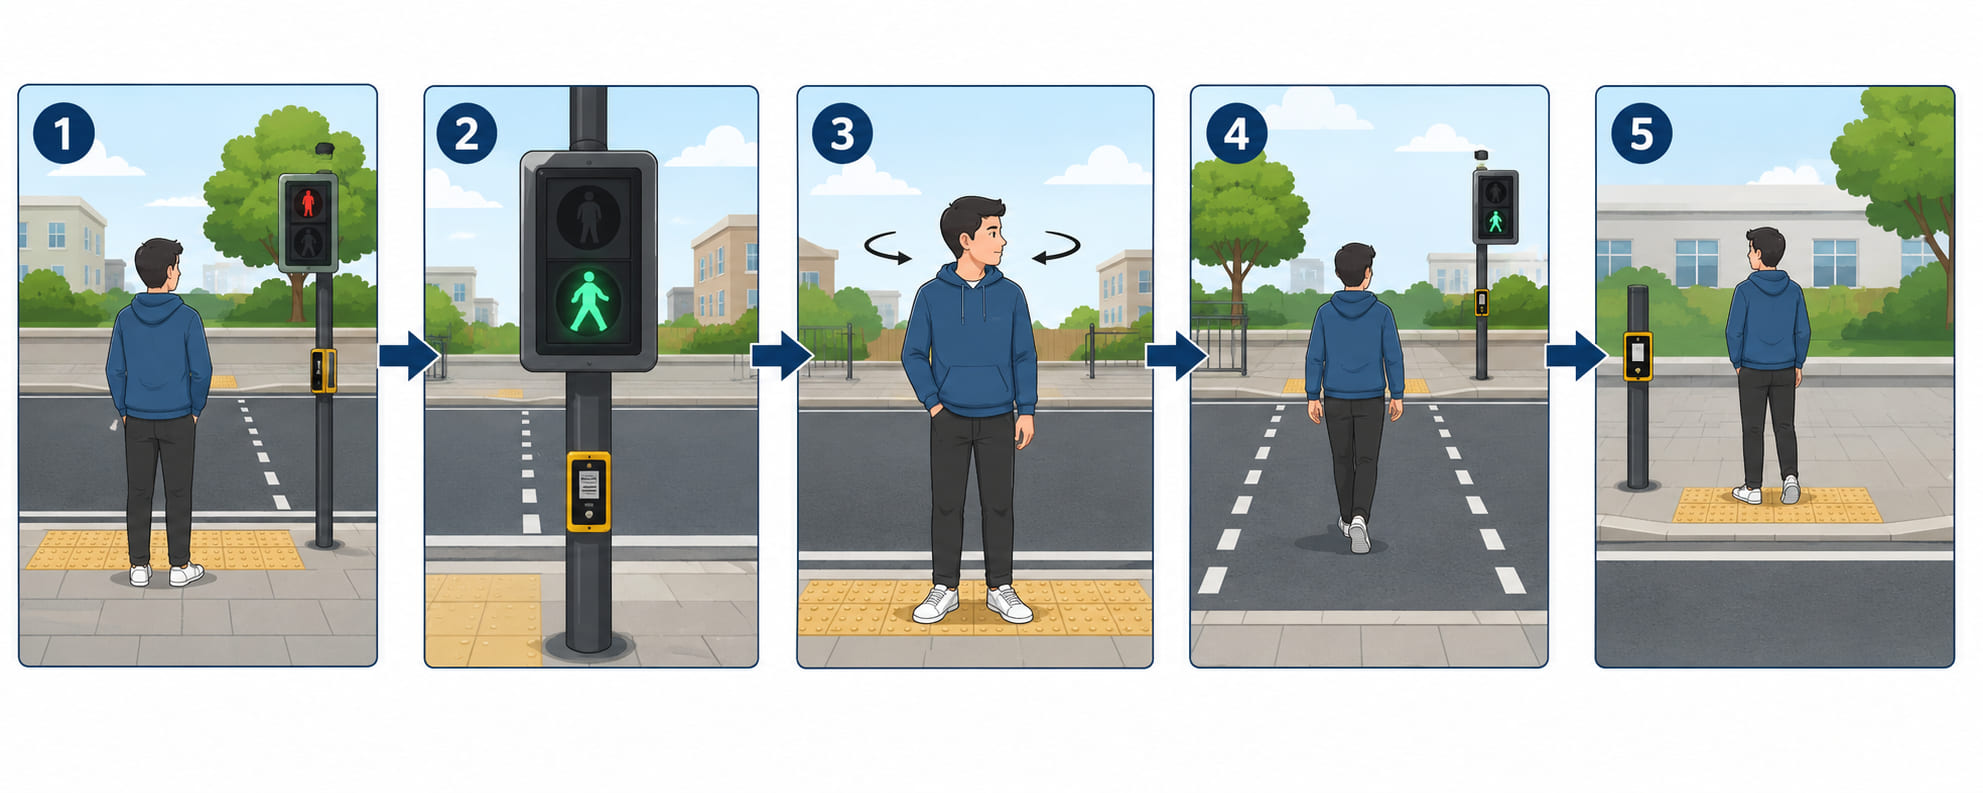
A five-frame horizontal crossing sequence infographic. Frame 1: pedestrian waiting on the pavement behind the curb. Frame 2: pedestrian traffic light showing green. Frame 3: pedestrian looking left and right before stepping off the curb. Frame 4: pedestrian crossing straight across, not diagonally. Frame 5: pedestrian safely on the opposite pavement. Each frame is numbered and separated by a right arrow. Clean flat safety infographic style.
Always wait, check the light, look both ways, cross straight - five steps to safe crossing.

Precautions for drivers

  • Drive at a moderate speed, especially in built-up areas.
  • Be extra cautious near pedestrians and parked vehicles with people inside - someone may step out without looking.
  • Never proceed when the light is red or amber.
  • Yield to pedestrians when they have the right of way.
  • Take extra care if a pedestrian is crossing while on a mobile phone - they may be distracted.
  • Pay close attention near nightlife and entertainment areas.
  • Take special care when exiting garages or driveways.
  • Do not park on the pavement (it forces pedestrians onto the roadway) or on pedestrian crossings.
  • Do not modify the vehicle exterior - modern exteriors are designed to reduce pedestrian injury.
  • Slow down when passing a stationary bus, especially a school bus.
  • Drive with extra caution on rainy days and take extra precautions when reversing.
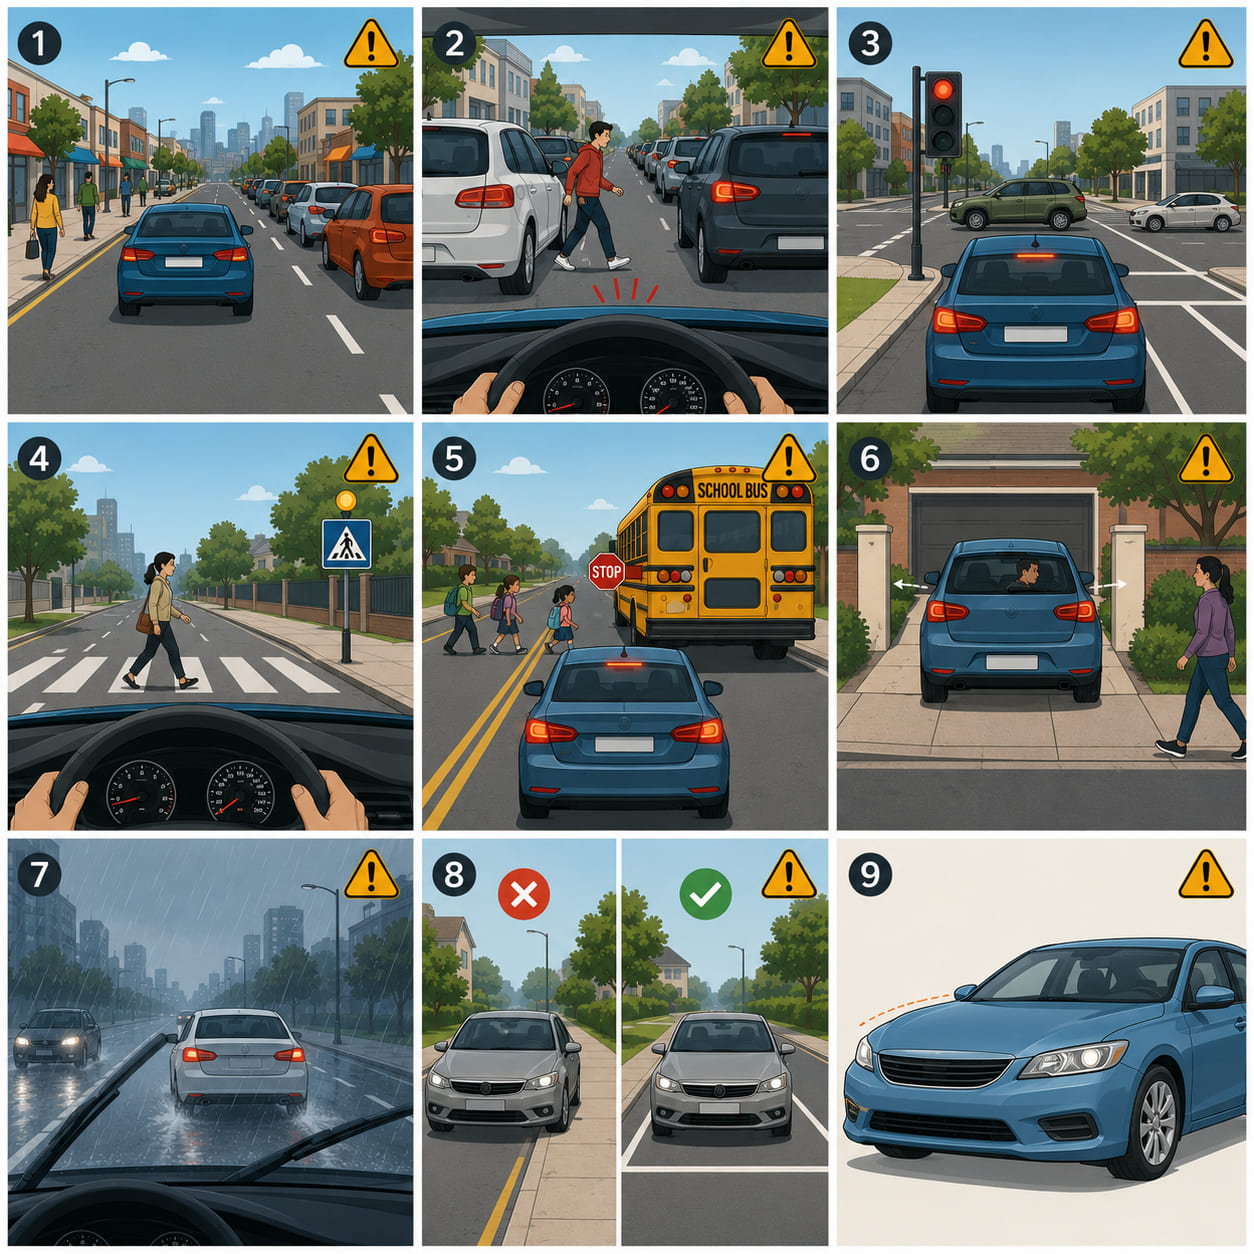
A three-panel "watch out" illustration for drivers. Panel 1: a car slowing behind a stationary bus, a pedestrian stepping out from the front of the bus - the car must slow further. Panel 2: a pedestrian emerging unexpectedly from between two parked cars - the car is braking. Panel 3: a car exiting a garage driveway, the driver checking right before the nose of the car clears the gate. Each panel has an amber warning badge in the corner.
Three hidden pedestrian hazards every driver must anticipate.

Children and Older People

The pedestrians at greatest risk are children and older adults.

Children

  • They are shorter than adults, so they see less of the roadway and drivers find them harder to see.
  • They pay less attention to the road because they have a lower sense of danger.
  • They don't fully know the traffic rules - most child pedestrian collisions happen when leaving school.
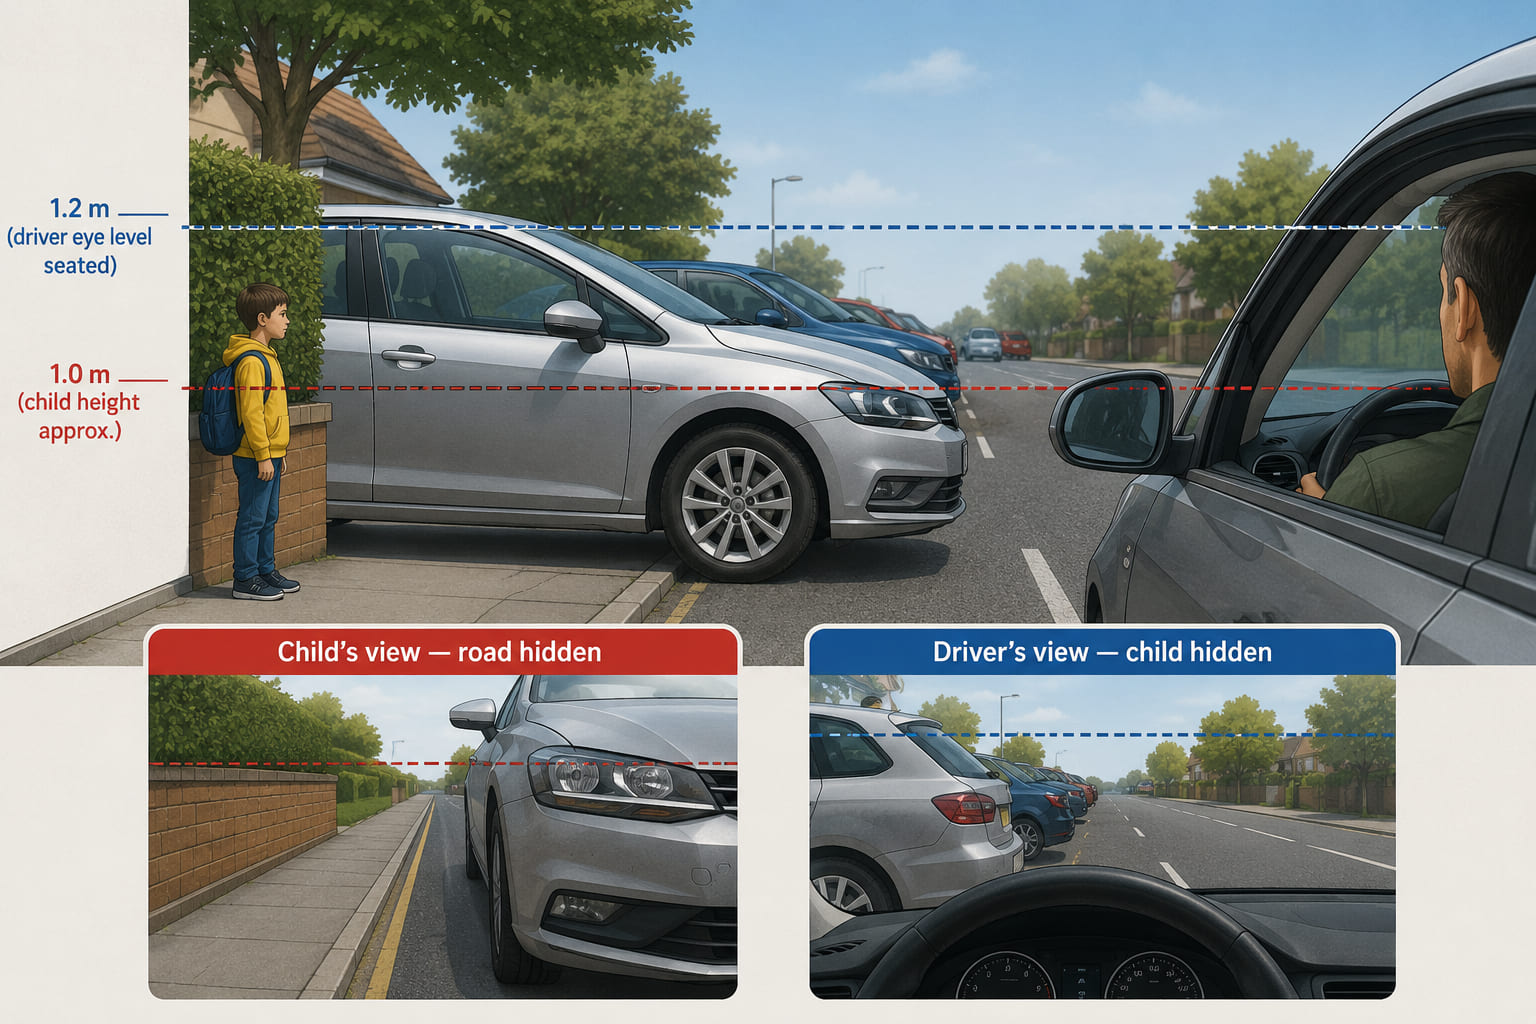
A side-view diagram at a roadside scene. Two eye-level reference lines are shown: a low dashed line at child height (roughly 1 m) and a higher dashed line at adult driver seated eye level (roughly 1.2 m in car). From the child's viewpoint: parked cars block sight of the approaching road entirely. From the driver's viewpoint: the child is hidden behind a parked car bonnet. Labels highlight "what the child sees" and "what the driver sees" - both showing blind zones.
A child's low eye level means they see less road - and drivers see less of them.

Elderly people

  • Ambient noise makes it hard to hear an approaching vehicle.
  • They may have difficulty judging how fast a vehicle is coming.
  • They may have difficulty distinguishing traffic-light colours.
  • In some areas there are too few pedestrian crossings.
  • Some streets are poorly lit, making them harder to cross.
  • Some kerbs are too high.
  • There are obstacles on pavements (planters, badly parked cars).
  • They may become disoriented in unfamiliar areas.

Older people have more accidents when alone than when accompanied by children - walking with children, they tend to be more cautious, both to set an example and to protect them.
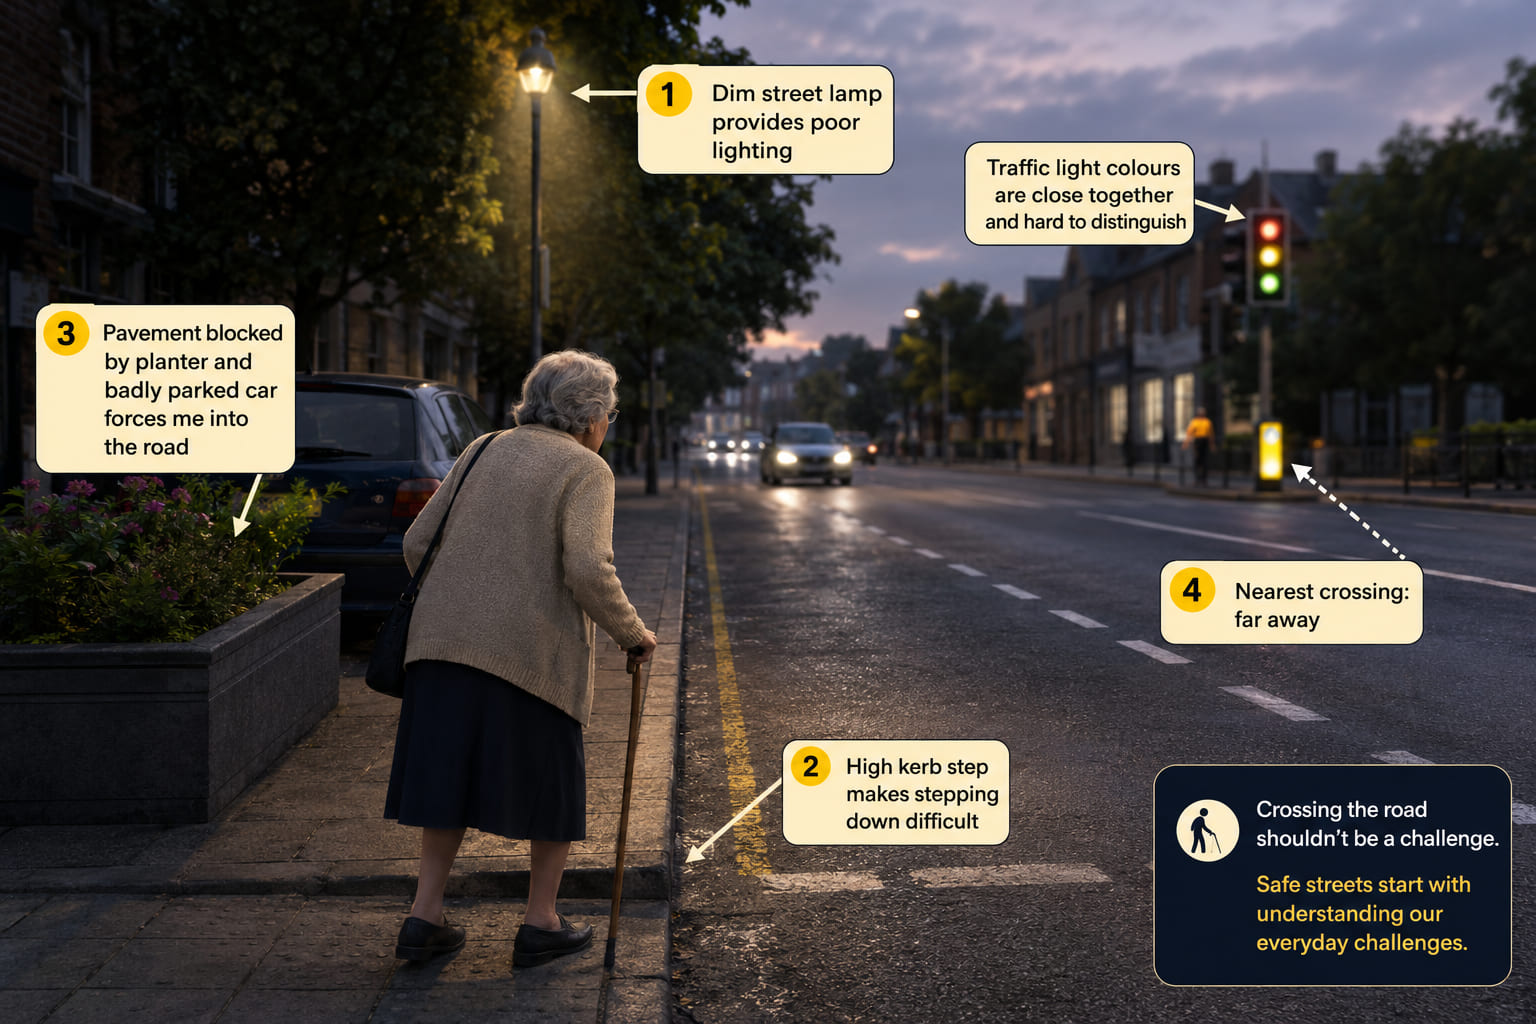
A street-level illustration of an elderly person attempting to cross a road. Around them, four labelled obstacles are highlighted: (1) a poorly lit street with a dim lamp post; (2) a high kerb step; (3) a pavement blocked by a badly parked car and a planter forcing them onto the road; (4) the nearest crossing is far away (sign with a long distance arrow). A traffic light with unclear colour separation is also labelled. Empathetic, clear infographic style.
Elderly pedestrians face a combination of physical and environmental obstacles every time they cross a road.

Drivers at Highest Risk

Young people

In Spain, traffic accidents are the leading cause of death among young people aged 15 to 29. Crashes occur mainly in large cities, on commutes, and in nightlife areas. The highest fatalities come in summer, Christmas, and weekends - most often at night and in the early hours. Main causes:

  • Driving at excessive speed.
  • Consuming alcohol and drugs.
  • Failing to comply with traffic rules.
  • Taking excessive risks while driving.
  • Little/limited experience.
  • Competing with other drivers (showing off or racing).
  • Not wearing a seat belt or helmet because they think they don't need it.
  • Following advertising or promotions that encourage risk-taking.
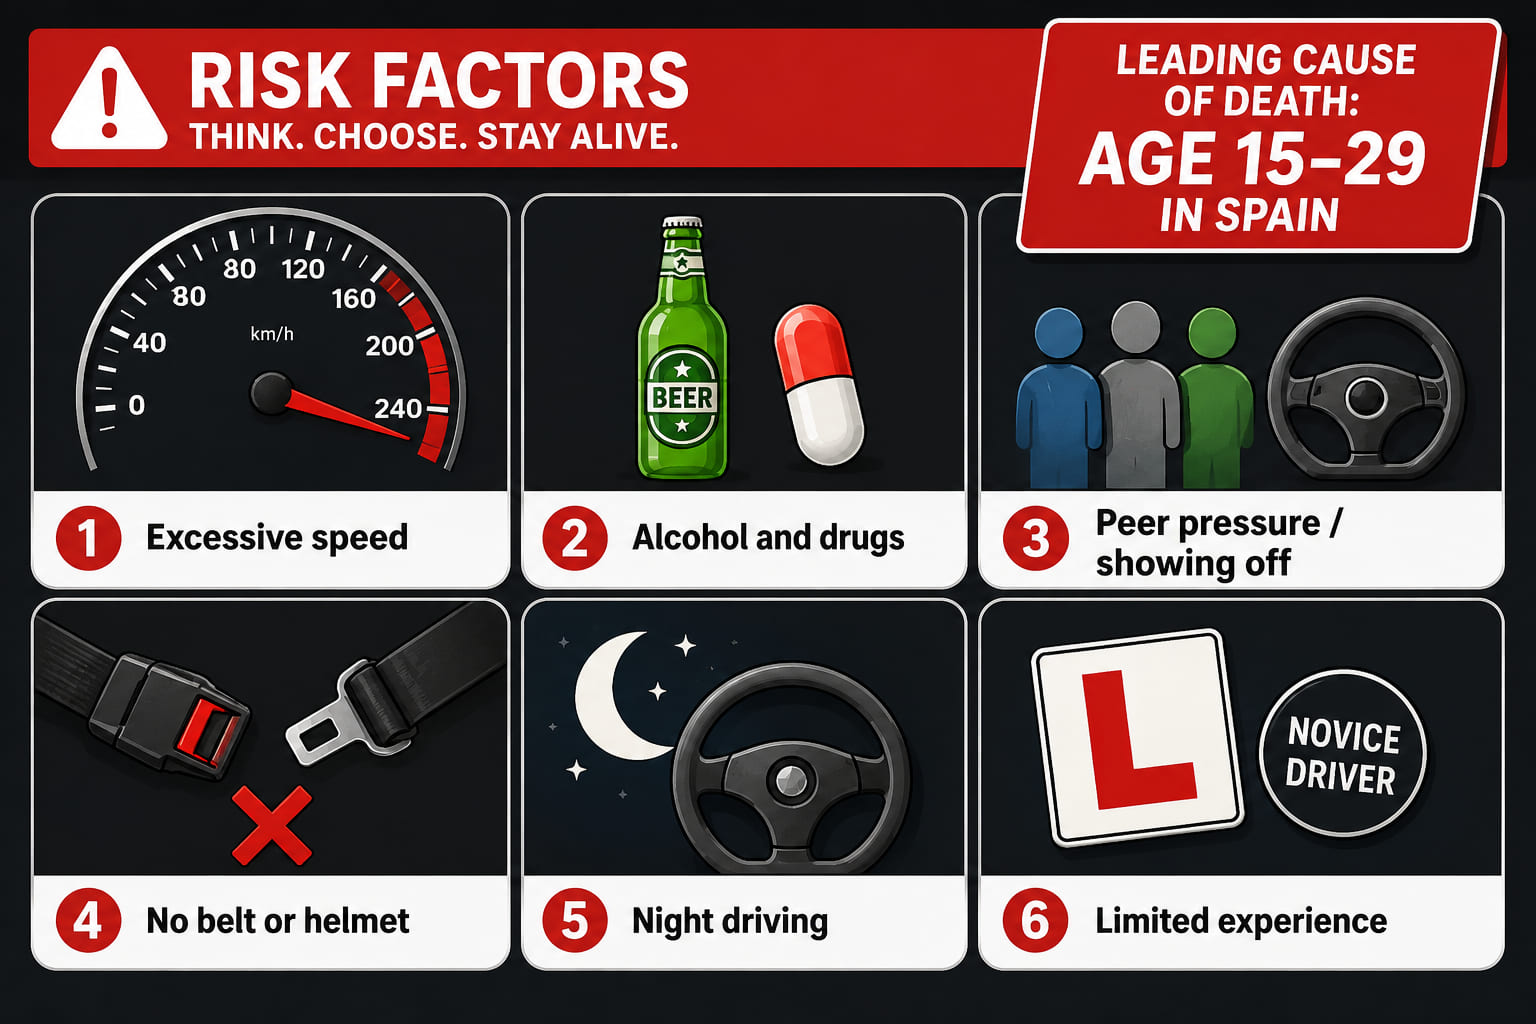
A risk factors card for young drivers (ages 15-29). Six icon cells in a grid: (1) a speedometer in the red zone - "Excessive speed"; (2) a bottle and pill icon - "Alcohol and drugs"; (3) a peer pressure icon (group of figures, one at wheel) - "Social pressure and showing off"; (4) an unbuckled seat belt - "No belt or helmet"; (5) a crescent moon with a steering wheel - "Night driving"; (6) a warning triangle - "Limited experience". A prominent stat badge reads "Leading cause of death age 15-29 in Spain". Energetic but sobering design.
Six risk factors - combined with inexperience, they make young drivers statistically the most dangerous.

Older drivers (65+)

Usually very cautious and rule-abiding, but may be involved in more accidents because:

  • Reduced attention capacity and more time needed to react to the unexpected.
  • Many over 65 have poorer vision and hearing.
  • Some take medications that impair driving.

In a crash, older people tend to suffer more severe injuries and have a lower chance of survival.
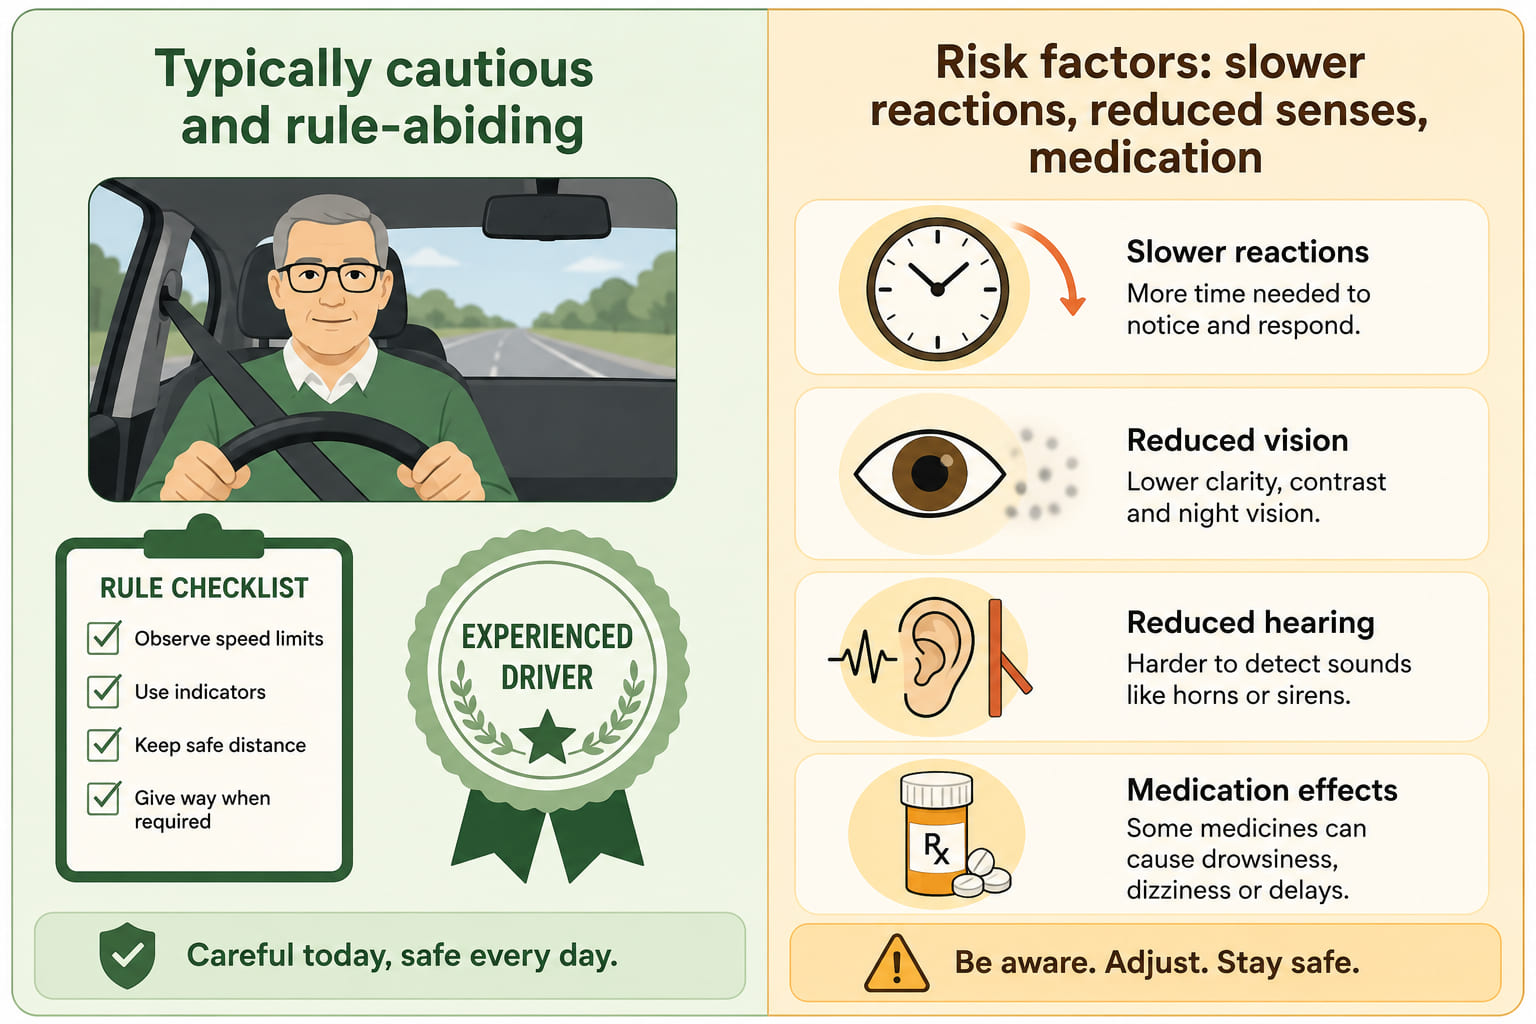
A two-column comparison card. Left column (green, positive): cautious driver icon, rule-following checklist icon, experienced driver badge - "Typically cautious and rule-abiding". Right column (amber, risk): slow reaction time icon (clock with lag arrow), eye/ear difficulty icons, pill bottle icon - "Reduced reaction time, poorer senses, medication effects". The two columns are separated by a centre line. Clean flat infographic.
Older drivers are usually the most rule-abiding - but age brings real risk factors that must be recognised.

Two-wheeled vehicle riders

Two-wheeled vehicles are more vulnerable and less visible, so riders must drive with extra care.

Bicycles. Cyclist accidents happen more often on weekends, especially in better weather. There are more crashes inside cities, but more fatalities on roads outside urban areas - mostly on straight sections or at junctions, from collisions with other vehicles. Causes may be cyclist mistakes or violations by other drivers. To avoid hitting cyclists, drivers should:

  • Leave enough space behind before overtaking, and ample lateral clearance while passing.
  • Never overtake if cyclists are approaching in the opposite direction.
  • Take extra care in rain, snow, fog, or poor visibility.
  • Avoid using the horn near cyclists so as not to startle them.
  • Be cautious around parked vehicles - cyclists may emerge from between them.
  • Drive more carefully near leisure areas and venues.
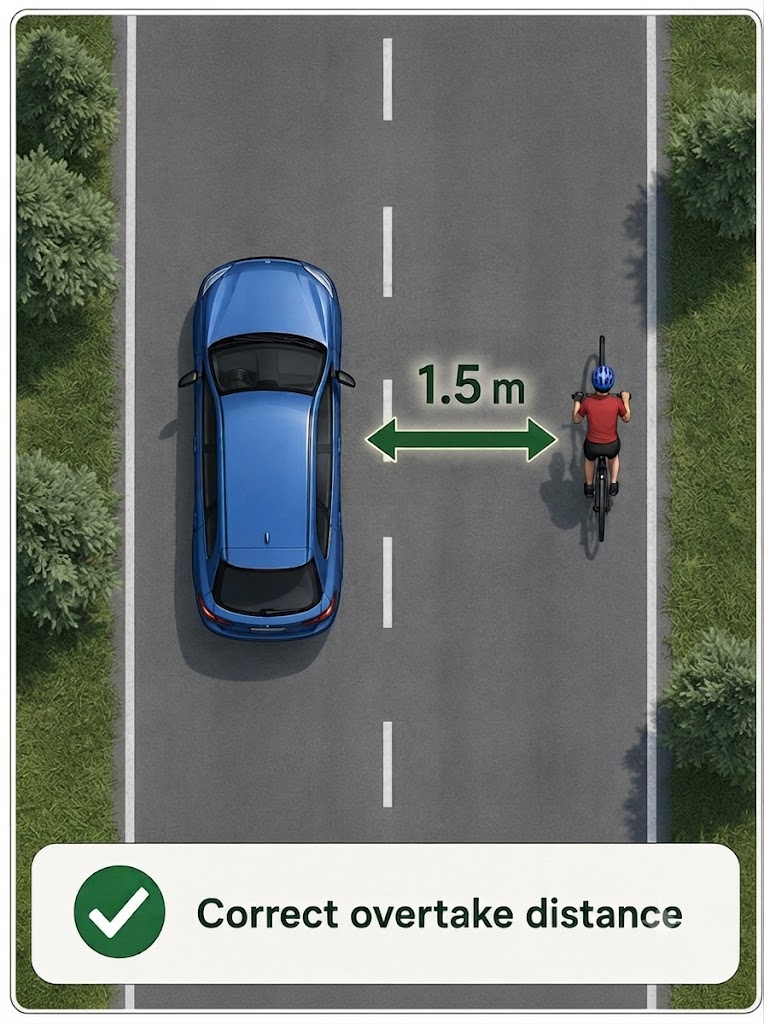
A top-down road diagram in two panels. Left panel: a car overtaking a cyclist with a clear 1.5 m lateral clearance measurement arrow between them - labelled "Correct overtake". Right panel: a car driving past a row of parked cars, a cyclist emerging suddenly from between two parked vehicles - an alert/warning highlight shows the hazard zone. Both panels are connected by a divider.
Keep 1.5 m of clearance when overtaking cyclists - and expect them from between parked cars.

Motorcycles and mopeds. The most common crashes when overtaking are head-on and side impacts, mostly in urban areas; consequences are far more serious without a helmet. Causes may be rider mistakes or violations by other drivers. To avoid crashes, drivers should:

  • Check carefully for two-wheelers before changing lanes.
  • Avoid lingering alongside a motorcycle or moped - either pass and move ahead or stay behind.
  • Maintain a safe following distance.
  • Respect situations where they have the right of way.
  • Take extra caution in rain, snow, fog, or poor visibility.
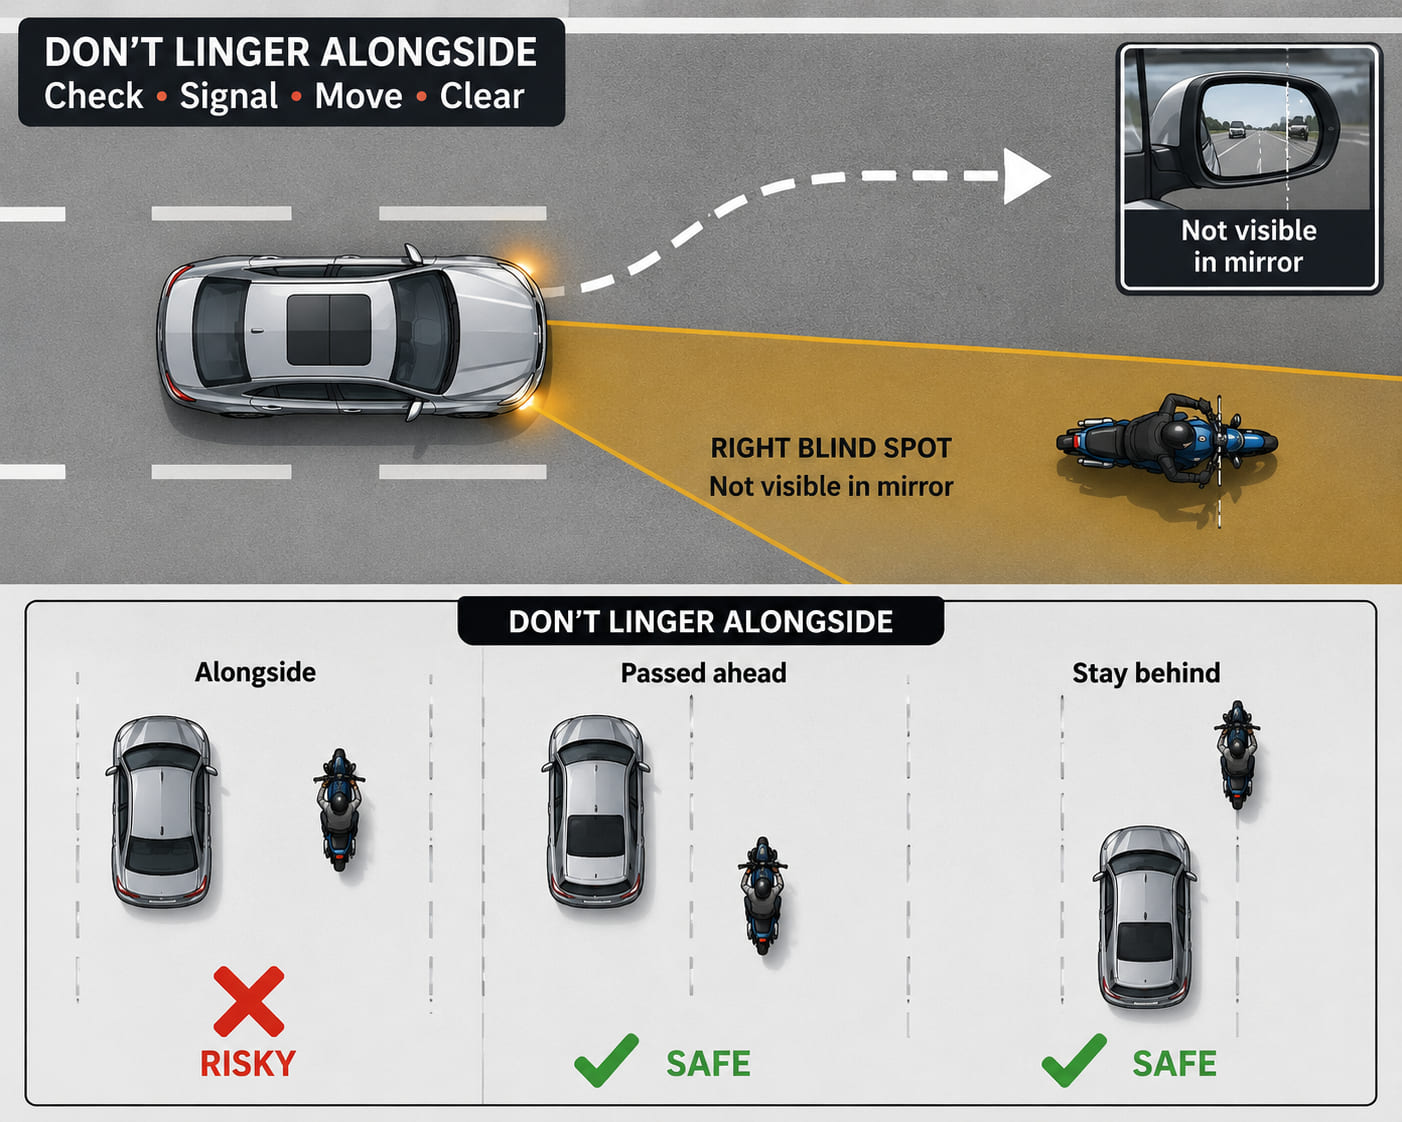
A top-down diagram showing a car in the process of changing lanes to the right. A motorcycle is positioned exactly in the car's right blind spot zone (amber shaded wedge) - invisible in the mirrors. A dashed lane-change arrow shows the car moving toward the motorcycle. A second sub-panel shows the "don't linger alongside" rule: a car matching speed alongside a motorcycle with a red X, vs. the correct alternative of overtaking past (green checkmark) or staying behind (green checkmark).
Always check blind spots before changing lanes - a motorcycle is easy to miss and has nowhere to go.

16.2 Duty to Assist

Anyone involved in or witnessing a traffic accident must stop and provide or seek help for the victims, prevent further danger, restore traffic flow, and cooperate with emergency services. Failure to do so may be a criminal offence under Spanish law.

This crime is committed by anyone who:
  • Fails to help victims when they can do so without putting themselves in danger.
  • Fails to report the accident so that help can be sent.
  • Causes an accident and then flees instead of assisting.
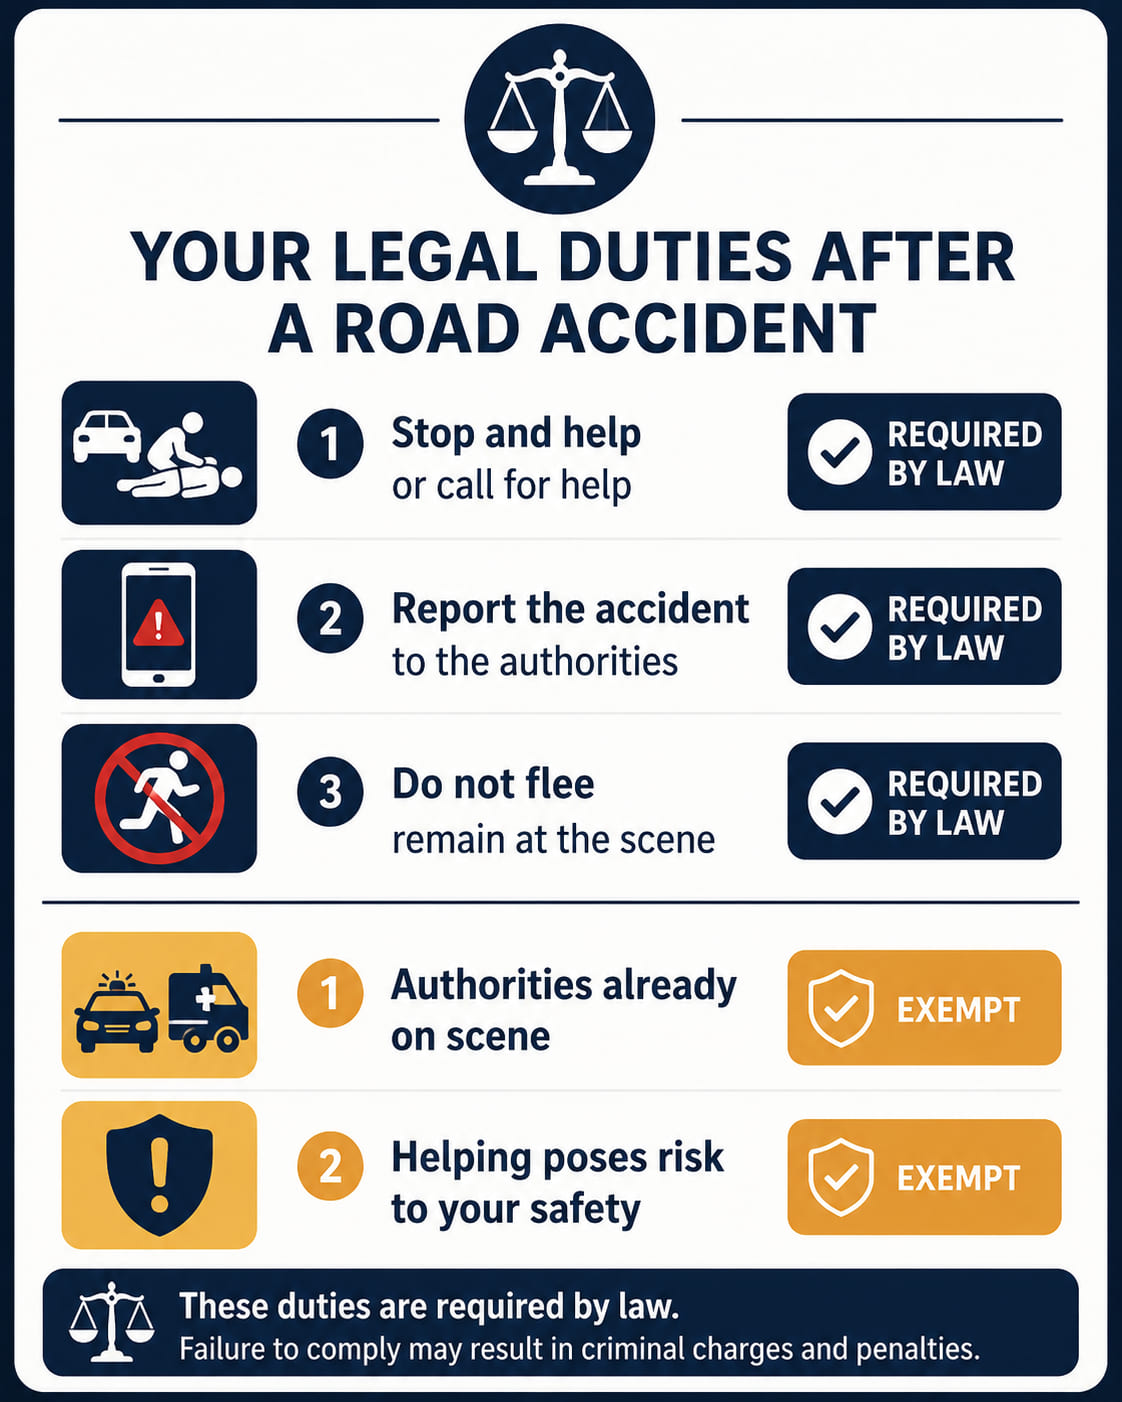
Exemptions: if authorities are already present at the scene, or if your help is clearly unnecessary or poses a risk to your safety.
A legal notice card with a scale-of-justice icon at the top. Three obligation rows with a mandatory badge: (1) Stop and help victims or call for help; (2) Report the accident so aid can reach victims; (3) Do not flee - stay and cooperate with authorities. Below a dividing line, two exemption rows with an amber "Exempt" badge: (1) Authorities already present at scene; (2) Helping poses a risk to your own safety. Clean legal document aesthetic, white background.
Three obligations, two exemptions - know both before you find yourself at an accident scene.

16.3 Action Plan: The PAS Rule

16.3.1 Steps to Follow

All people who witness a traffic accident must:

  • Assist the victims or call for help so someone can assist them.
  • Help prevent further damage or injuries.
  • Help restore safe traffic flow when possible.
  • Explain what happened to the authorities and emergency services.
  • Give their name and contact details to the authorities and others involved. Drivers must also provide their vehicle details.

When you witness an accident but can't help, or traffic officers have already arrived, the best course is to keep driving and avoid obstructing the scene.
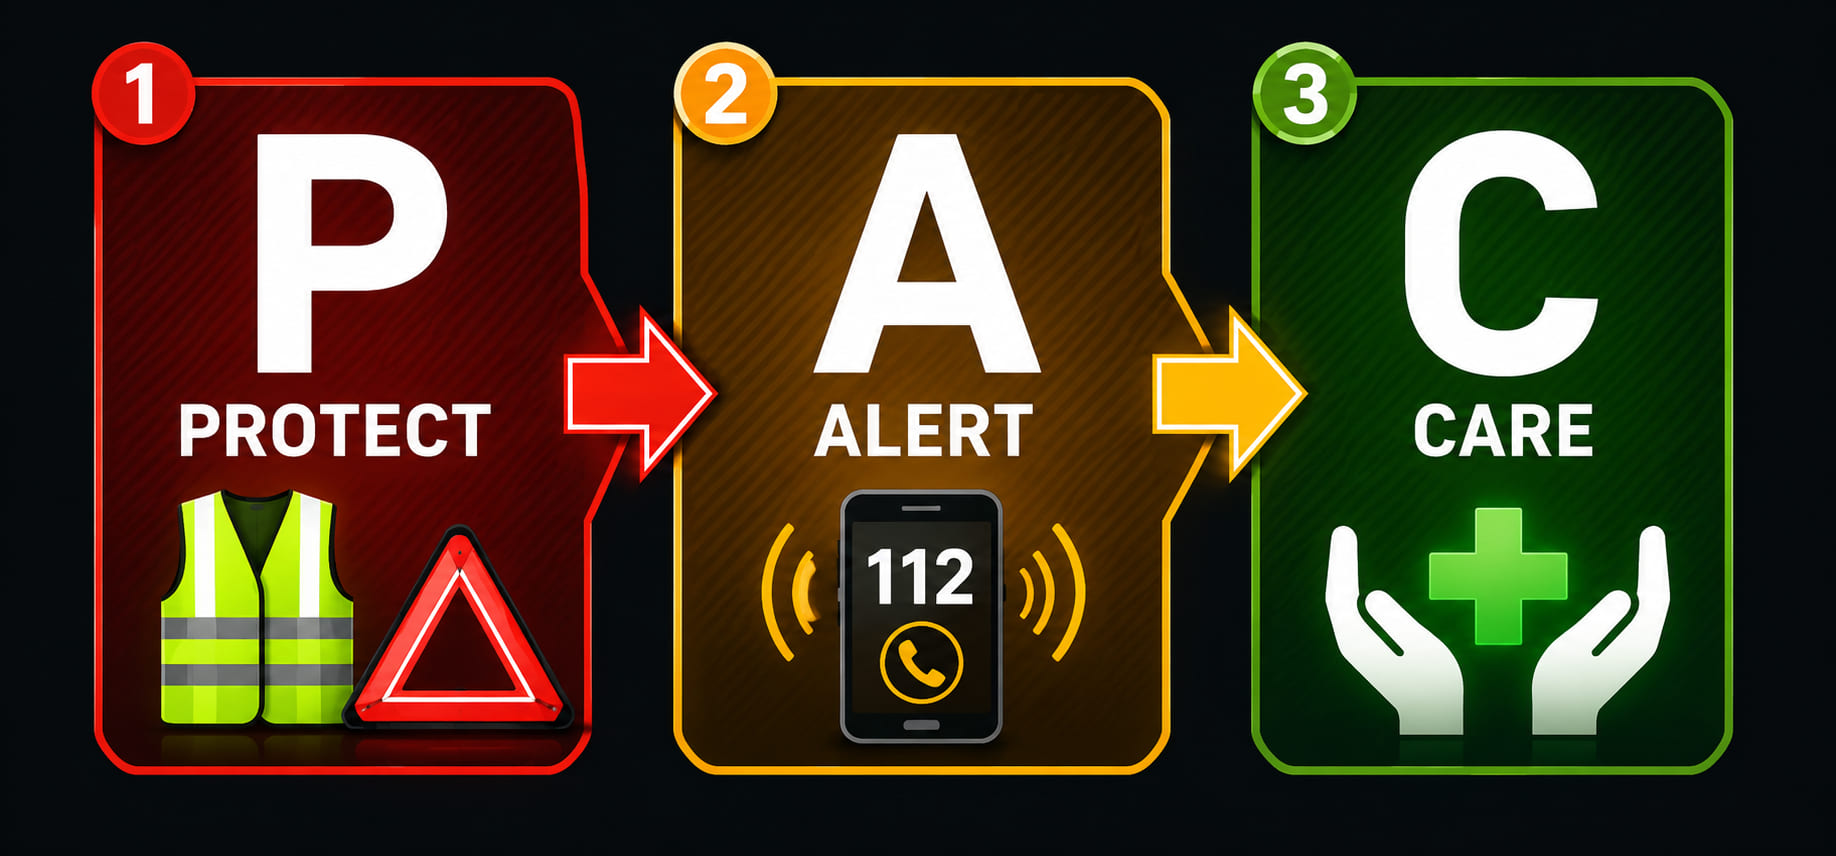
A bold three-step horizontal banner. Step 1 - a large "P" in red: "PROTECT" - icon of a reflective vest and hazard triangle. Step 2 - a large "A" in amber: "ALERT" - icon of a mobile phone with 112 displayed on screen. Step 3 - a large "A" in green: "AID" - icon of hands in a caring/first-aid gesture. Steps are connected by right-pointing arrows. The banner has a dark background for high contrast and strong visual impact.
PAS: Protect - Alert - Aid. Three steps. In that order. Every time.

16.3.2 Protect

  • Stop your vehicle in a safe location away from traffic.
  • Wear your reflective vest before leaving the vehicle.
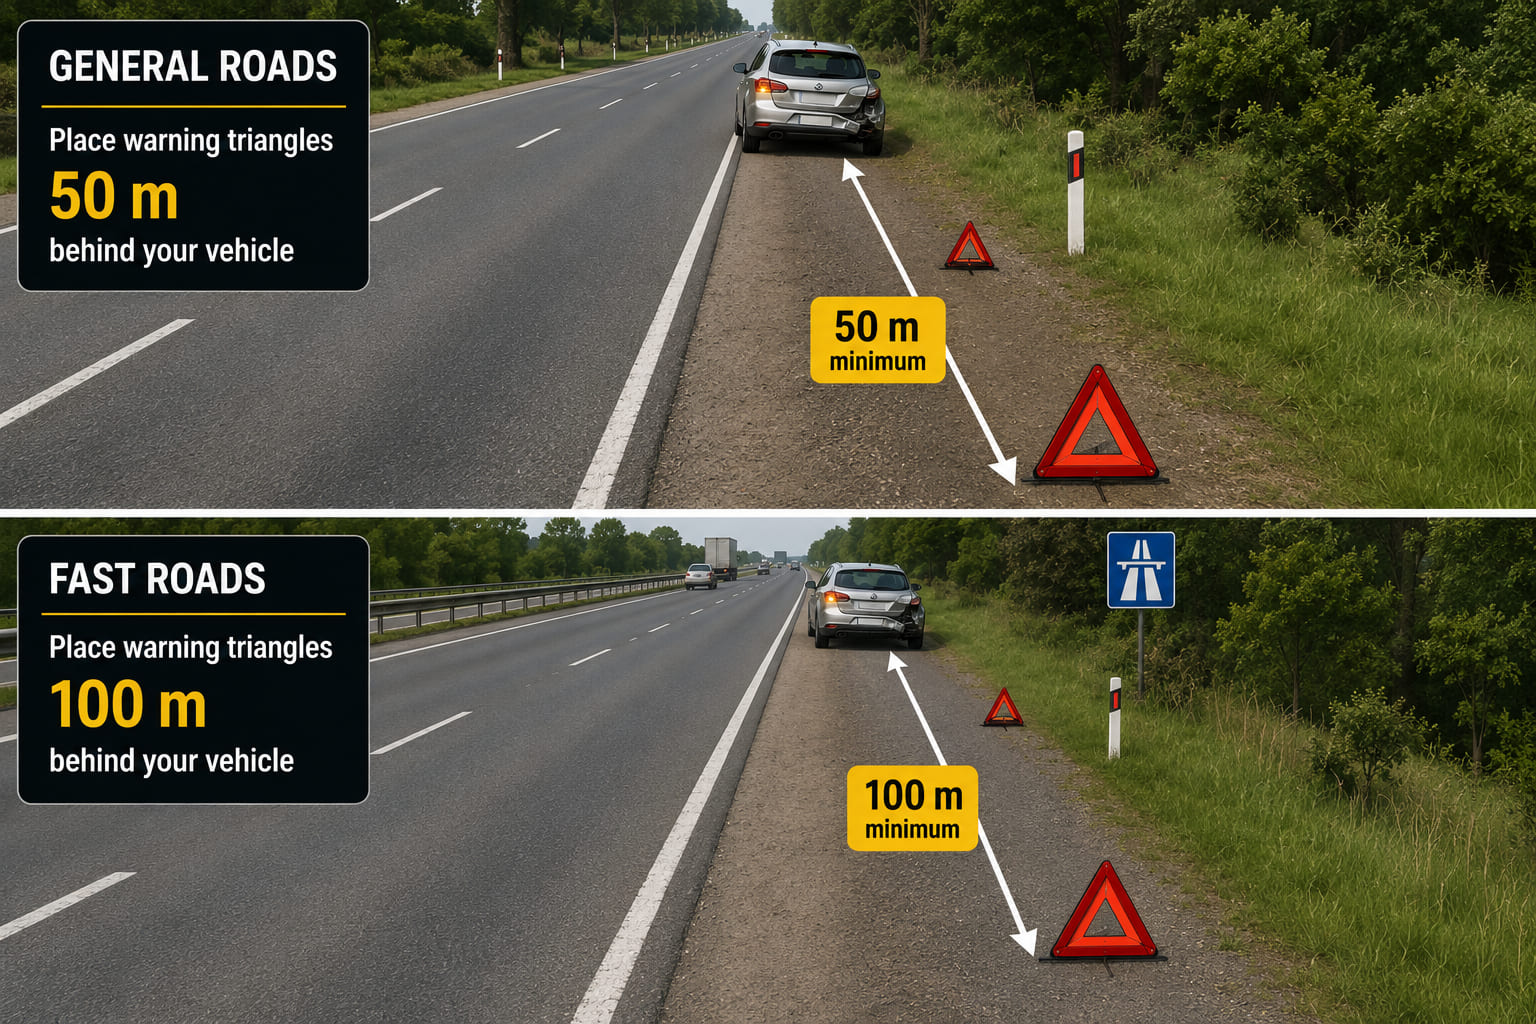
  • Switch on hazard lights and place emergency triangles 50 m behind the vehicle (or more, on fast roads).
  • Turn off engines in damaged vehicles and avoid fire risks - do not smoke or use flames.
  • If a fire starts, use a fire extinguisher, sand, or blankets - never water.
  • Do not move injured people unless absolutely necessary for their survival or safety.
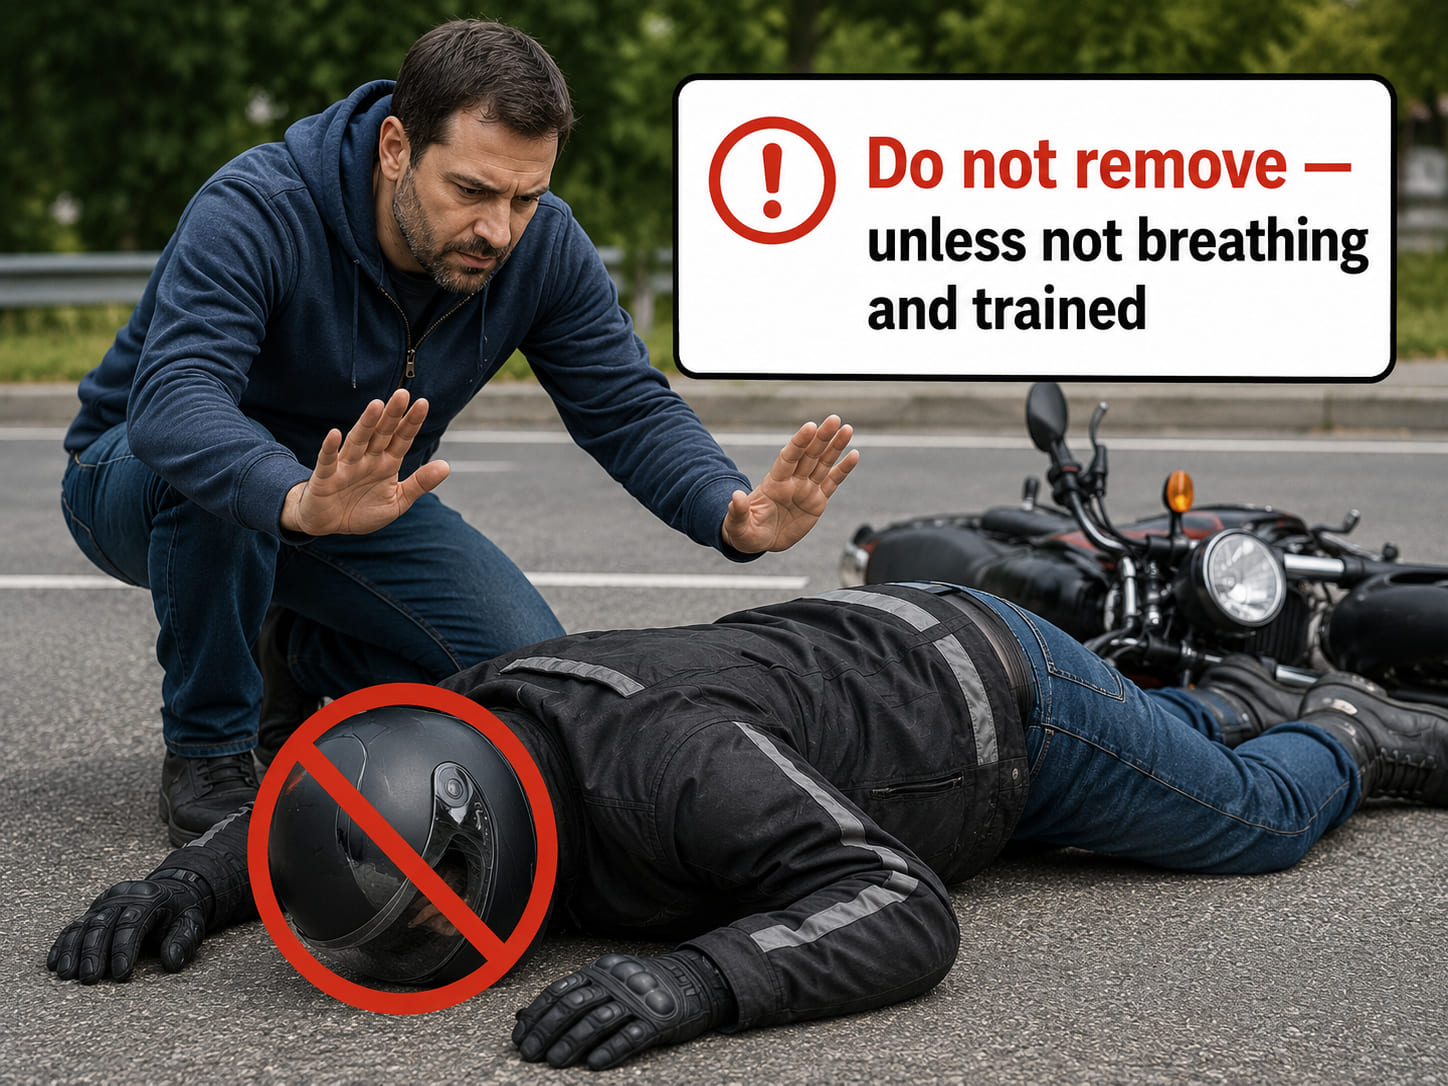
  • Do not remove a motorcyclist's helmet unless they are not breathing and you know how to do it safely.
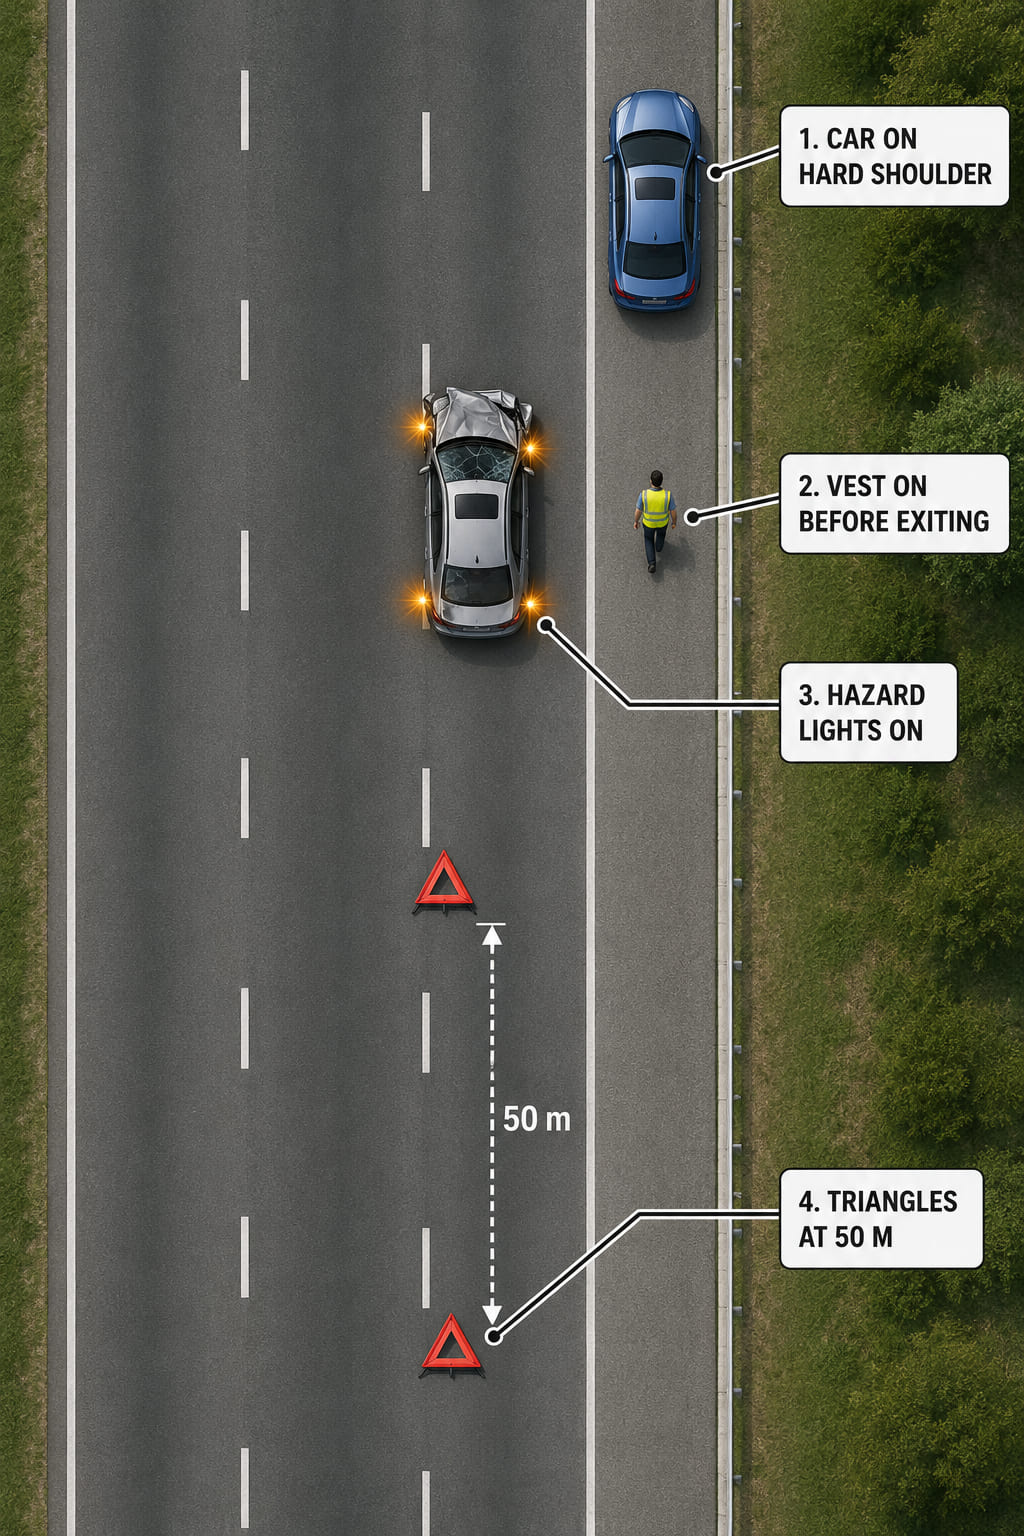
A top-down road diagram showing the Protect sequence at an accident scene. A crashed car is in the lane. 50 m behind it: emergency warning triangles placed on the road. The assisting car is parked safely on the hard shoulder. A driver in a yellow reflective vest is walking toward the scene. The crashed car has hazard lights flashing. Labels point to each element: "car on hard shoulder", "vest before exiting", "hazard lights on", "triangles at 50 m".
Protect: park safely, vest first, hazard lights on, triangles 50 m back - in that order.
A top-down road diagram with a clear distance ruler running along the centre lane. A crashed vehicle sits at the top. Two red warning triangles are placed exactly 50 m behind it, shown with a bold double-headed measurement arrow labelled "50 m minimum". On a motorway variant shown below, the distance extends to 100 m with a label. The road markings, lane lines, and perspective are clear.
Emergency triangles must be placed at least 50 m behind the vehicle - more on fast roads.
A single-panel illustration. A motorcyclist is lying on the road, still wearing their helmet. A bystander is crouching beside them - their hands are raised in a "stop" gesture, not touching the helmet. A bold red stop symbol is overlaid on the helmet. A callout reads: "Do not remove unless not breathing and you know how to do it safely." Clean, clear, emphatic safety illustration.
Never remove a motorcyclist's helmet - unless they are not breathing and you are trained to do it safely.

16.3.3 Alert

Call emergency services at 112. Provide:

  • Exact location: road type, direction, nearby signs or kilometre markers.
  • Description of the accident: number of vehicles, victims, visible injuries, trapped individuals.
  • Your contact information: name and phone number.

Stay on the line until the operator confirms all details.
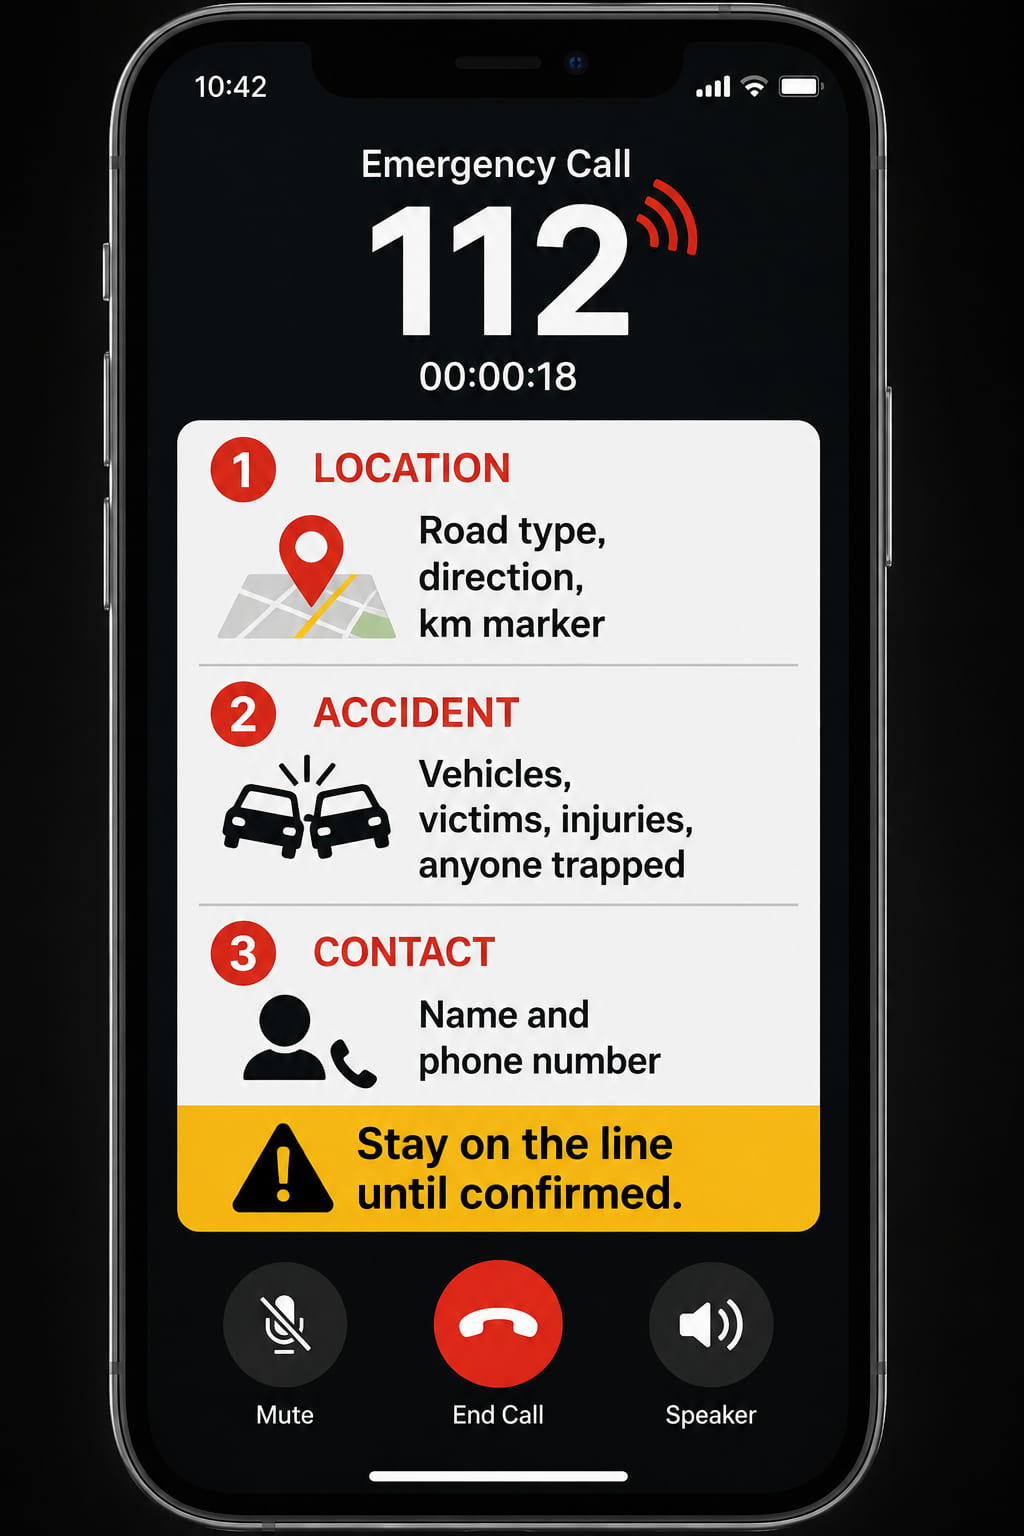
A phone screen mockup showing an active 112 call. On the screen, a speech bubble prompt card lists what to say: (1) Location - road type, direction, km marker (map pin icon); (2) Accident description - number of vehicles, number of victims, type of injuries, anyone trapped (crash icon); (3) Your contact details - name and phone number (person icon). A "Stay on the line" reminder sits at the bottom. Realistic phone UI style.
When you call 112: location first, then accident details, then your contact information.

16.3.4 Aid

Provide help to injured persons while waiting for professionals:

  • Do not move victims unless there is an immediate threat (fire, explosion, etc.).
  • If unconscious but breathing, place them in the recovery position.
  • Reassure and keep them warm - cover with a coat or blanket if possible.
  • Do not offer food or drink - especially not alcohol.
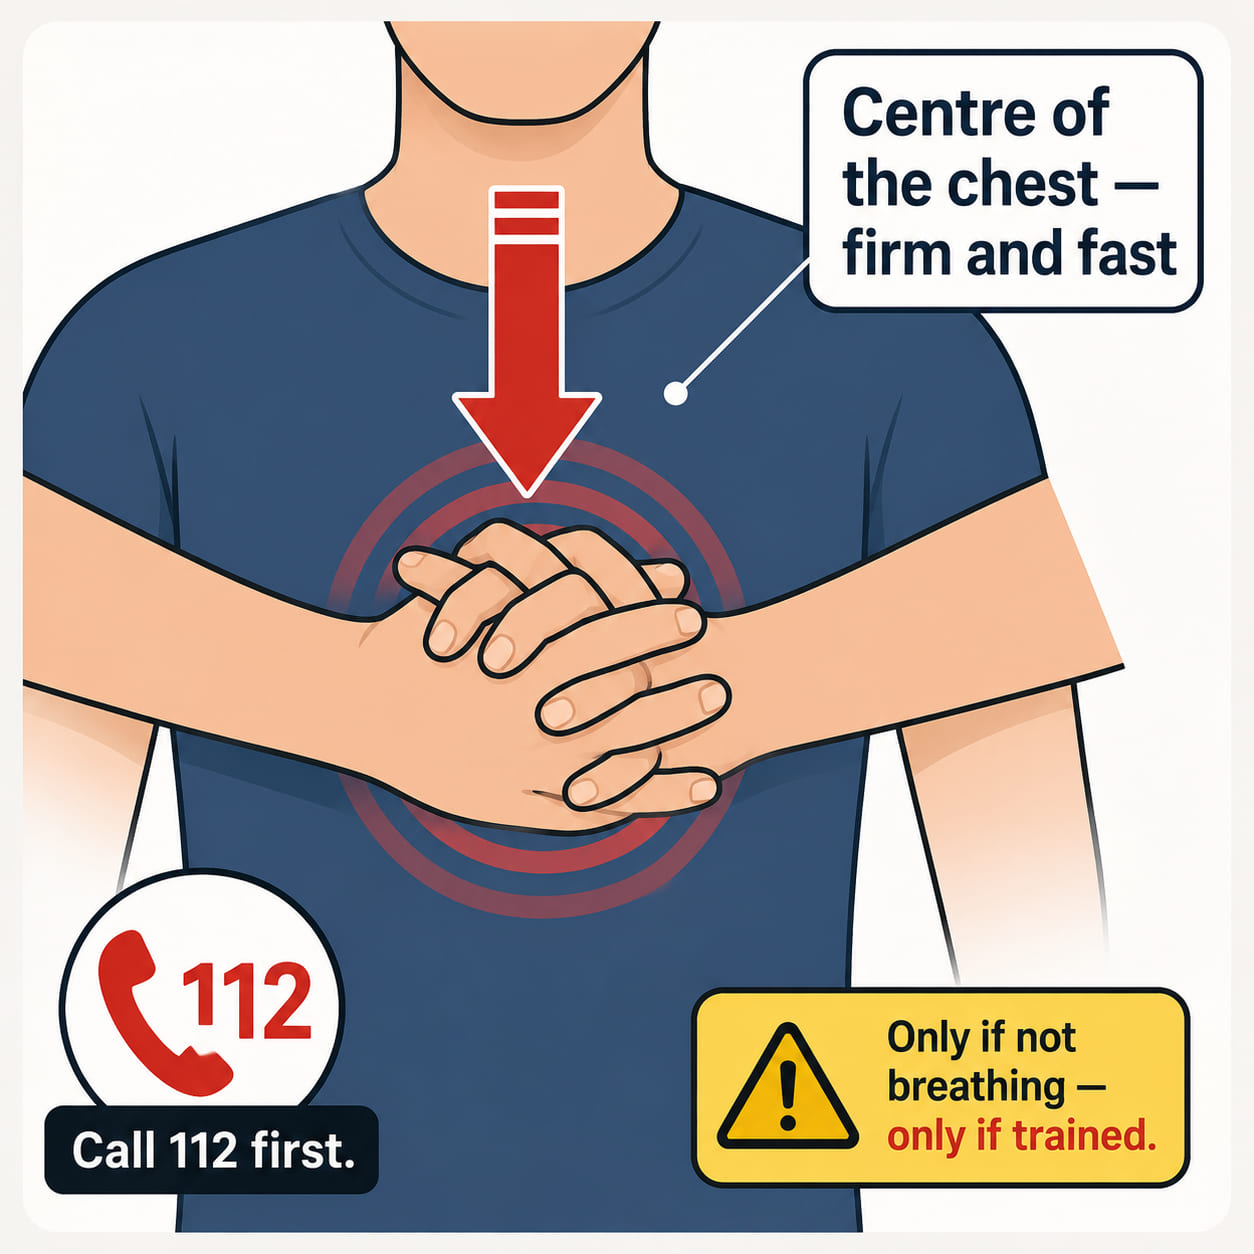
  • If the person is not breathing, start CPR if trained to do so.
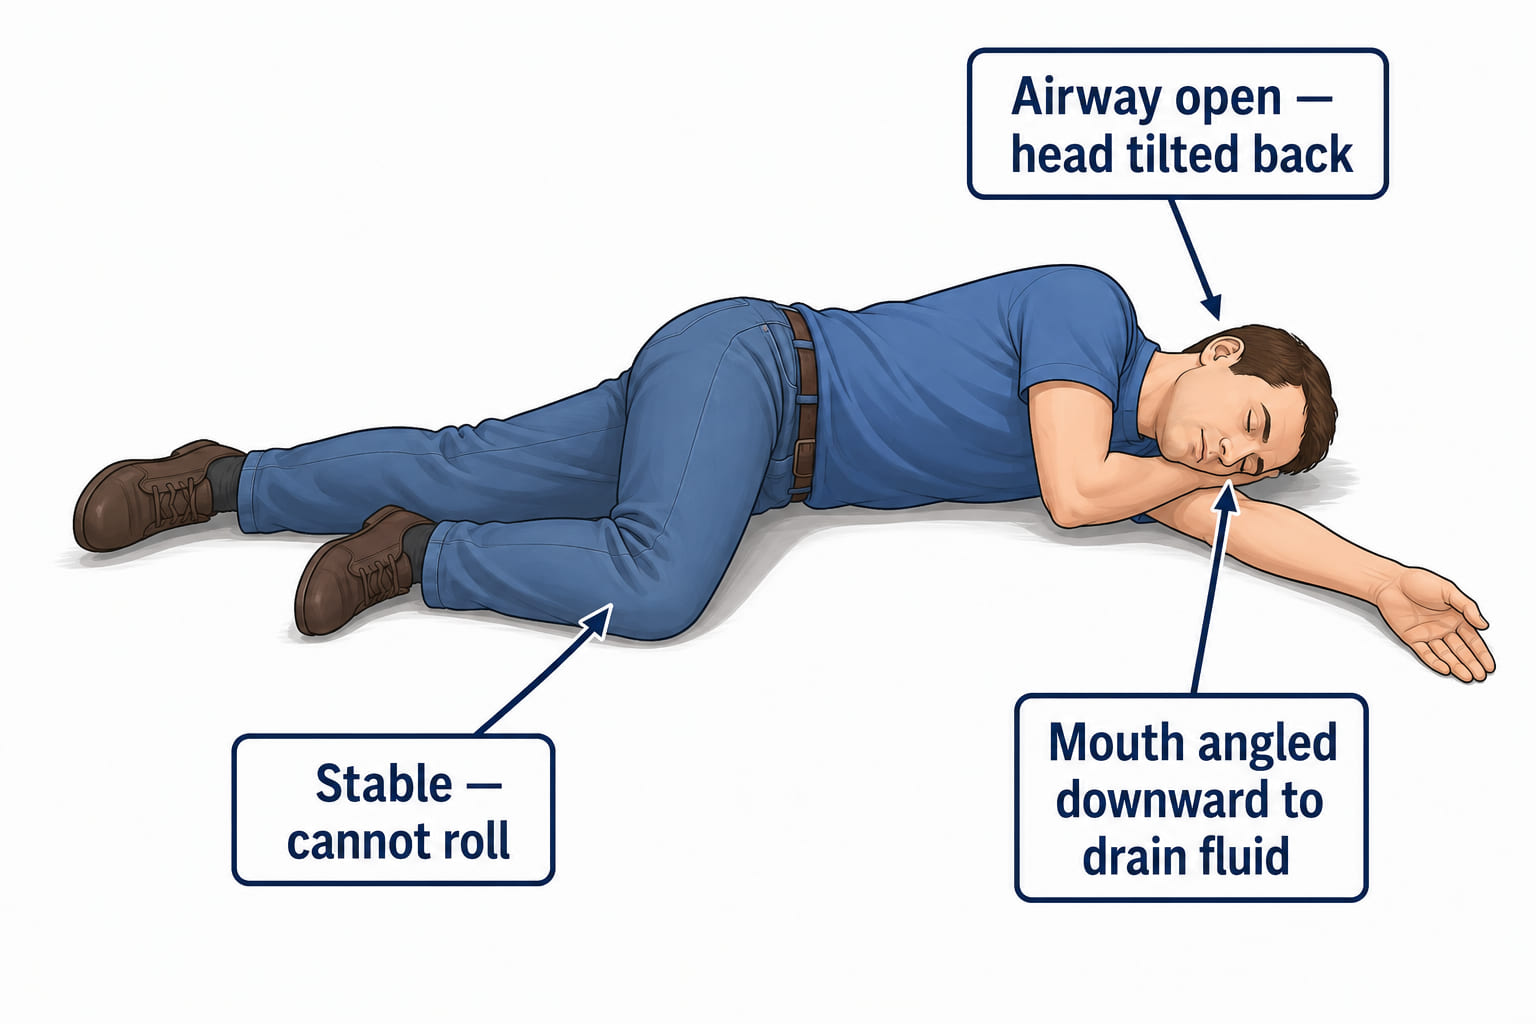
A clear side-view medical diagram of an unconscious person placed in the recovery position. They are lying on their side, lower arm extended forward at a right angle to the body, upper knee bent forward to prevent rolling, head tilted slightly back to keep the airway open. Callout labels point to: "airway open", "stable position - cannot roll forward or back", "mouth facing downward to drain fluid". Clean first-aid illustration style.
Recovery position: unconscious but breathing - on their side, airway open, stable.
A simple icon-forward illustration of CPR. Two hands are shown positioned on the centre of a person's chest (sternum), one on top of the other, fingers interlaced. A downward compression arrow is shown. A label reads "Only if not breathing - and only if trained." A 112 phone icon in the corner reminds to call before starting. Clean medical infographic style.
CPR: hands on the centre of the chest - only begin if the person is not breathing and you are trained.

16.4 Managing Common Injuries

Shock (Circulatory Collapse)

Signs: pale, cold, clammy skin; rapid, shallow breathing; confusion or fainting.

Action: if conscious, lay flat with legs elevated (anti-shock position); if unconscious or vomiting, use the recovery position.
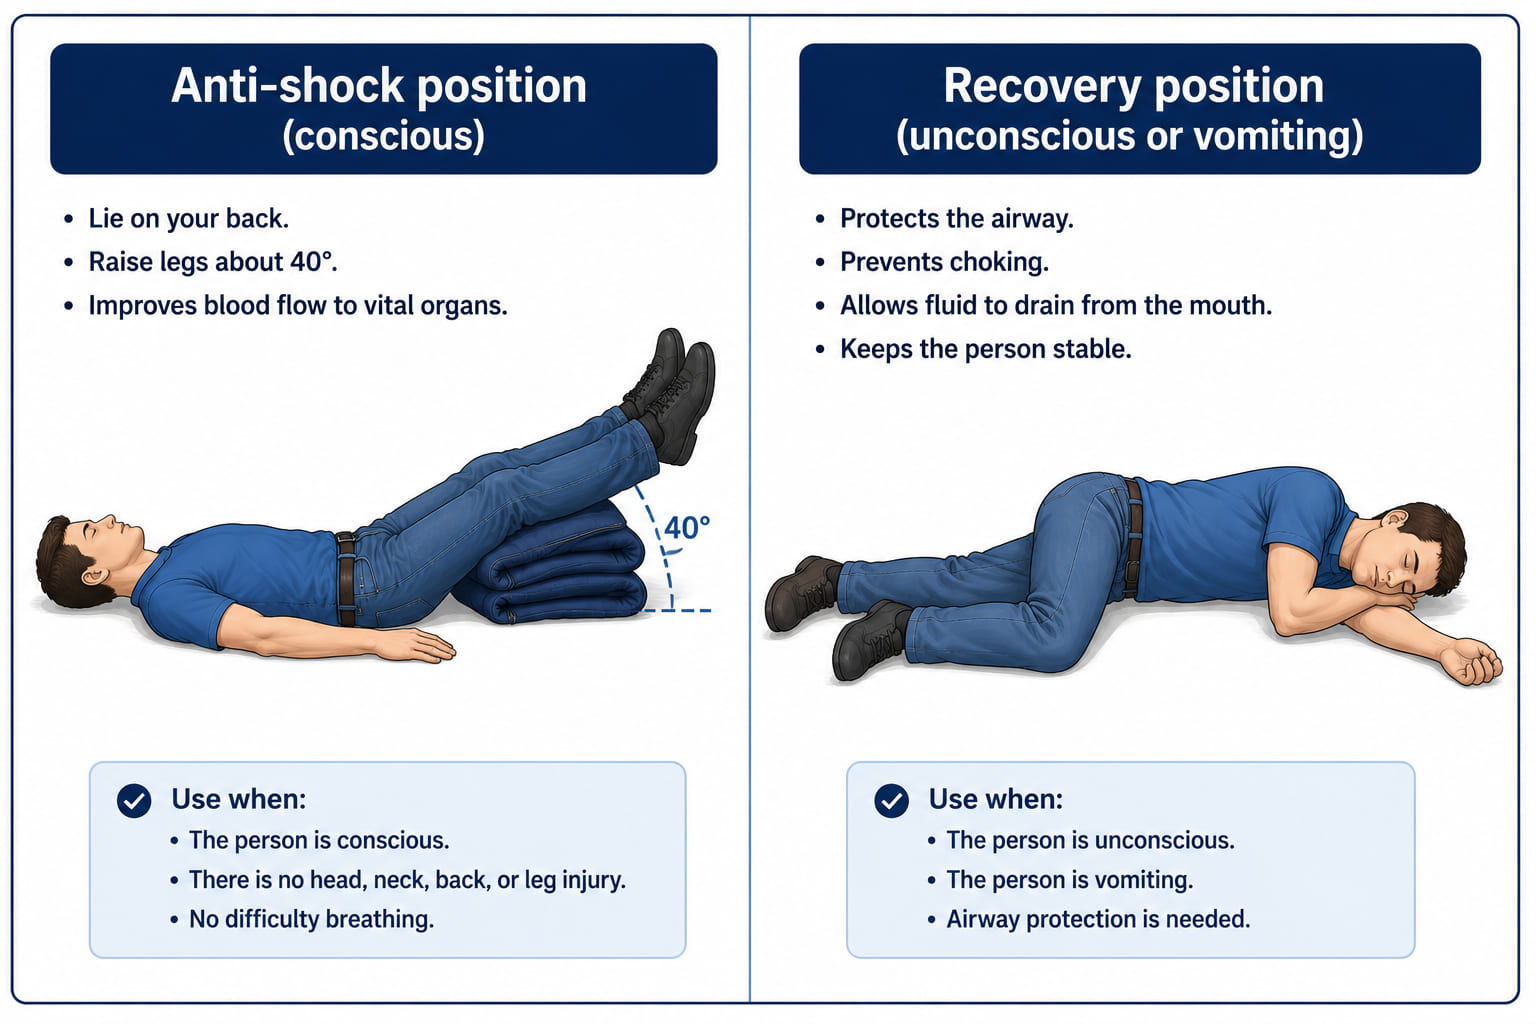
A two-panel medical diagram. Left panel: a conscious victim lying flat on their back, legs raised on a rolled jacket or surface at approximately 30-45 degrees - label "Anti-shock position (conscious)". Right panel: the same person unconscious/vomiting, placed on their side in the recovery position - label "Recovery position (unconscious or vomiting)". Both panels use a clear side-view perspective with callout labels.
Shock: legs elevated if conscious - recovery position if unconscious or vomiting.

External Bleeding

Do not plug or cut wounds. Apply pressure with a sterile cloth or dressing. Do not remove embedded objects - pad around them. Ear bleeding: lay on the side of bleeding, gauze on ear. Nosebleed: seated, head tilted forward (if conscious); recovery position if unconscious. Mouth bleeding: semi-seated if conscious; recovery position if vomiting.
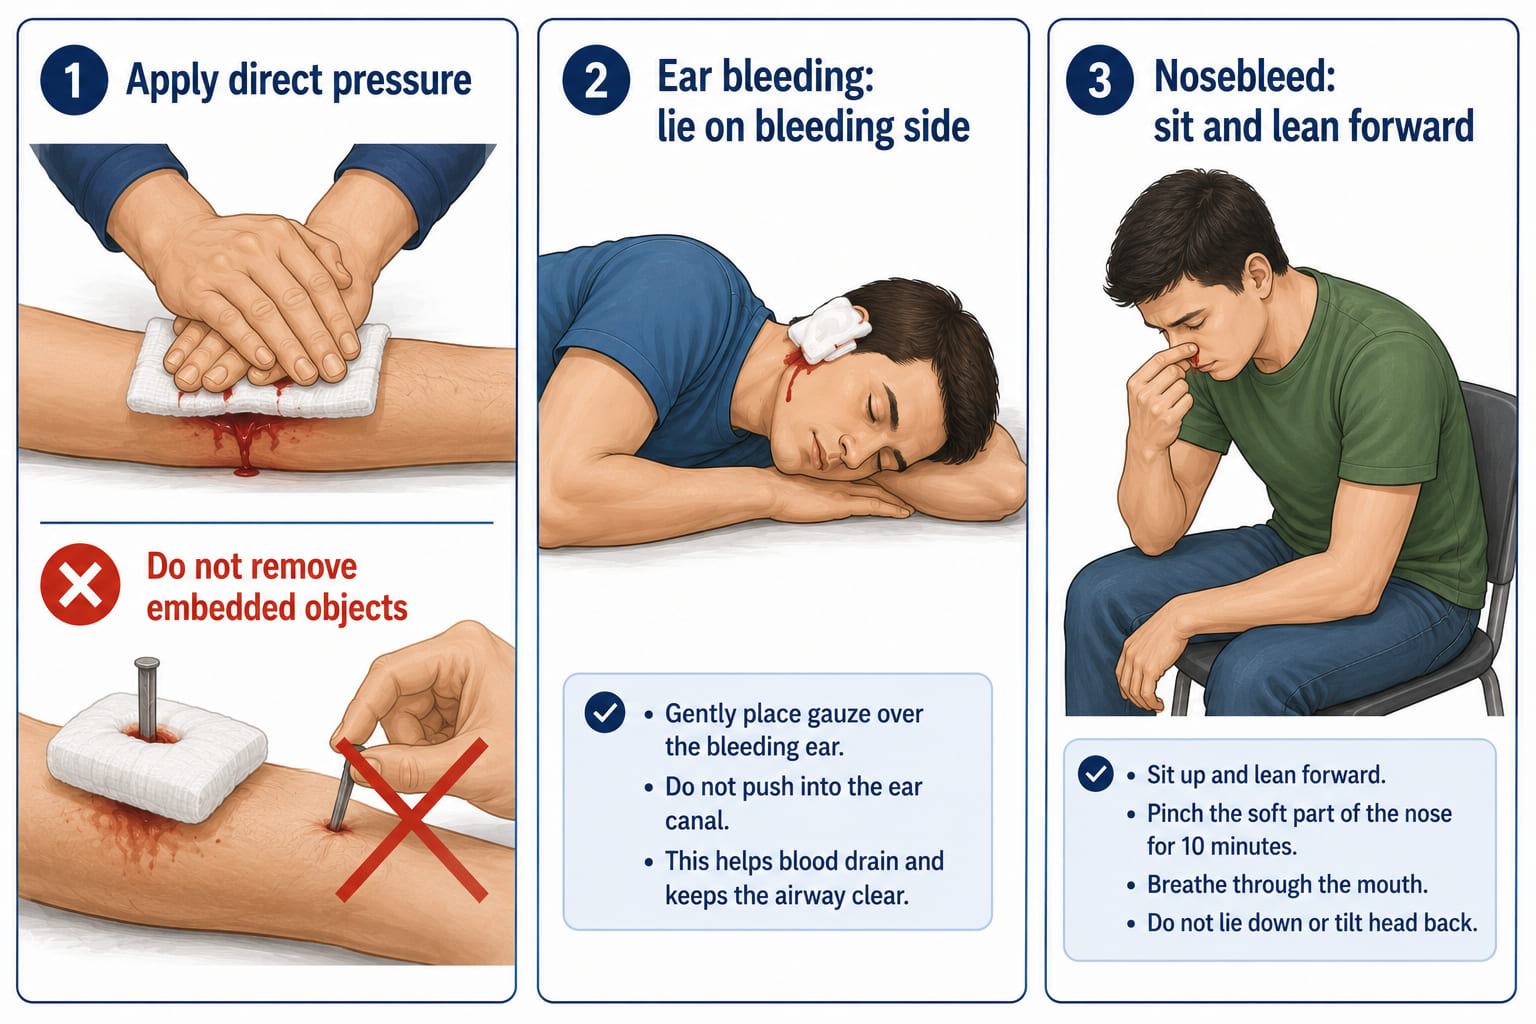
A three-panel bleeding first-aid illustration. Panel 1: two hands pressing firmly down on a wound with a sterile gauze cloth - "Apply direct pressure". An embedded object is shown in a sub-note: a thick pad placed around (not on) the object, red X on removing it. Panel 2: a figure lying with head tilted sideways, gauze on the ear - "Ear bleeding: lie on the bleeding side". Panel 3: a conscious seated figure, head tilted slightly forward (not back) - "Nosebleed: sit, lean forward". Clean first-aid style.
Bleeding: press firmly, pad around embedded objects, position correctly for ear and nose bleeds.

Fractures

Signs: swelling, deformity, or shortening of a limb; pain and immobility.

Action: do not try to straighten or reset the bone; immobilise with splints or slings.
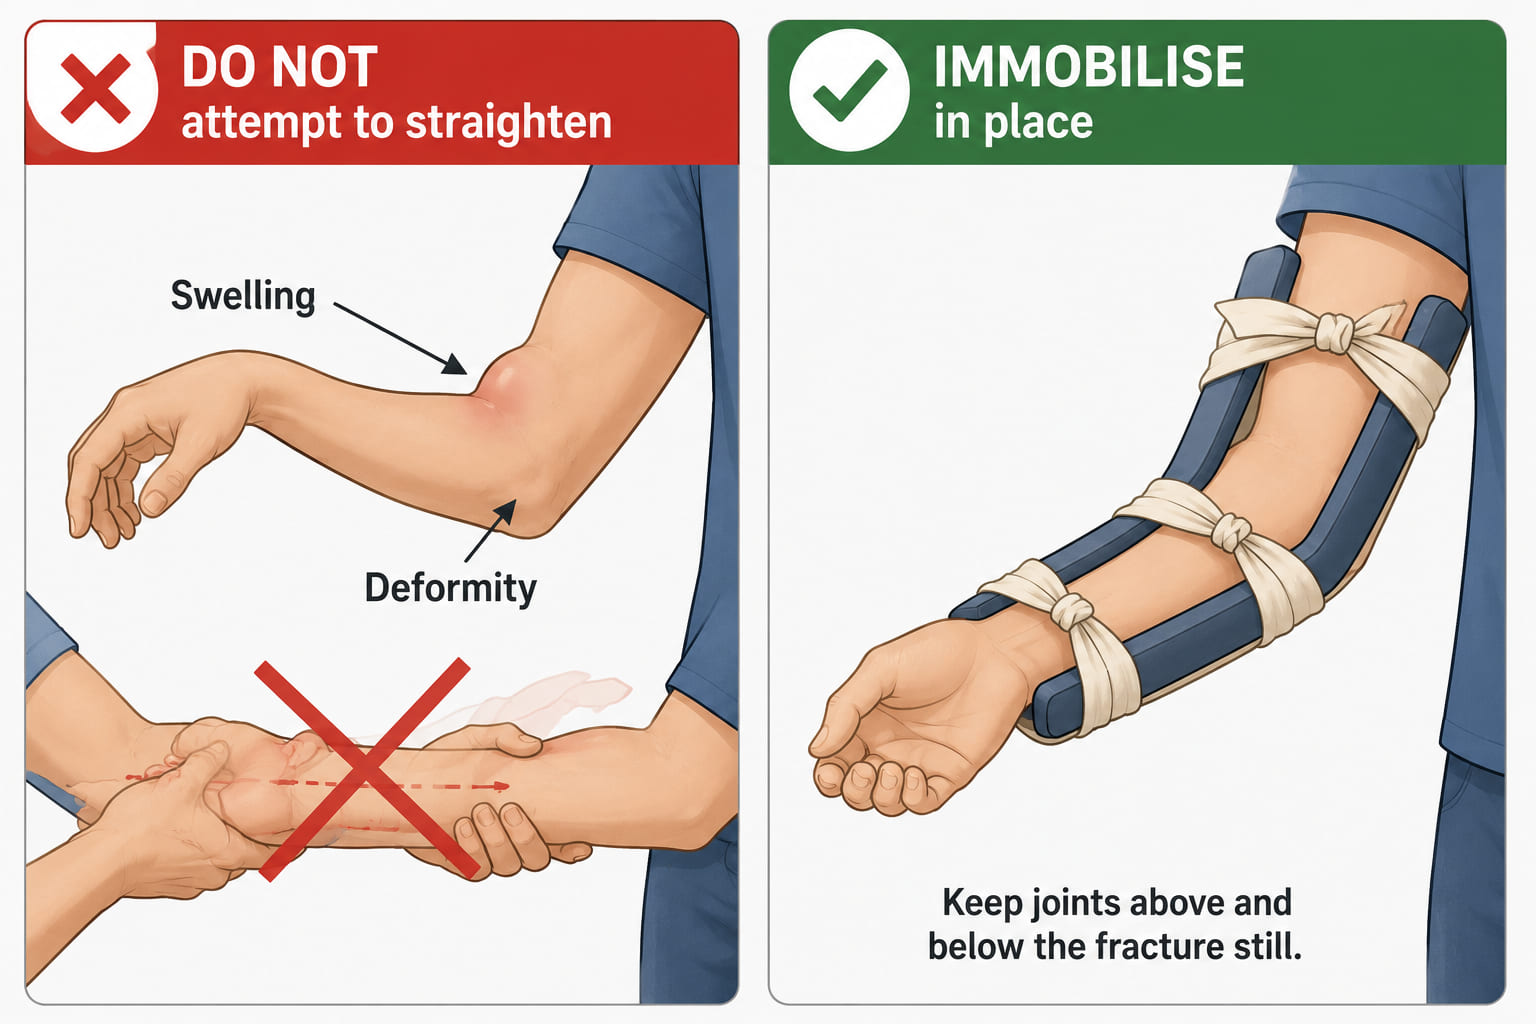
A two-panel fracture first-aid diagram. Left panel: a forearm with visible swelling and an unnatural angle - two callout labels: "Swelling" and "Deformity/shortening". A red X is overlaid on a hand attempting to straighten the limb. Right panel: the same arm correctly immobilised with two splints bound with triangular bandage slings, the arm held in a natural position - label "Immobilise - do not straighten". Clean medical illustration style.
Fractures: recognise the signs, immobilise the limb - never try to straighten or reset the bone.

Burns

Do: cool with clean, cold water (not ice) for at least 10 minutes; cover with moist, sterile cloths; elevate the burned area if possible.

Do NOT: touch or remove clothing stuck to the burn, break blisters, apply creams or oils, or wrap two burned surfaces together. If conscious and not vomiting, a small amount of bicarbonated water may be given to drink.
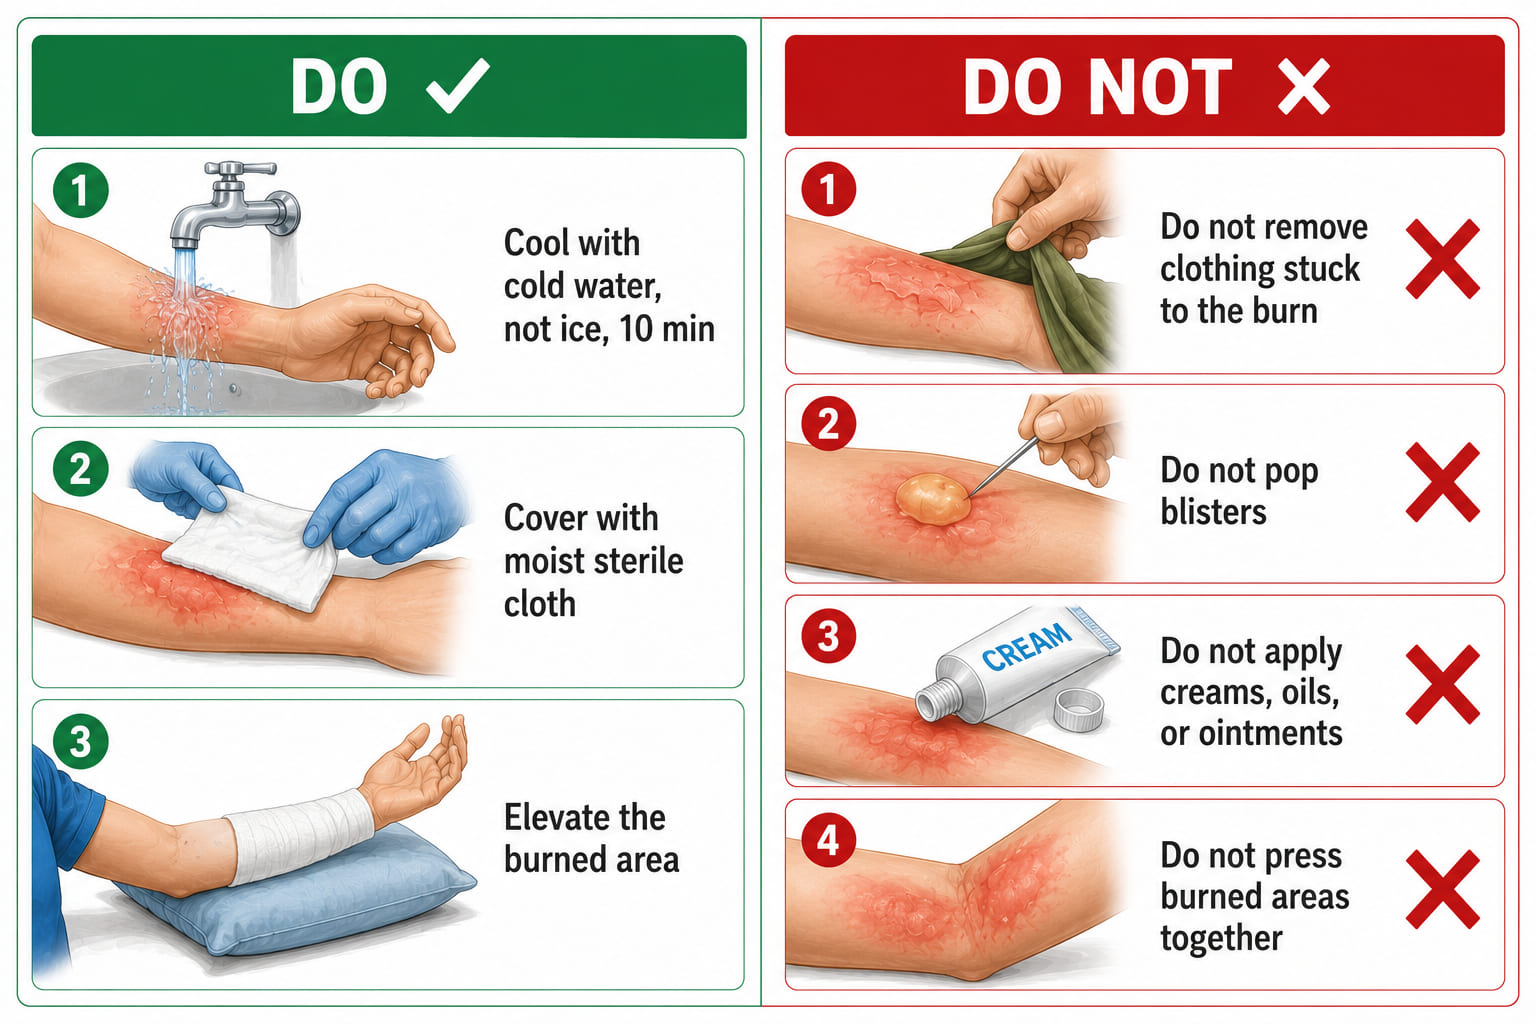
A two-column do/do-not burns first-aid card. Left column (green "DO" header): three rows with green checkmarks - (1) water tap pouring cold (not ice) water on a burn for 10 minutes; (2) a moist sterile cloth covering the burn; (3) an elevated arm icon. Right column (red "DO NOT" header): four rows with red X marks - (1) clothing being pulled off a burn (red X); (2) a blister with a needle approaching it (red X); (3) a cream/oil tube near skin (red X); (4) two burned surfaces touching/wrapped together (red X). Clean split-card format.
Burns: cool with cold water for 10 minutes, cover, elevate - never remove stuck clothing or break blisters.

16.5 First Aid Kit

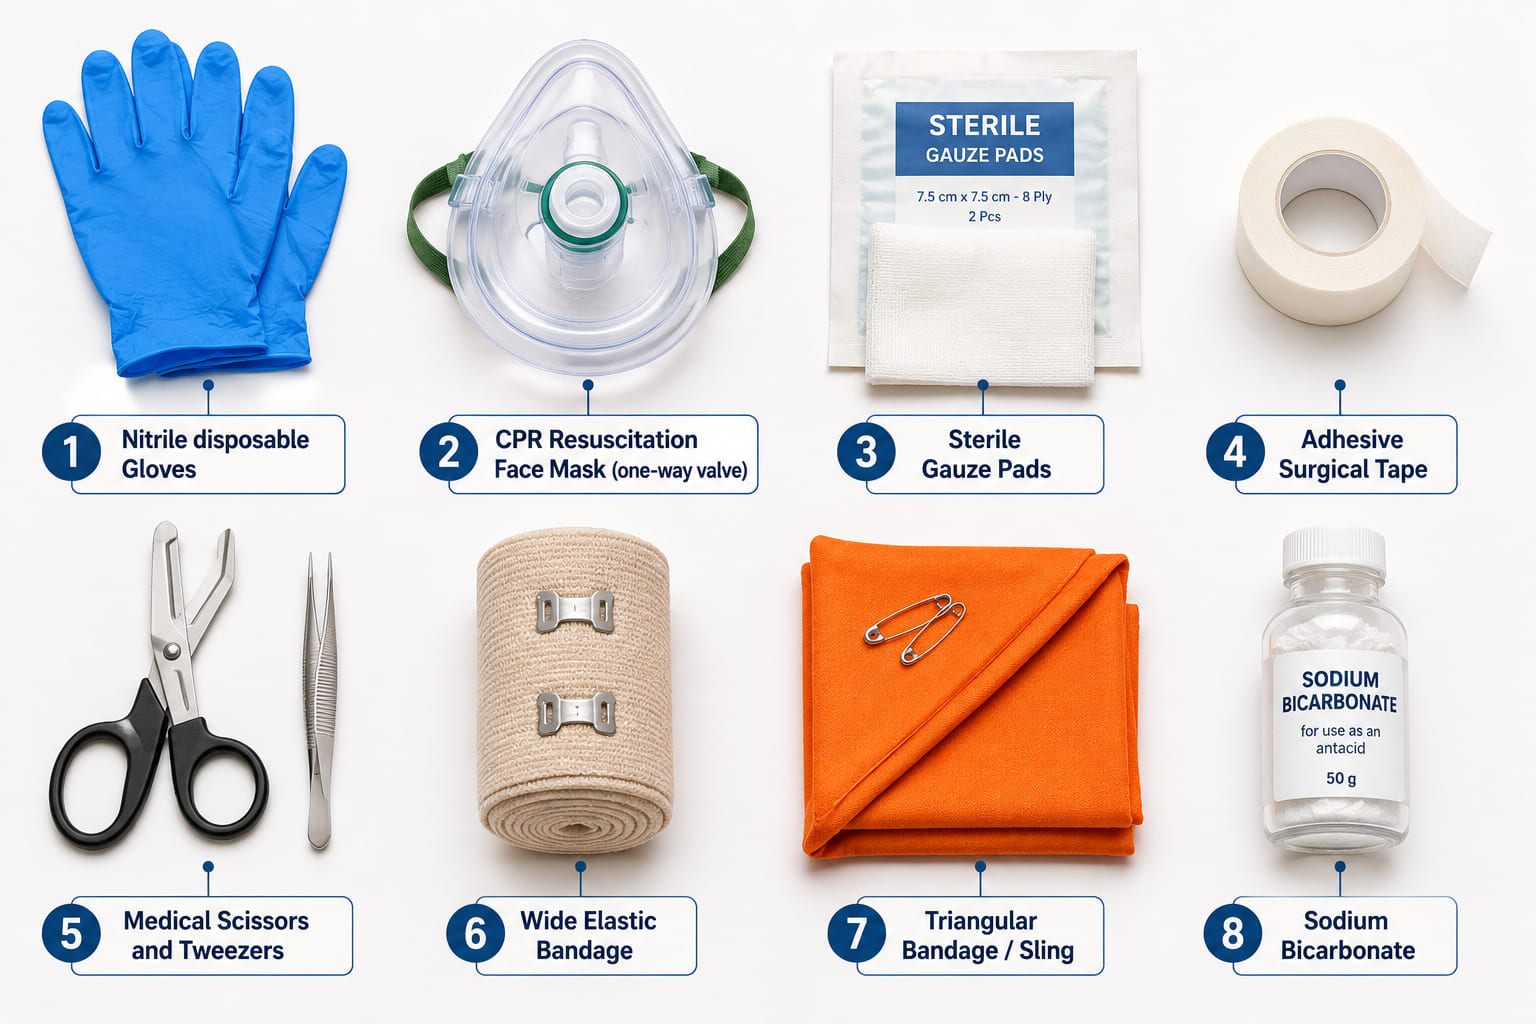
While not mandatory in Spain, it is highly recommended to carry a basic first-aid kit in your car:

  • Disposable gloves
  • Resuscitation mask or mouth barrier
  • Sterile gauze and bandages
  • Adhesive tape (e.g., surgical tape)
  • Scissors and tweezers
  • Elastic band (5-10 cm wide and ~150 cm long)
  • Triangular bandage or large scarf
  • Bottle of sodium bicarbonate
A top-down flat-lay illustration of a first-aid kit with all 8 items laid out on a clean white surface, each labelled with a callout. Items: (1) blue disposable gloves; (2) a CPR/resuscitation face mask; (3) folded sterile gauze pads; (4) a roll of adhesive surgical tape; (5) scissors and tweezers; (6) a wide elastic band (rolled); (7) a folded triangular bandage; (8) a small bottle of sodium bicarbonate. Items are evenly spaced in a grid arrangement.
Eight recommended kit items - know what you carry and where to find it when seconds matter.

16.6 Legal and Ethical Considerations

Drivers must respect the dignity of accident victims, avoid causing additional harm, and collaborate with authorities. It is also forbidden to obstruct emergency services or alter the accident scene (except when it poses danger).
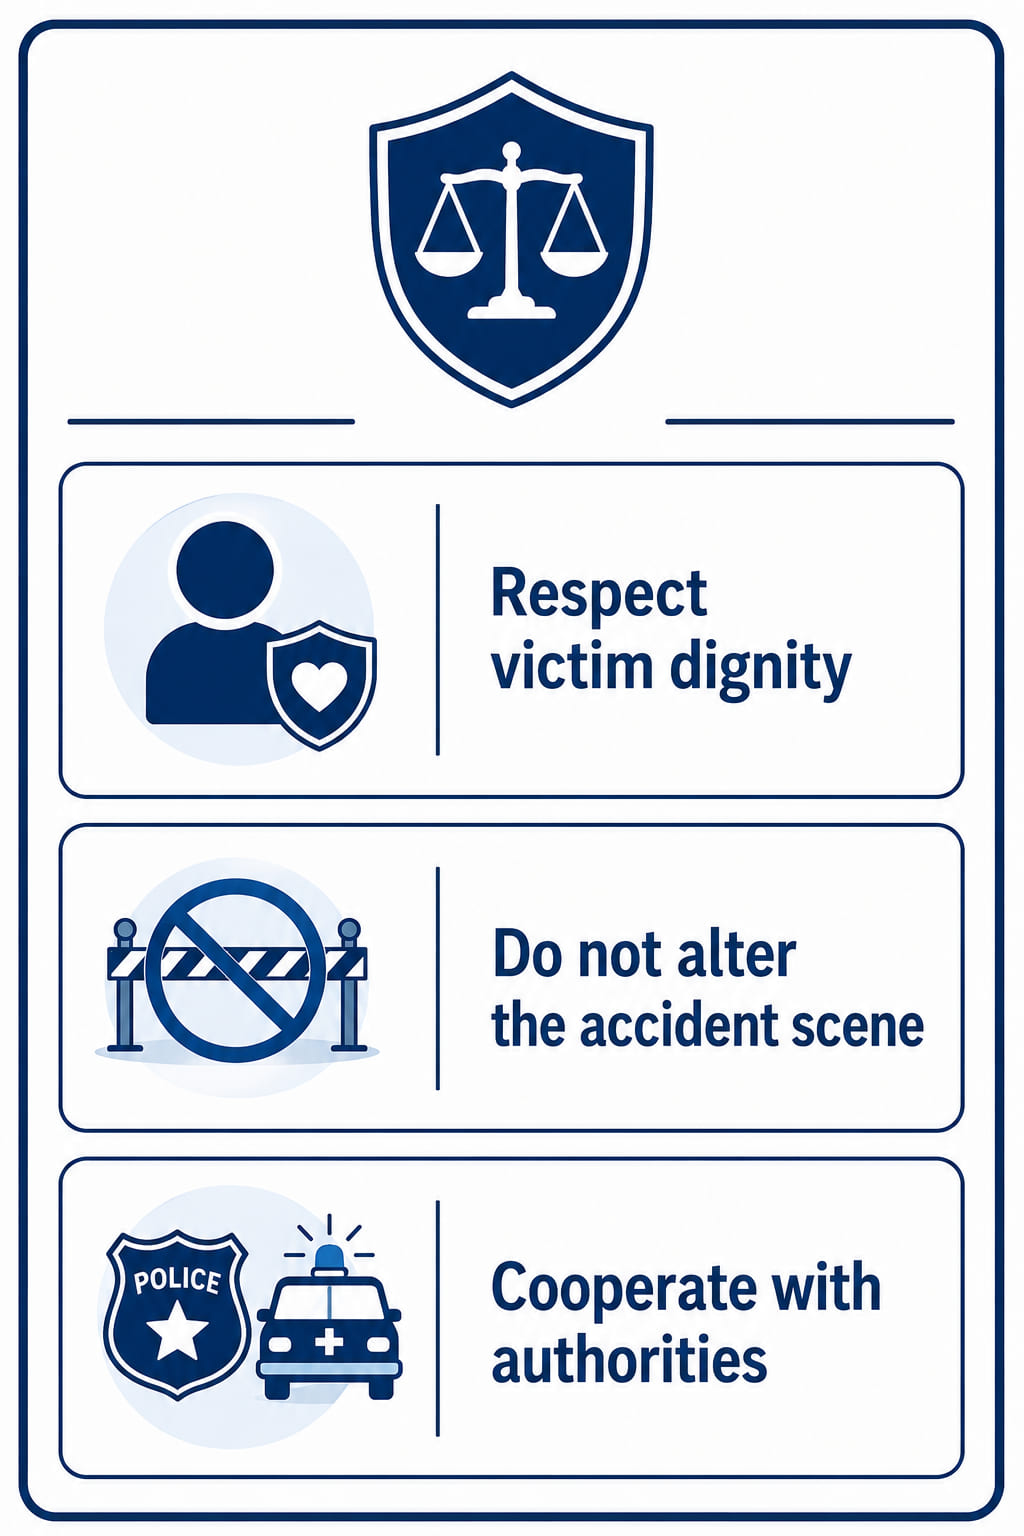
A legal reminder badge card with a scale-of-justice icon at the top. Three rows each with a small icon: (1) a person silhouette with a dignity/respect icon - "Respect victim dignity"; (2) a crime scene tape with a prohibition mark - "Do not alter the accident scene"; (3) a police/ambulance siren icon - "Cooperate with authorities at all times". Clean legal notice card aesthetic with a blue and white colour scheme.
Three legal and ethical rules every driver must follow when involved in or witnessing an accident.

16.7 Preventing Accidents

Prevention is the most effective form of safety. Drivers should:

  • Maintain full attention and avoid distractions (e.g., mobile phones).
  • Adapt speed to road and weather conditions.
  • Use seat belts and child restraints properly.
  • Not drive under the influence of alcohol, drugs, or extreme fatigue.
  • Ensure vehicle maintenance (brakes, tyres, lights) is up to date.
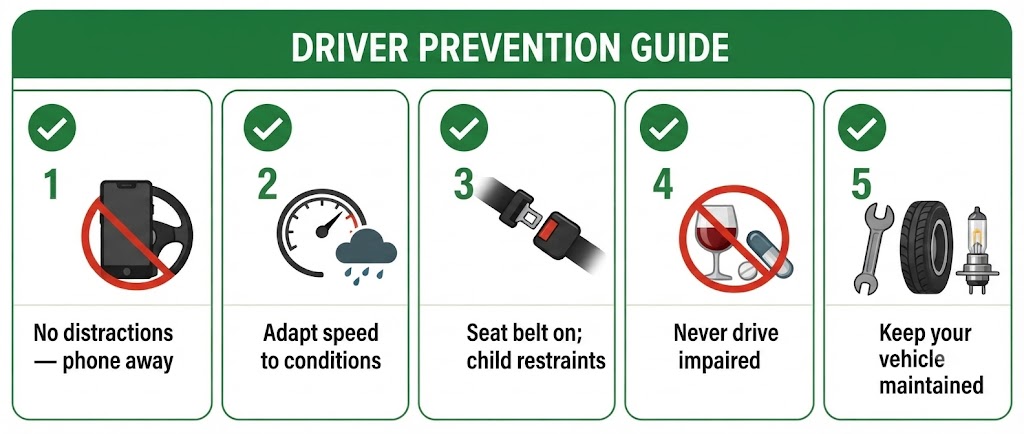
A five-row vertical icon checklist card. Row 1: a phone with a crossed-out steering wheel - "No distractions: put the phone down". Row 2: a speedometer with a rain cloud - "Adapt speed to conditions". Row 3: a seat belt buckle icon - "Wear seat belt; use child restraints". Row 4: an alcohol glass and pill crossed out - "Never drive impaired". Row 5: a spanner/tyre/light bulb - "Keep vehicle maintained". Each row has a bold green checkmark. Clean prevention card style.
Five prevention essentials - the most effective road safety tool is the one you use before you drive.

16.8 Summary

  • Always follow the PAS rule: Protect - Alert - Aid.
  • Call emergency services (112) as soon as possible.
  • Offer assistance without putting yourself or others at further risk.
  • Never move victims unless their life is in immediate danger.
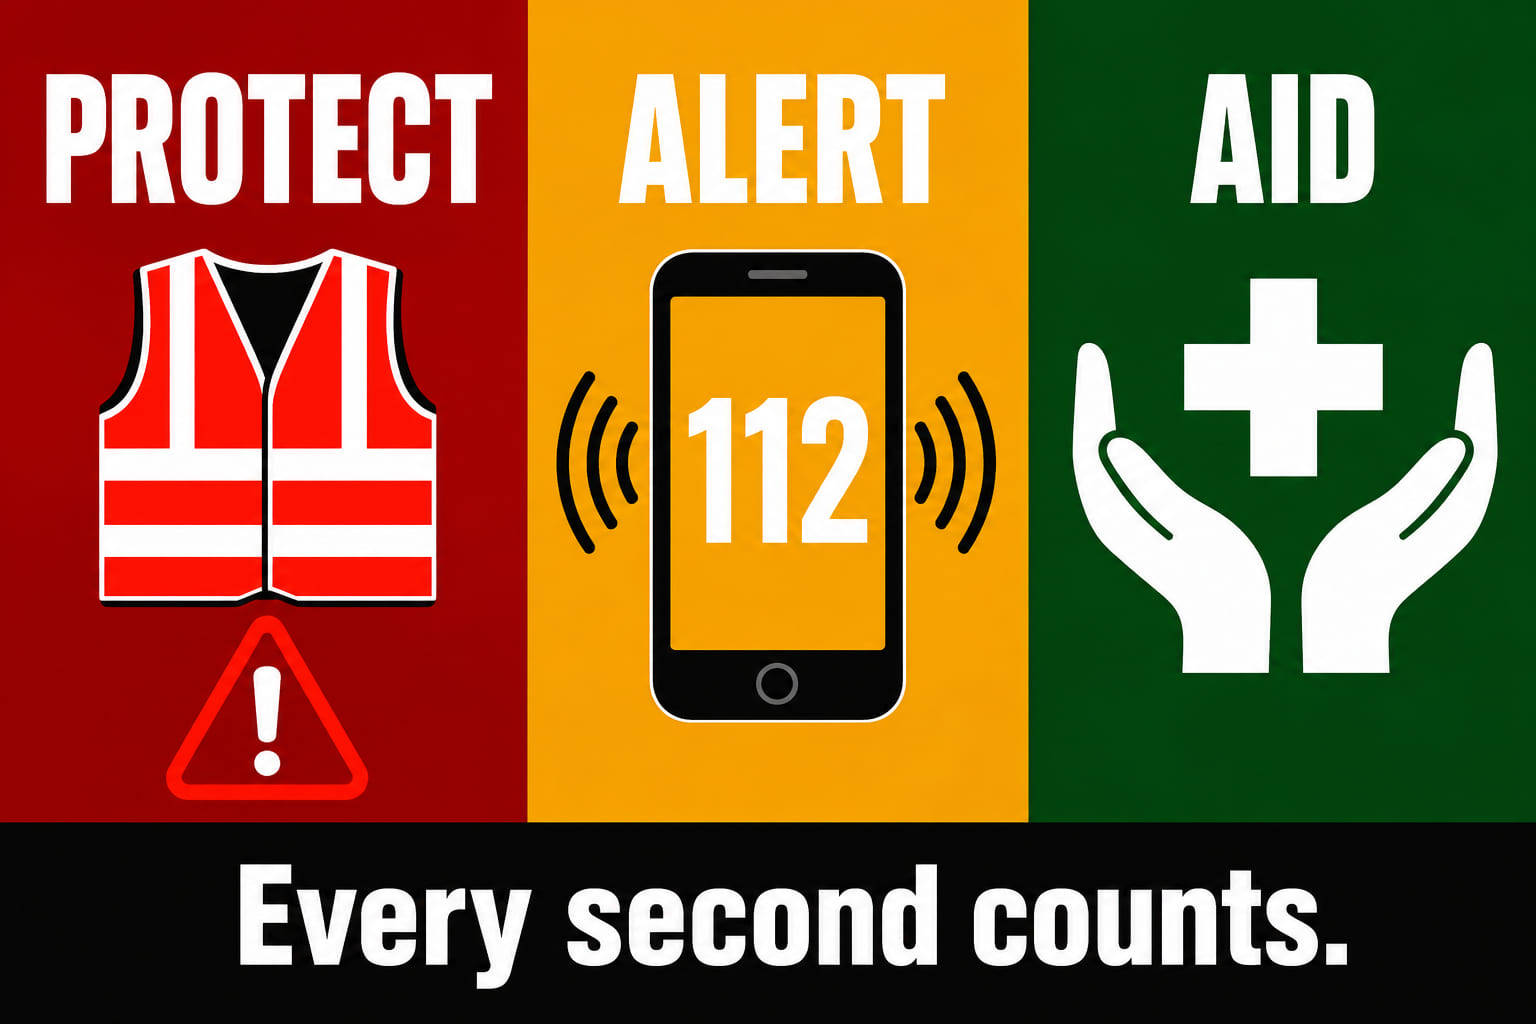
Protect · Alert · Aid - every second counts.
A bold wide landscape banner divided into three equal sections. Section 1 (red background): large "PROTECT" text with a reflective vest and triangle icon. Section 2 (amber background): large "ALERT" text with a mobile phone showing "112" in large digits. Section 3 (green background): large "AID" text with caring hands and a first-aid cross icon. Below the three sections, a full-width dark footer strip reads "Every second counts." in white bold text. High contrast, impactful emergency communication design.
Protect. Alert. Aid. 112. Every second counts.

Ready to test your knowledge?

Practice questions covering everything in Chapter 16 - Accidents and First Aid.
Practice Chapter 16 →

Última actualización: 2026-06-27

Practica las preguntas de este capítulo

La teoría es gratis. Crea una cuenta gratis para practicar preguntas con formato oficial y seguir tu progreso.