← All chapters
Driving Manual · Theory

Chapter 17 - Automobile Maintenance

Maintenance is essential to the safety, performance, and durability of your vehicle. Good habits reduce mechanical failures and accidents while improving fuel efficiency and environmental performance. This chapter explains basic systems, regular inspections, and maintenance practices all drivers should follow.
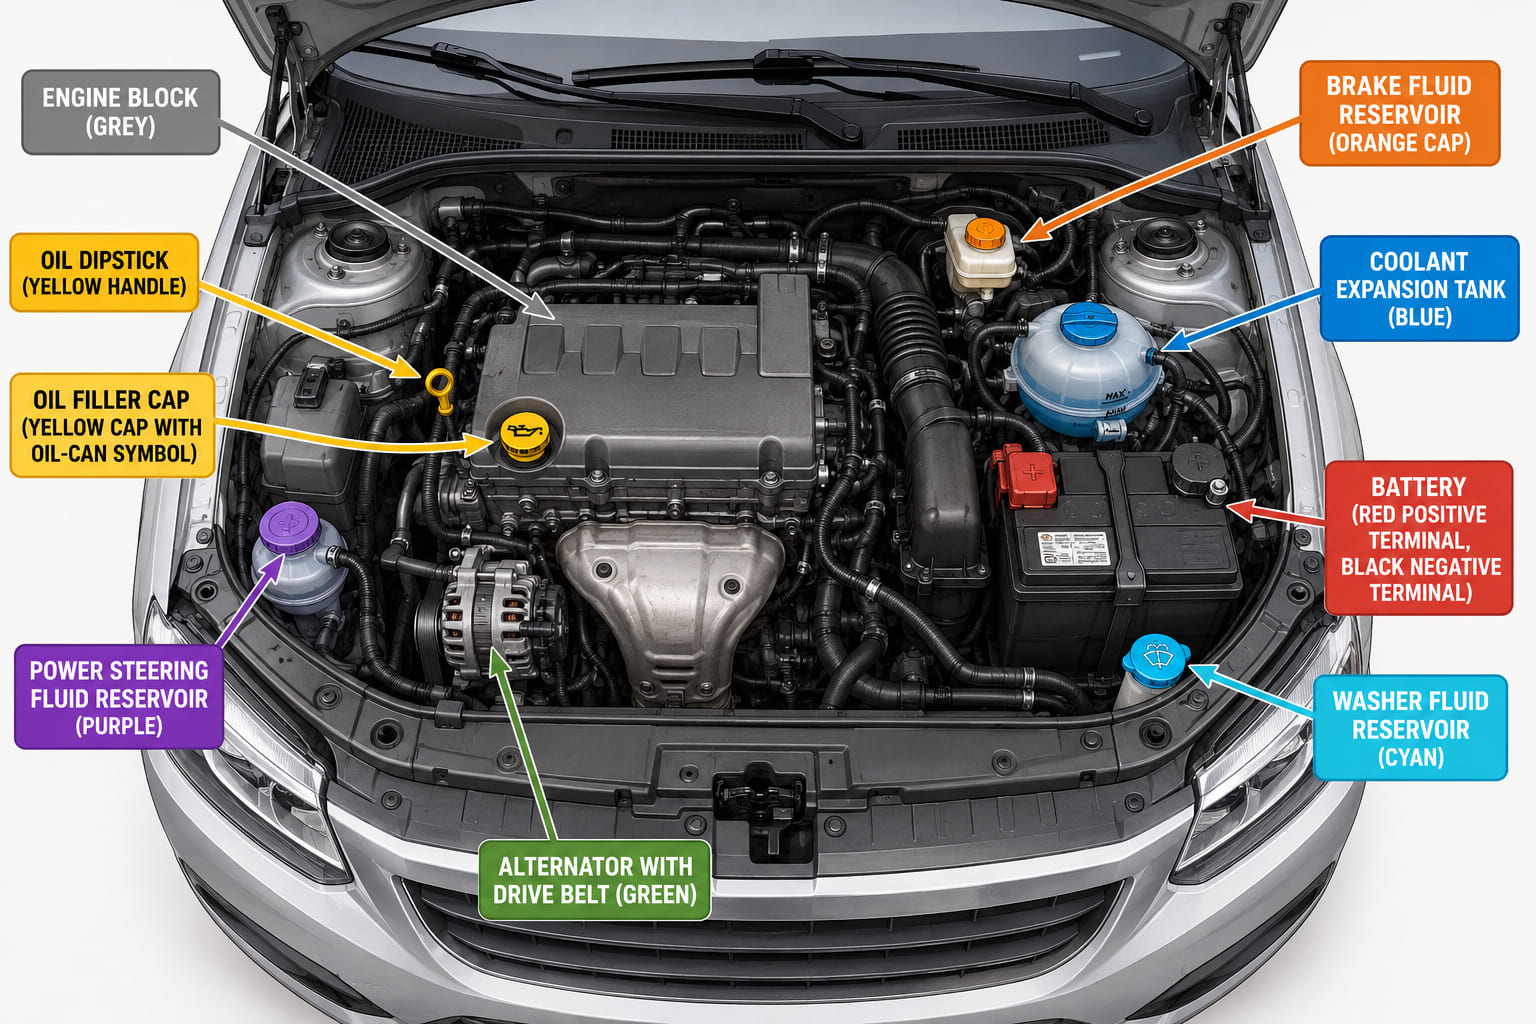
A labelled under-bonnet overview illustration of a car engine bay viewed from above with the bonnet open. All major systems are marked with colour-coded callout arrows: engine block (grey), oil dipstick and filler cap (yellow), coolant expansion tank (blue), battery (red/black terminals), brake fluid reservoir (orange), alternator and drive belt (green), power steering reservoir (purple), washer fluid reservoir (cyan). Each callout has a short system name label.
A visual map of everything under the bonnet - know where each system lives before you need it.

17.1 Why Maintenance Matters

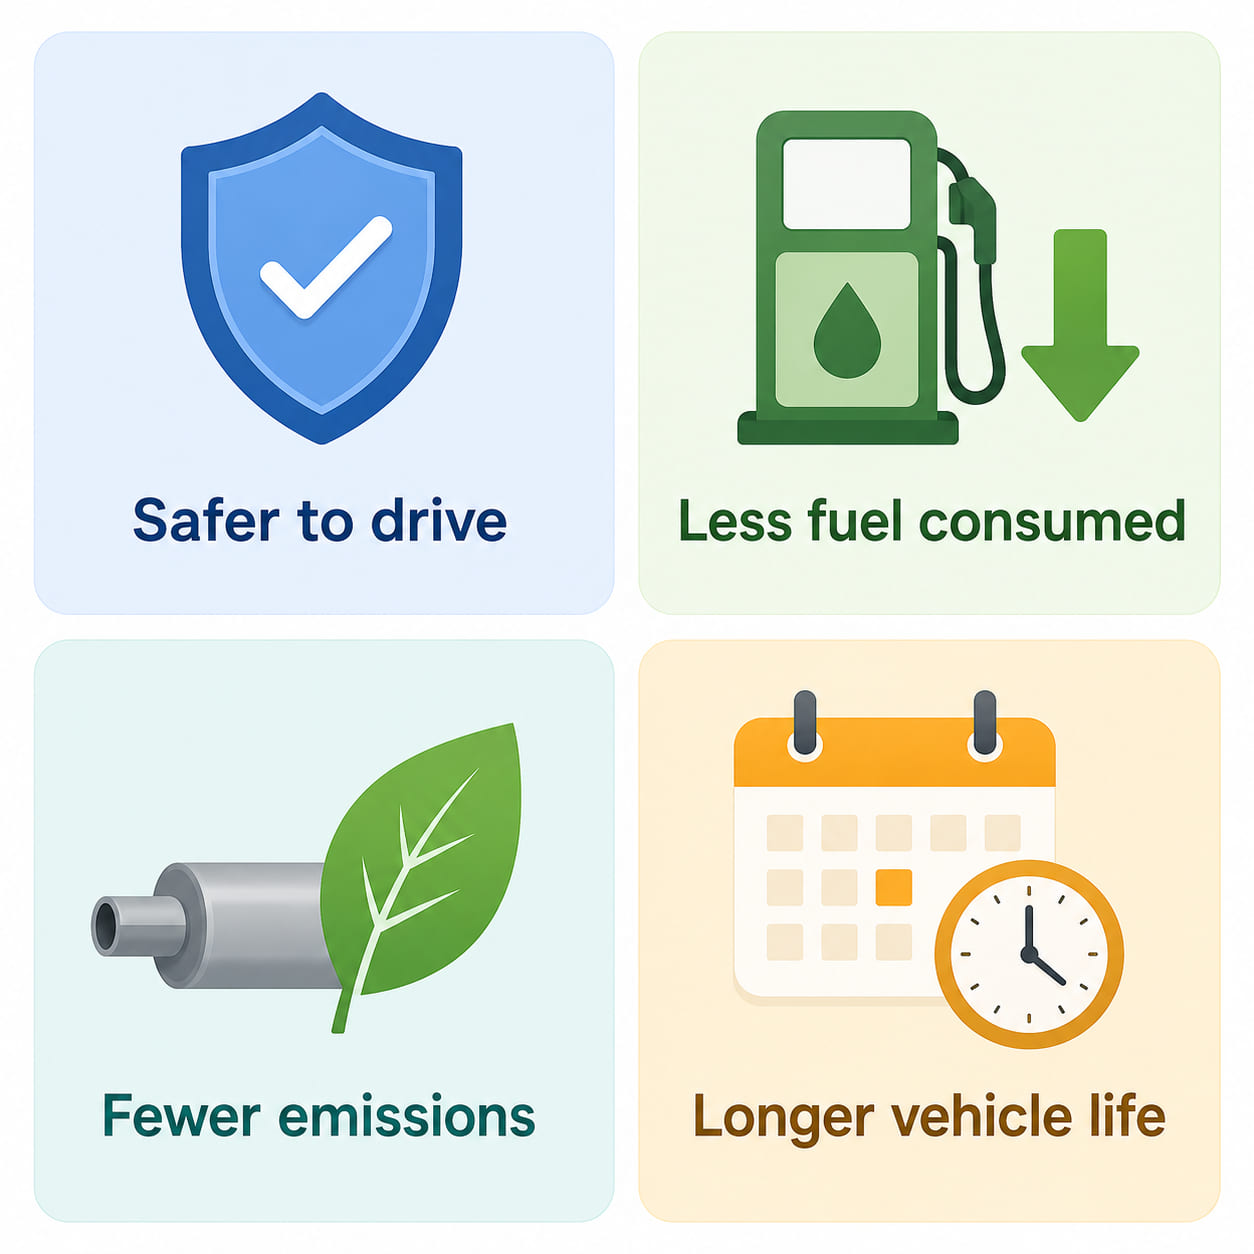
Vehicle maintenance is often a legal requirement (such as the Spanish ITV), but also a preventive measure that avoids costly repairs, dangerous breakdowns, and environmental harm. A properly maintained vehicle:

  • Is safer to drive.
  • Consumes less fuel.
  • Produces fewer emissions.
  • Has a longer useful life.
A 2×2 icon benefits card. Top-left: a shield icon - "Safer to drive". Top-right: a fuel pump with a downward green arrow - "Less fuel consumed". Bottom-left: a green leaf with an exhaust pipe - "Fewer emissions". Bottom-right: a calendar with a clock showing years - "Longer vehicle life". Each cell has a soft pastel background and a short label. Clean flat design.
Four reasons to maintain your car - safety, fuel, environment, longevity.

17.2 Basic Engine Systems and Maintenance

17.2.1 Lubrication System

The lubrication system reduces friction between moving engine parts using oil. Maintenance involves:

  • Oil level: check with the dipstick - oil should be between the MIN and MAX marks, on a level surface with the engine cold.
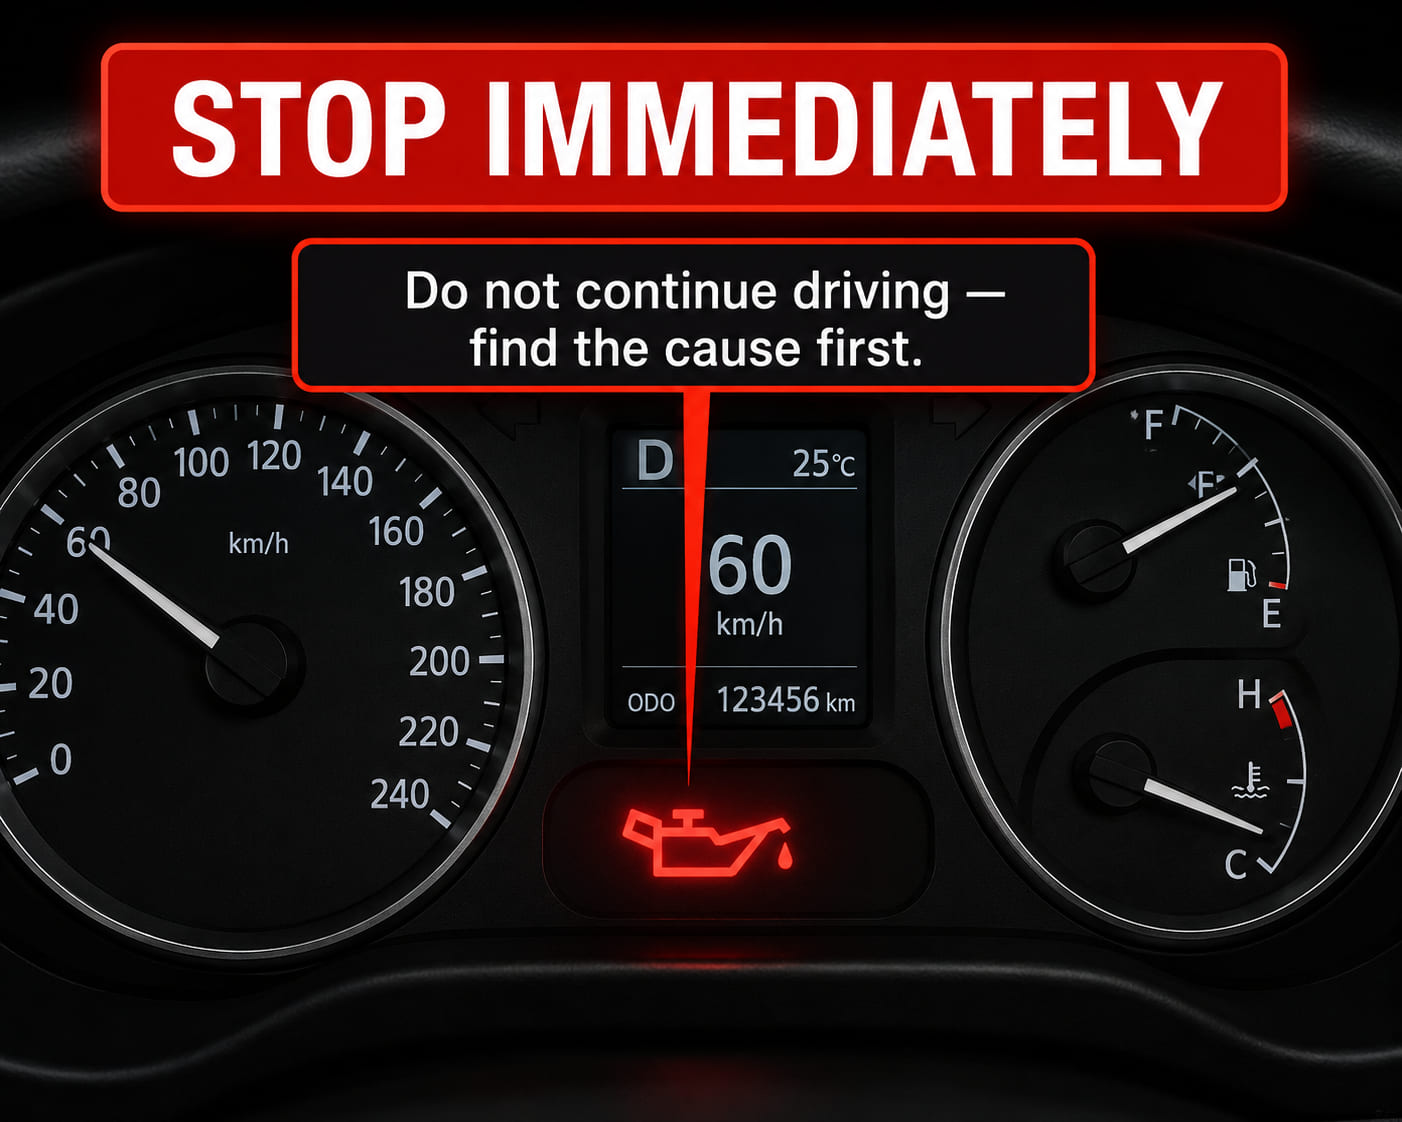
  • Oil pressure: a dashboard warning light indicates pressure problems. If lit, stop the vehicle immediately.
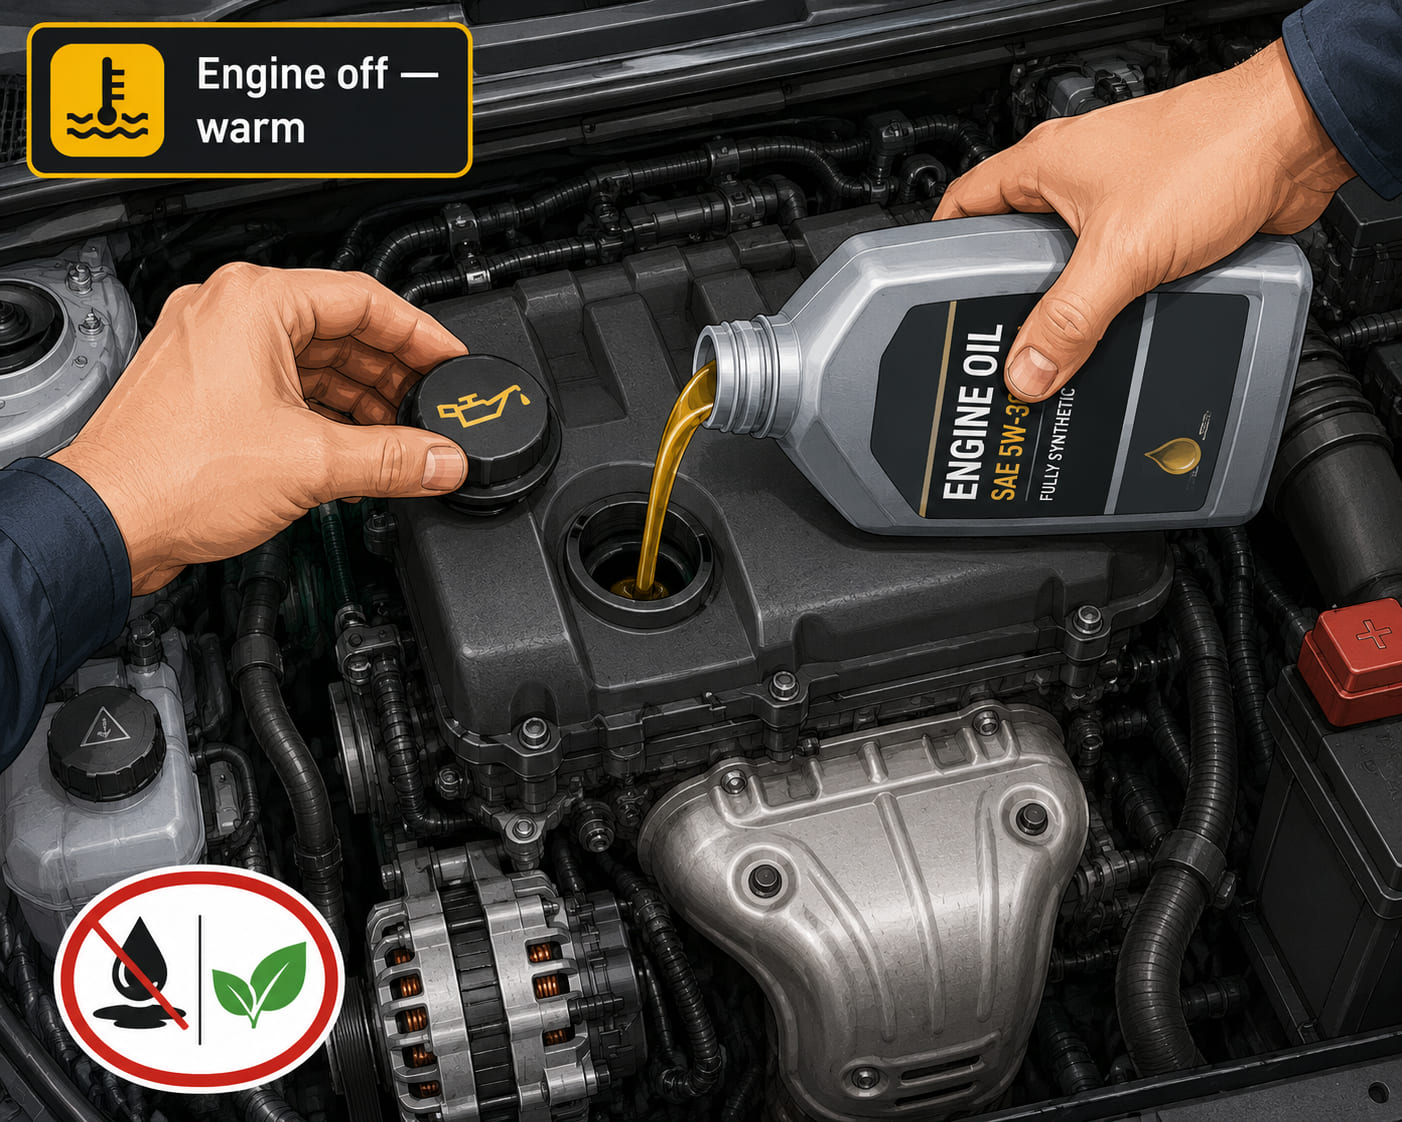
  • Oil and filter change: replace per manufacturer guidance. Oil should be drained warm and filled from the top of the engine.

Function. To distribute oil to all engine parts, forming a thin protective film that prevents metal-to-metal contact. Automotive oils are specially formulated to reduce wear. The devices that monitor oil are:

  • Dipstick: indicates how much oil is in the engine. Check with the engine off and cold; the level must be between the minimum and maximum marks.
  • Oil pressure gauge or warning light: monitors oil pressure (needed so oil circulates and coats all components). If the warning light comes on, the oil level is low or pressure is insufficient - stop and don't continue until the cause is found and fixed.
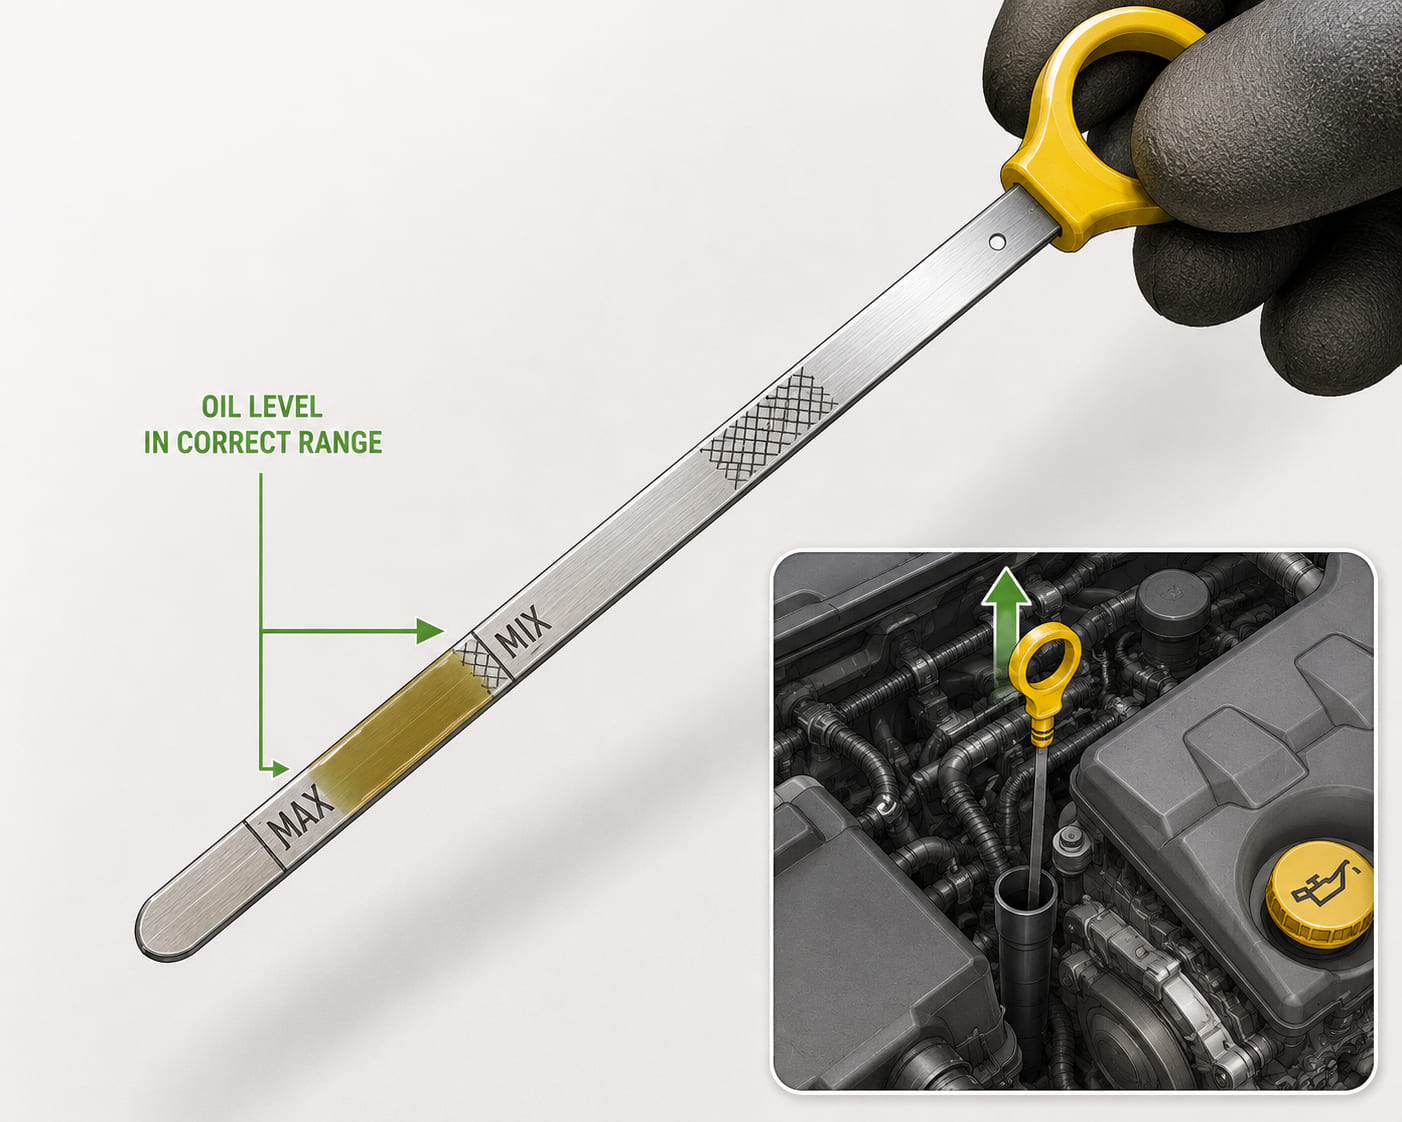
A close-up illustration of an engine oil dipstick being held up after withdrawal. The dipstick is shown at an angle with its lower end clearly visible. Two marks are labelled: "MIN" at the bottom and "MAX" near the top. The oil stain on the dipstick reaches between the two marks (correct level). A small inset shows the dipstick tube location in an engine bay. Clean technical illustration.
Check the dipstick cold, on level ground - oil must sit between MIN and MAX.
A close-up of a car instrument cluster. The oil pressure warning light - a red icon showing an oil can with a drip - is illuminated brightly. A bold callout reads "STOP IMMEDIATELY". A secondary note beneath reads "Do not continue driving until cause is found." The rest of the cluster is shown in normal operation to provide context. High-contrast warning illustration.
Oil pressure warning light on: stop immediately - continued driving risks catastrophic engine damage.
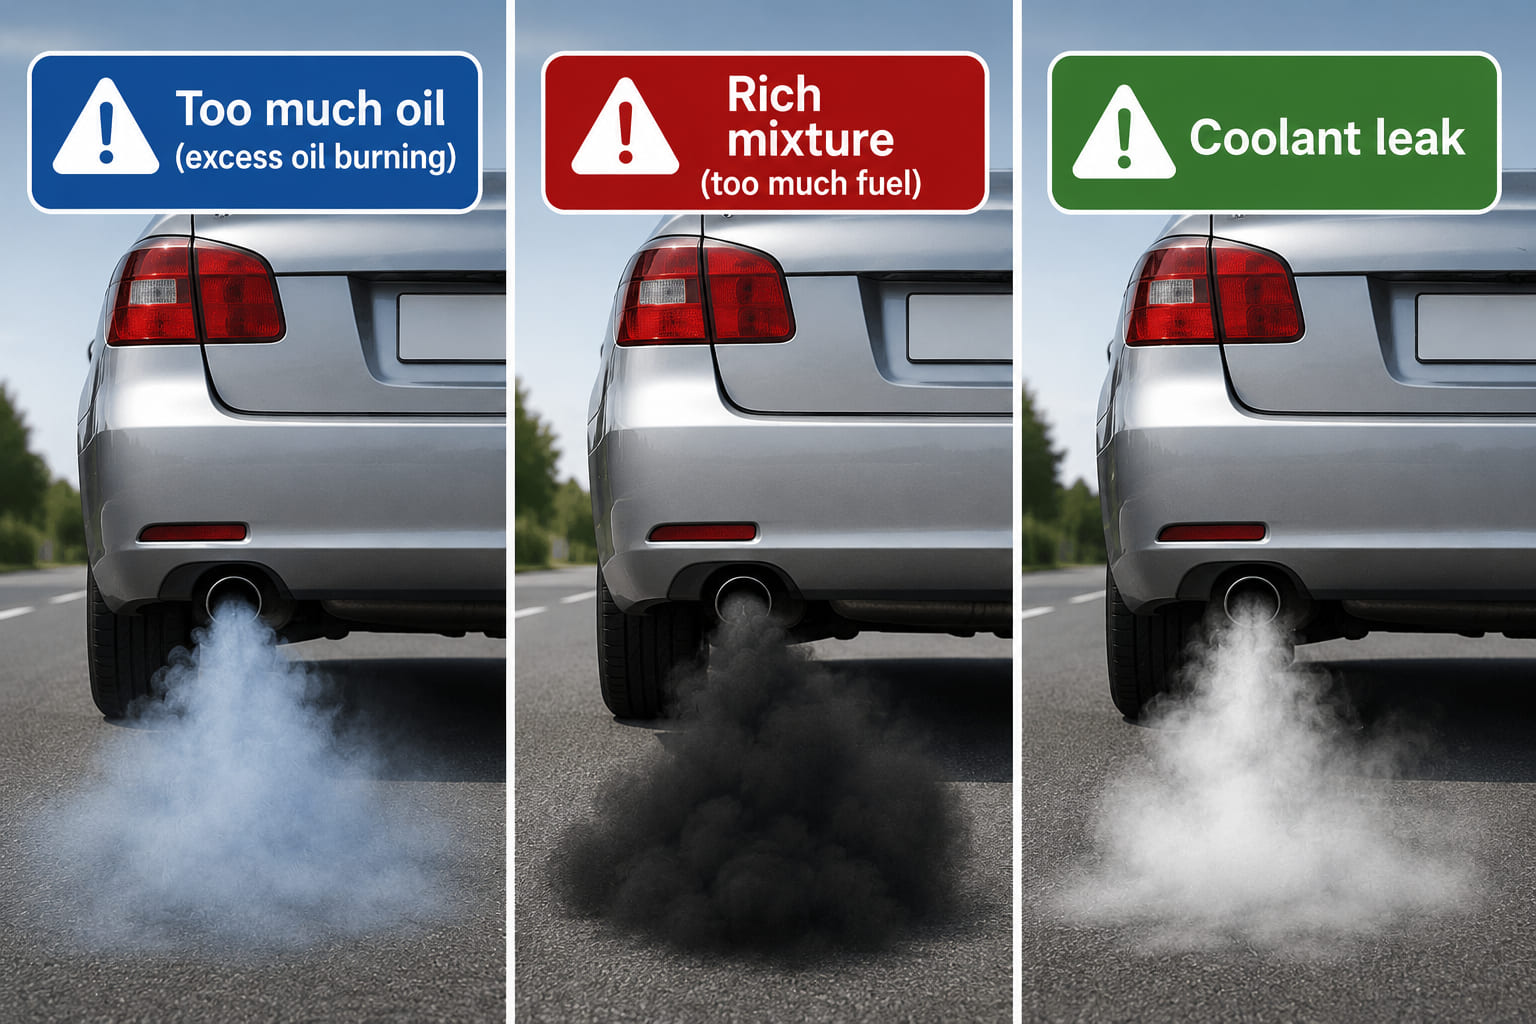
To top up, lift the bonnet and pour oil through the filler cap on the engine. Replace oil and filter at regular intervals - vehicle level, engine off but warm. Avoid spilling oil (highly polluting), and clean up any spills. Bluish-white smoke from the exhaust means the engine has too much oil.
An under-bonnet illustration showing hands lifting an oil filler cap from the top of the engine (the cap has an oil can symbol on it). An oil bottle is being tilted to pour oil through the open filler hole. A small badge in the corner reads "Engine off - warm". Another badge shows a spill warning with a pollution leaf icon.
Always add oil through the filler cap with the engine off - and never overfill.
A car rear view showing three exhaust smoke colour scenarios as side-by-side comparison panels. Panel 1: bluish-white smoke - label "Too much oil". Panel 2: black smoke - label "Rich fuel mixture (too much fuel)". Panel 3: white/steam - label "Coolant leak". Each panel has a colour-tinted smoke cloud and a coloured warning badge matching the smoke colour.
Exhaust smoke colour is a diagnostic clue - blue/white means excess oil, black means over-fuelling, white means coolant.

17.2.2 Cooling System

Prevents the engine overheating by dissipating heat. Maintenance:

  • Coolant level: check in the expansion tank, cold - between MIN and MAX.
  • Coolant replacement: follow manufacturer intervals. Use antifreeze in winter to prevent freezing.
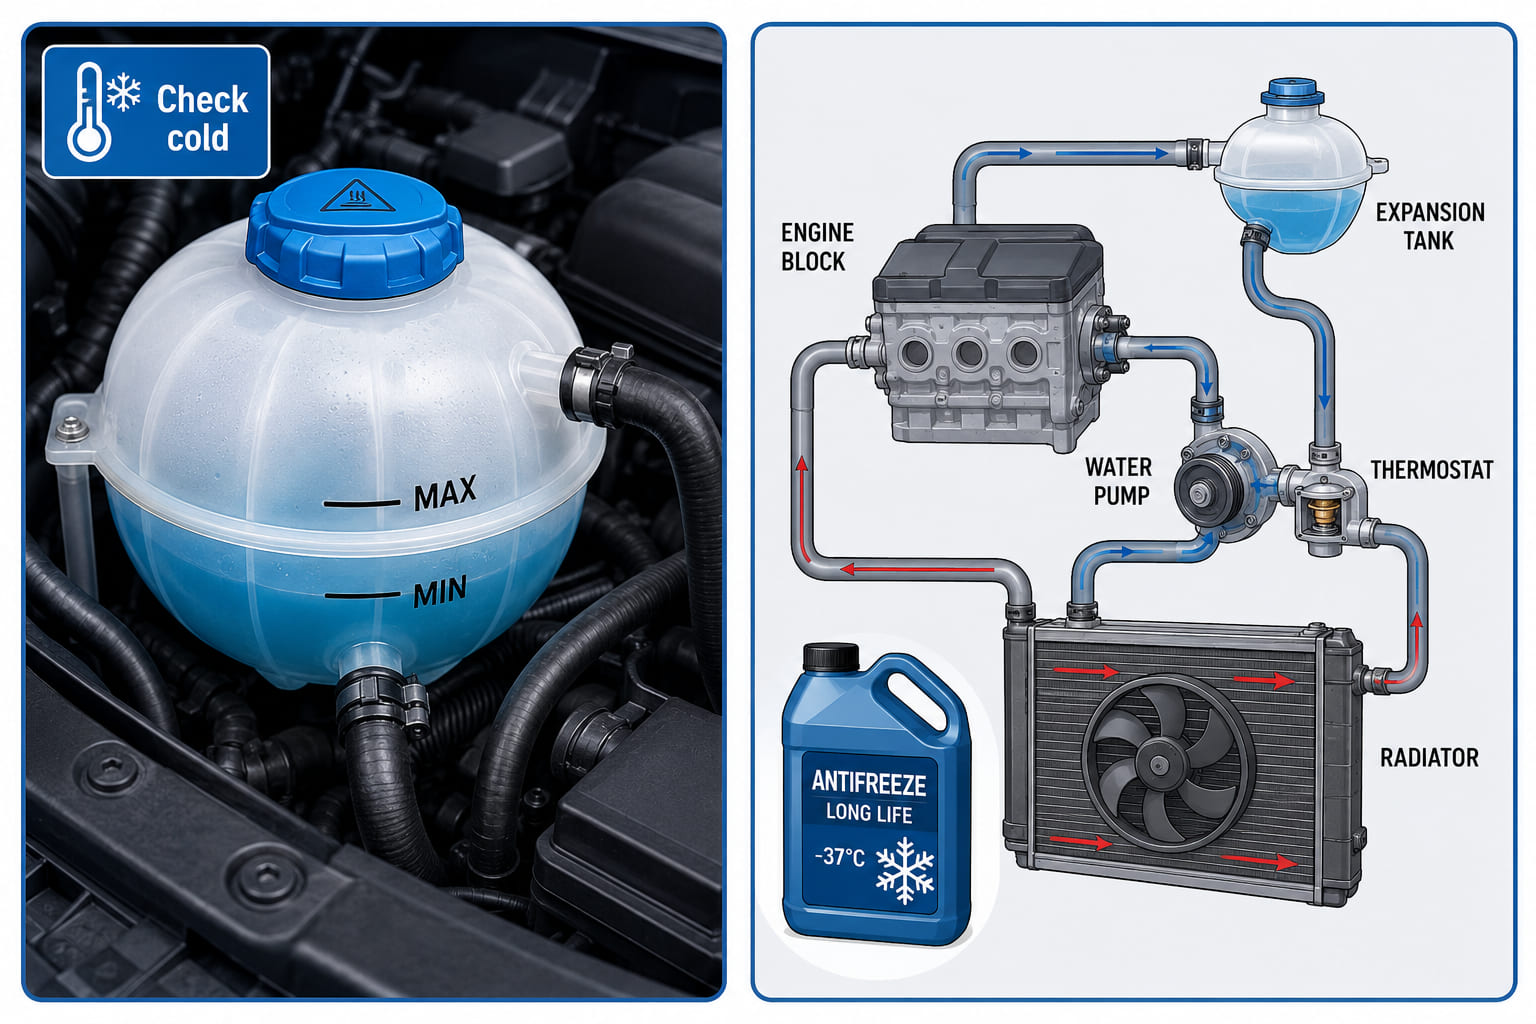
A two-panel cooling system illustration. Left panel: a close-up of a semi-transparent coolant expansion tank showing the coolant level sitting correctly between the MIN and MAX marks, with a "check cold" badge. Right panel: a simplified cooling circuit diagram showing the engine block, radiator, water pump, thermostat, and expansion tank connected by hoses, with an antifreeze bottle icon overlaid for the winter label.
Check coolant cold - between MIN and MAX. Add antifreeze in winter to prevent freezing.

17.2.3 Idle Speed

The engine idle speed must be correctly set. If too high, fuel consumption and wear increase.
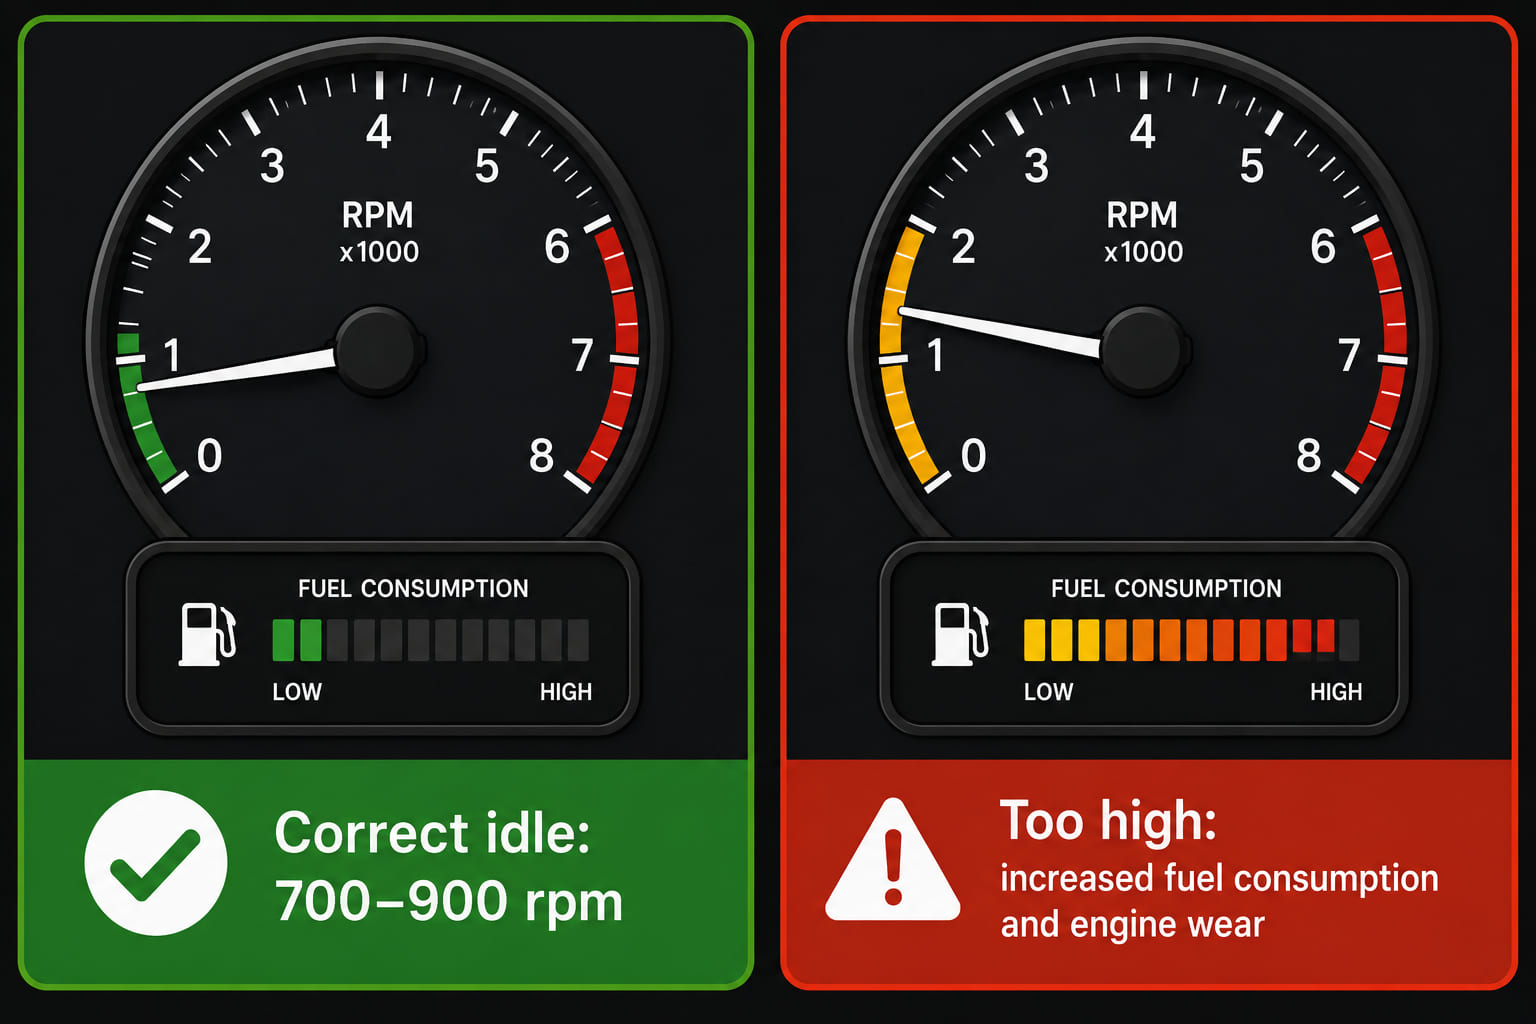
A two-panel RPM gauge (tachometer) comparison. Left panel: needle resting in the correct idle zone (approximately 700-900 rpm) marked with a green band - label "Correct idle: 700-900 rpm". Right panel: needle resting at 1,500 rpm, marked with an amber/red band - label "Too high: increased fuel consumption and wear". A small fuel gauge inset below shows fuel use rising with the higher idle. Flat gauge illustration style.
Idle speed too high? Fuel consumption and engine wear both increase - have it checked.

17.3 Electrical System

17.3.1 Battery

Supplies electricity when the engine is off. Types: maintenance-required and sealed. Clean terminals and cover with vaseline; in open batteries keep electrolyte above the lead plates using distilled water.
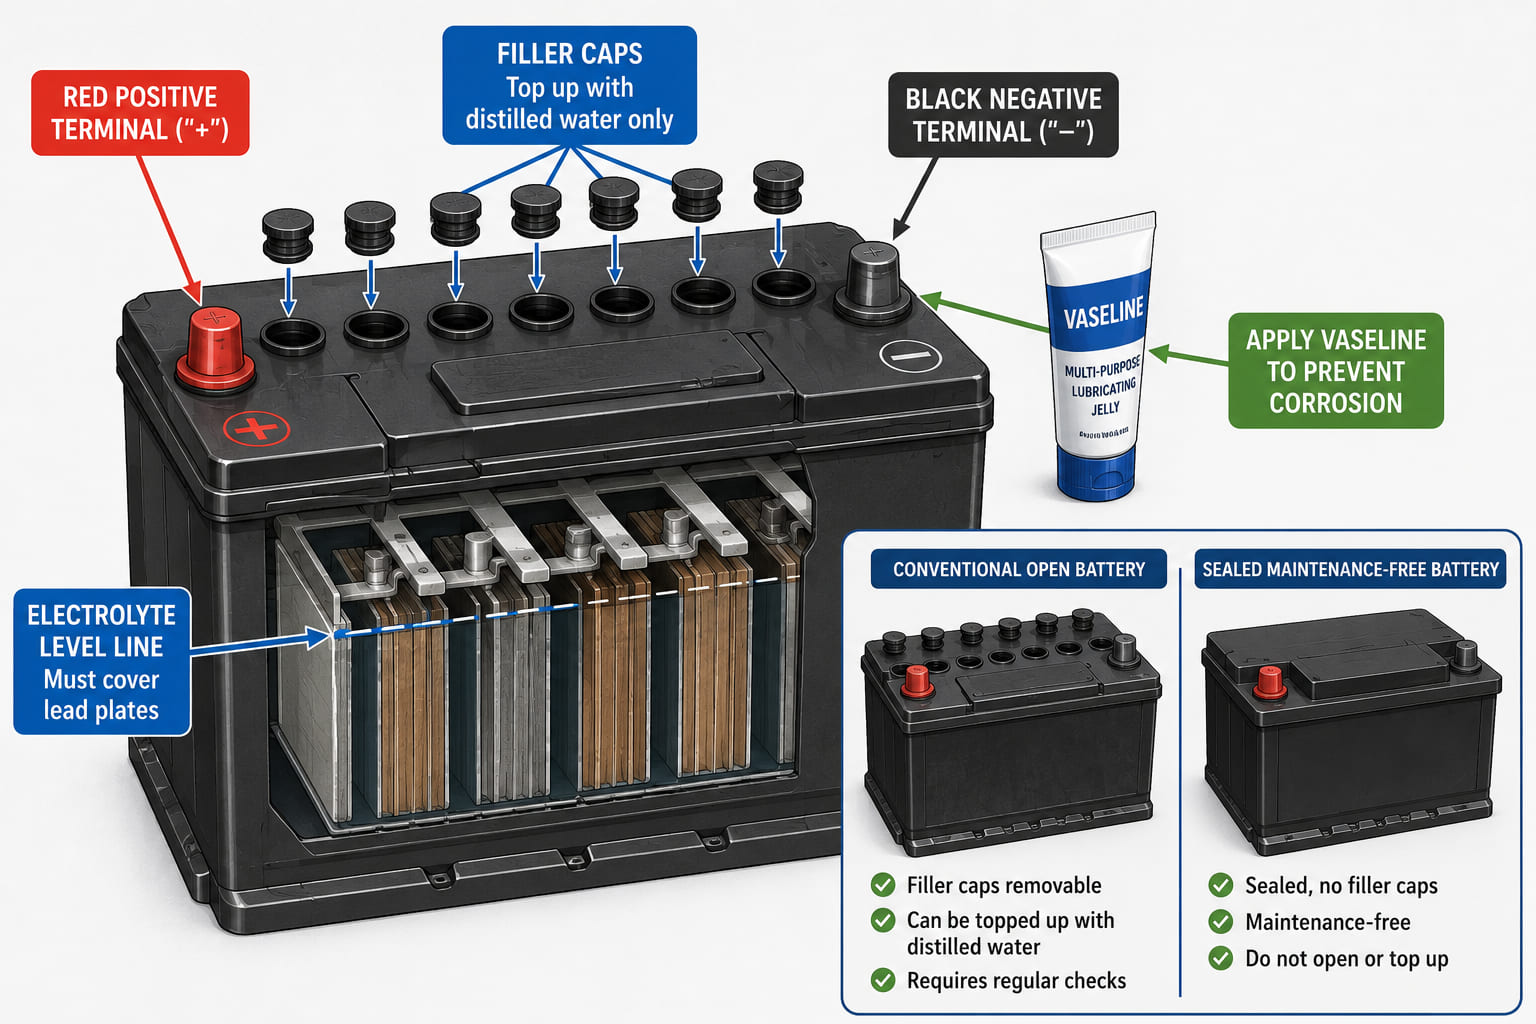
An annotated diagram of a car battery. The battery is shown from a slight angle with the top visible. Callout arrows label: positive terminal (red, "+" symbol), negative terminal (black, "-" symbol), filler caps on an open/maintenance battery (label "Distilled water only"), and electrolyte level line (label "Must cover lead plates"). A vaseline tube icon sits near the terminals. An inset comparison shows a sealed maintenance-free battery alongside a conventional open battery, both labelled.
Battery maintenance: clean terminals, apply vaseline, and keep electrolyte above the plates on open batteries.

17.3.2 Charging System

The alternator charges the battery while the engine runs, via a belt connected to the crankshaft. Check the alternator belt for wear and correct tension.
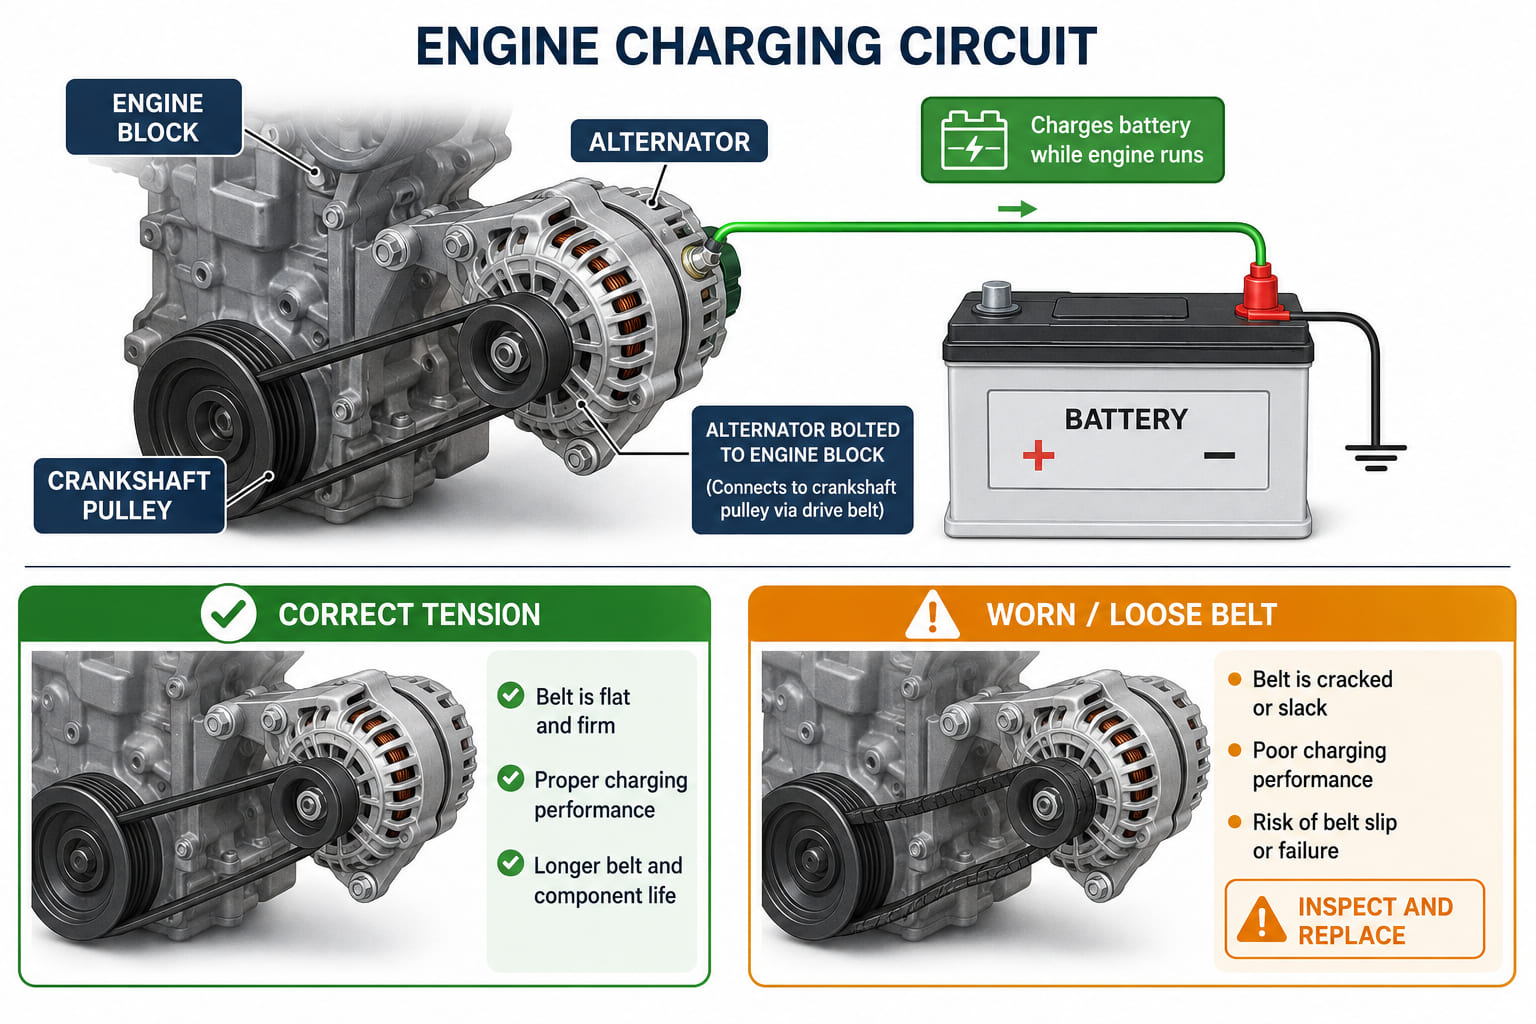
A diagram of the engine charging circuit. The alternator is shown bolted to the engine block, connected by a serpentine drive belt to the crankshaft pulley. An electrical line runs from the alternator to the battery (green arrow labelled "charges battery"). A callout on the belt shows two states: correct tension (flat belt, green tick) and worn/loose belt (cracked, slack belt, amber warning triangle). Labels identify: alternator, crankshaft pulley, drive belt, battery.
The alternator charges the battery via a belt - inspect the belt regularly for wear and correct tension.

17.3.3 Starting System

The starter motor turns the engine at ignition. If it rotates slowly or not at all, the battery may be low or poorly connected.
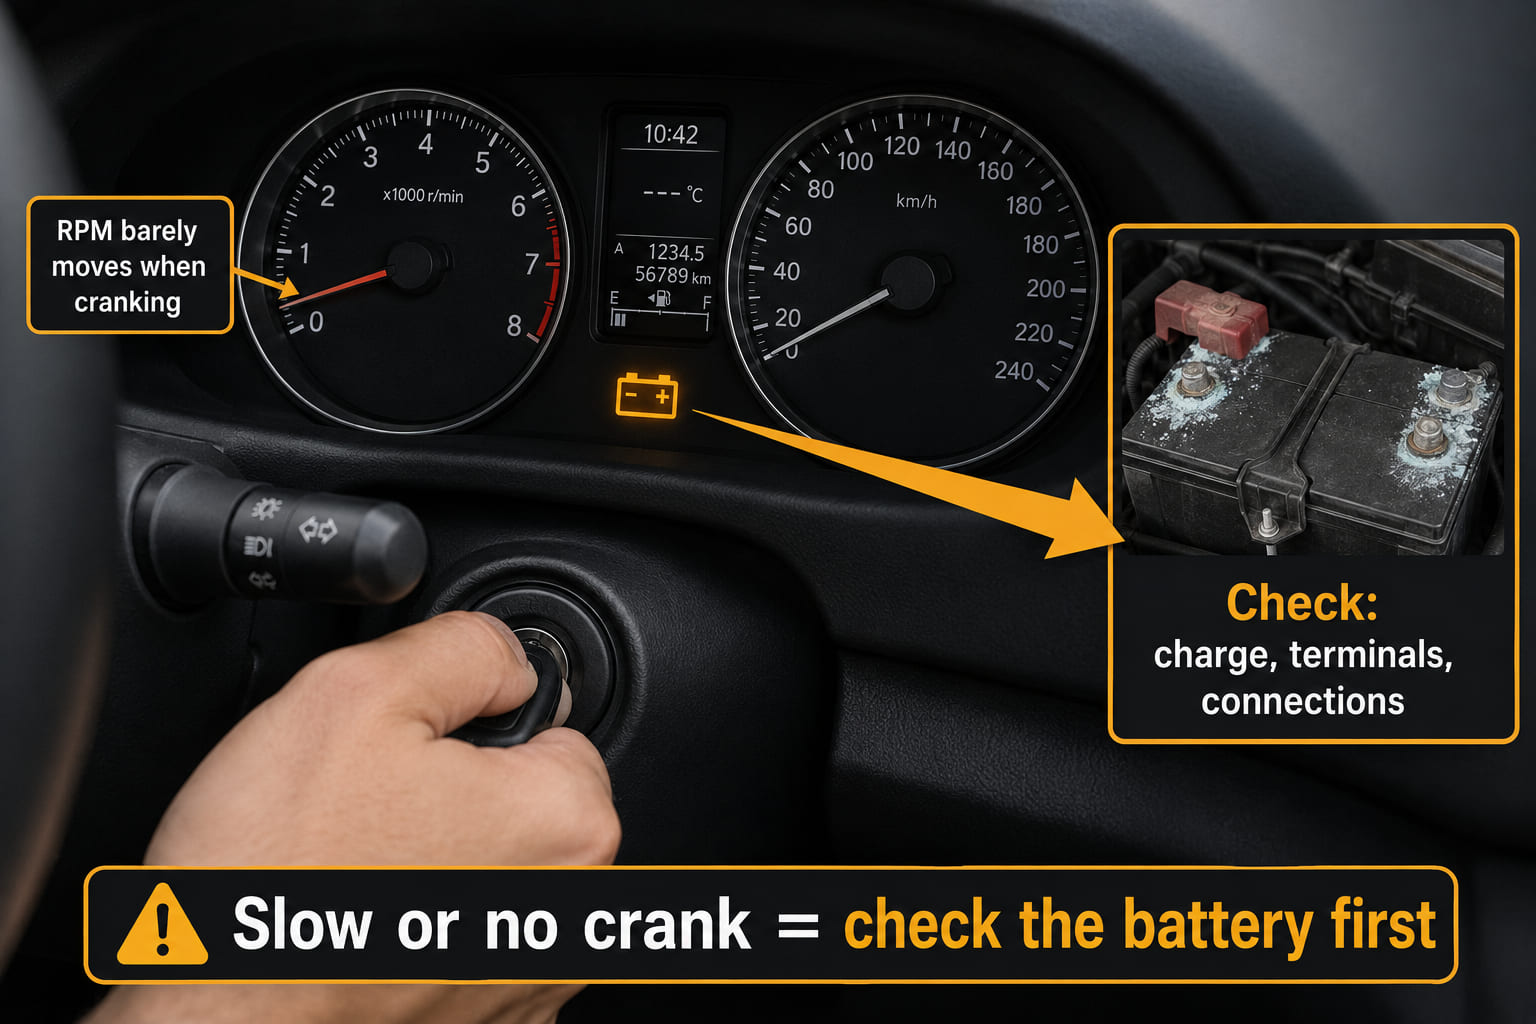
A dashboard scene. A hand is turning the ignition key. The instrument cluster shows a slow-crank warning: the battery symbol is illuminated in amber, the RPM needle barely moves upward. A callout arrow points from the battery warning light to an inset image of a car battery with poor terminal connections labelled as the most common cause. A second note reads "Slow or no crank = check battery charge and connections".
Slow cranking on ignition usually means a weak or poorly connected battery - check before it fails completely.

17.3.4 Ignition System

In petrol engines, generates the spark to ignite the air-fuel mixture. Includes spark plugs, distributor, and coil. Keep components clean and replace as needed.
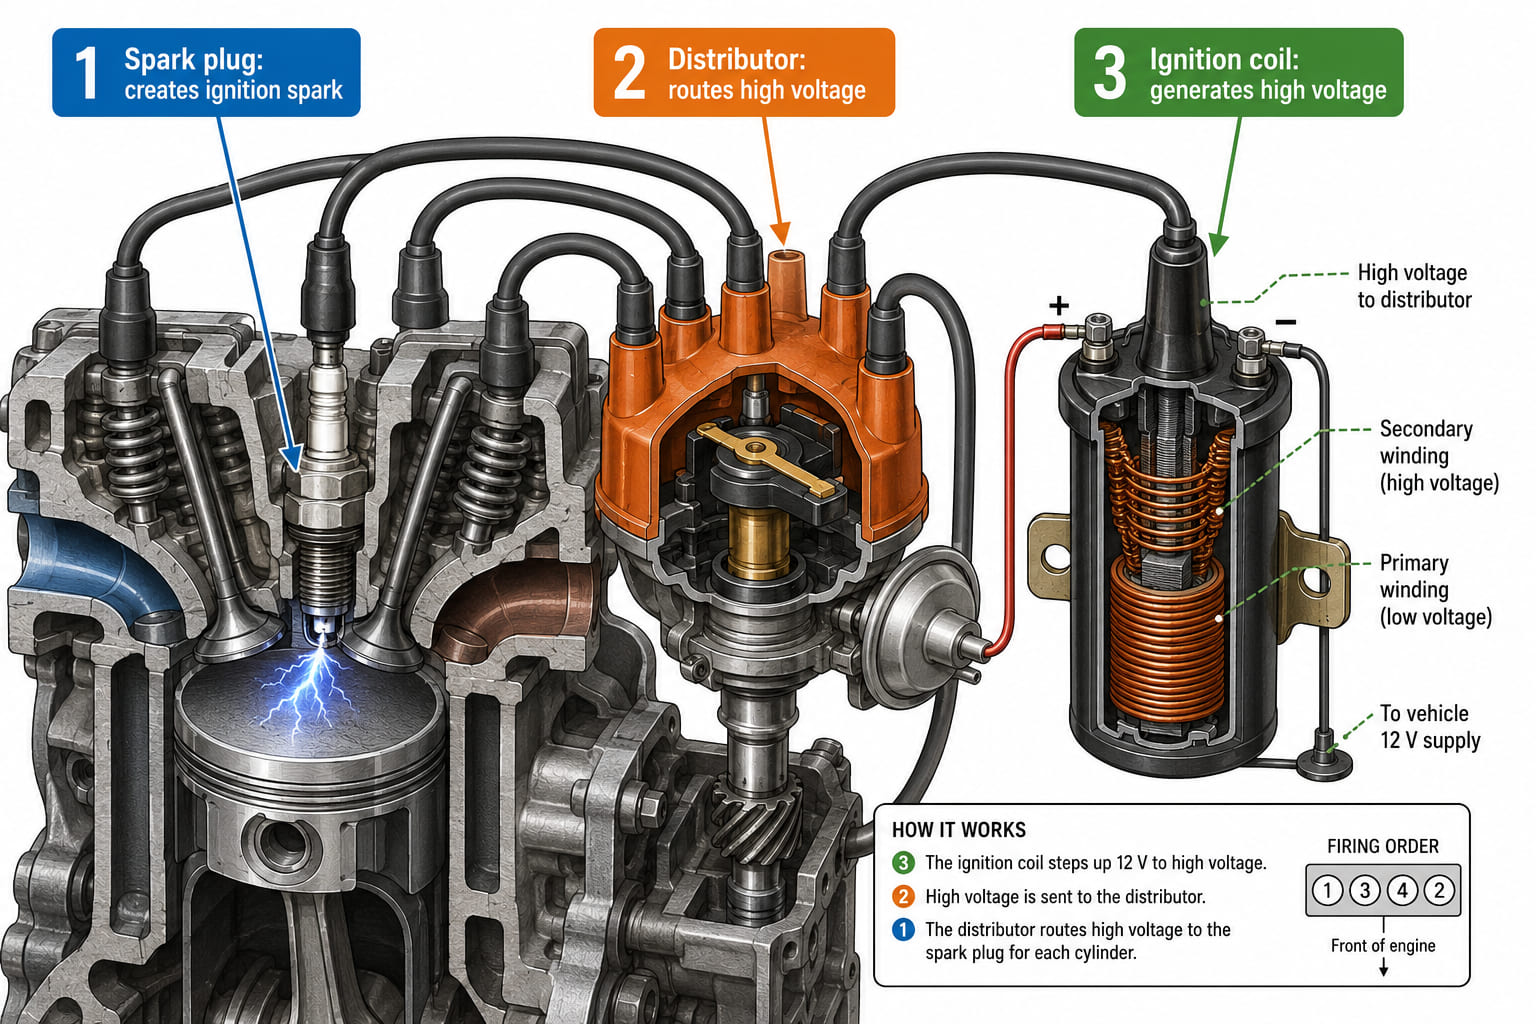
A labelled diagram of a petrol engine ignition system. The engine cutaway shows: a spark plug inserted into the cylinder head with an electrical spark arc shown; a distributor cap connecting to individual plug leads; an ignition coil connected to the distributor. Each component has a distinct colour and a callout label: "Spark plug - creates the ignition spark", "Distributor - routes high voltage to each plug", "Ignition coil - generates high voltage". Technical cutaway style.
The ignition system: coil generates high voltage to distributor routes it to spark plug ignites the mixture.

17.4 Brake System

  • Brake fluid: check the level and ensure it's not old or contaminated.
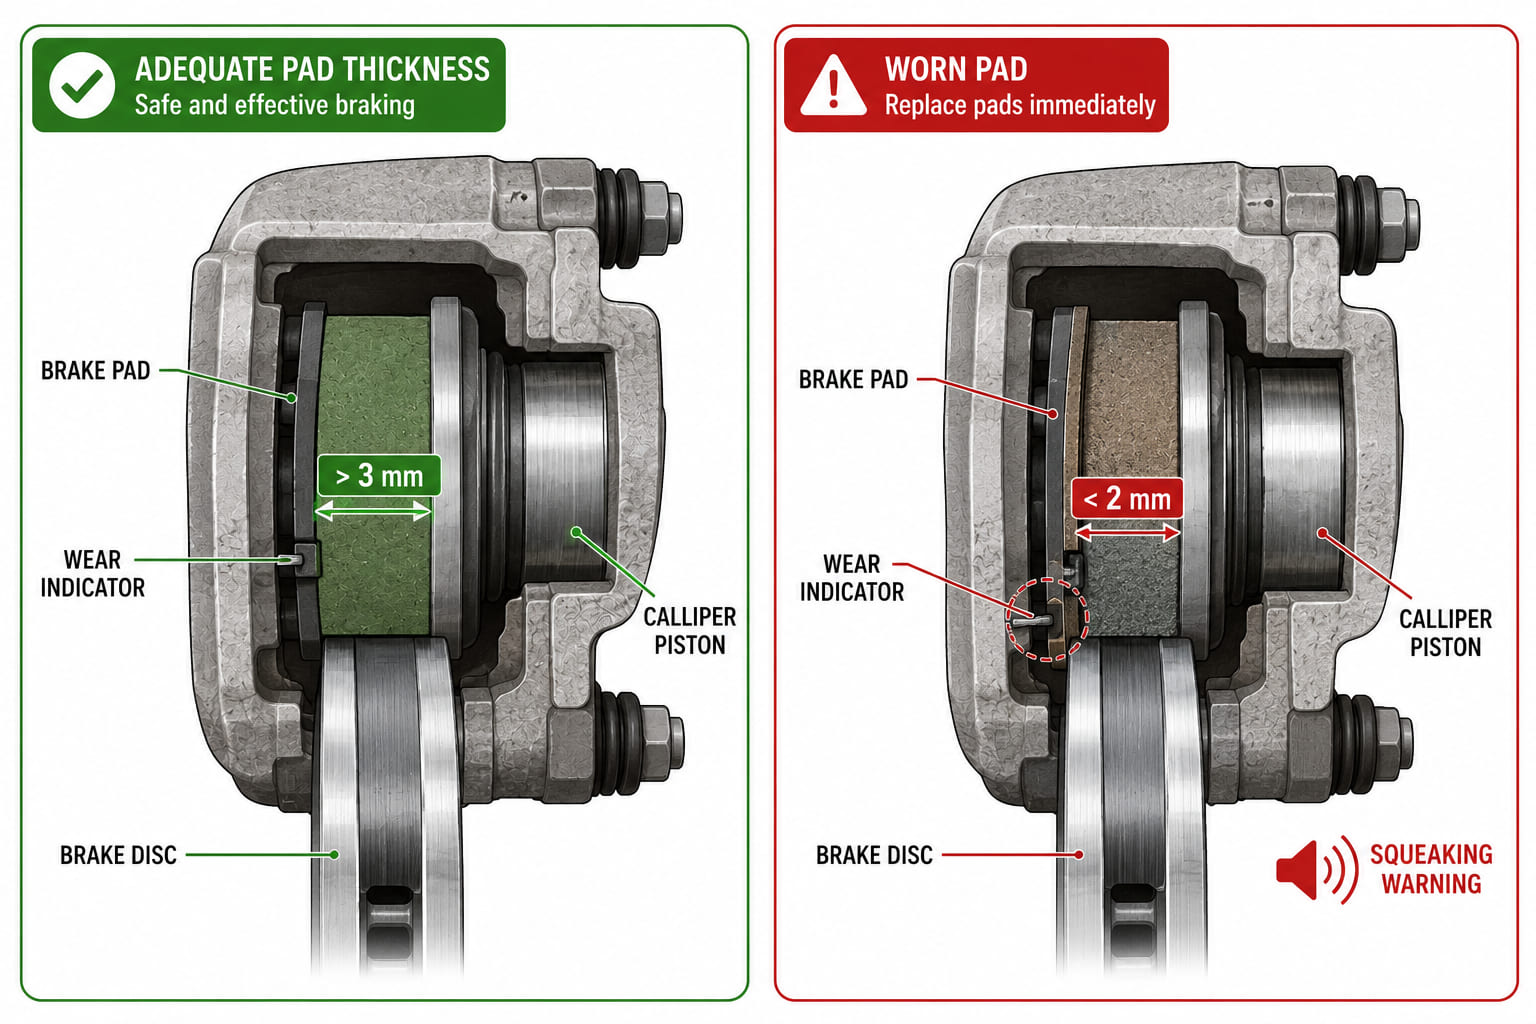
  • Brake pads and discs: inspect regularly. Squeaking or reduced response may indicate wear.
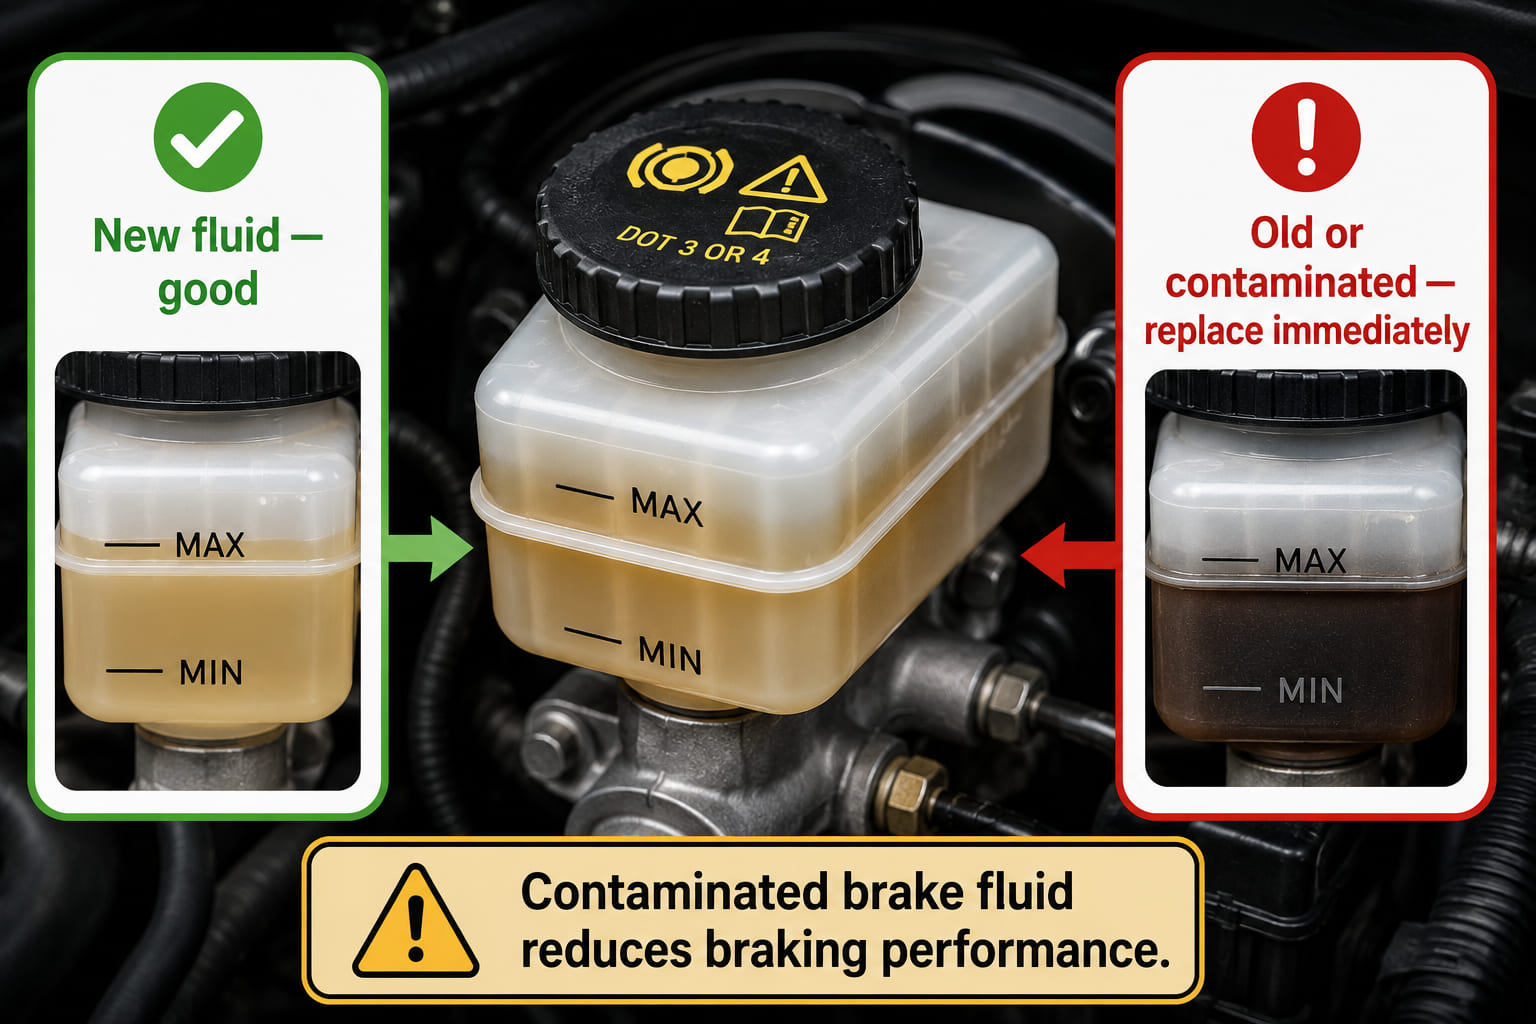
A close-up illustration of a brake fluid reservoir under the bonnet. The transparent reservoir shows the fluid level between the MIN and MAX lines. Two callout panels: left - the fluid is light/golden coloured (new fluid, green checkmark); right - the fluid is dark brown/black (old/contaminated fluid, amber warning triangle with label "Replace - contaminated fluid reduces braking performance").
Brake fluid: between MIN and MAX, and pale-coloured - dark fluid is contaminated and must be replaced.
A two-panel cross-section diagram of a brake calliper and disc. Left panel: adequate pad thickness - a thick pad (labelled "> 3 mm") pressing against a smooth disc, green checkmark. Right panel: worn pad - a thin pad (labelled "< 2 mm") with a wear indicator notch, the pad almost metal-on-metal, a squeaking sound wave icon, red warning badge. Labels identify: brake pad, wear indicator, brake disc, calliper piston.
Pads below 2 mm or squeaking under braking: time to inspect - worn pads increase stopping distances.

17.5 Tyres

  • Pressure: check monthly, including the spare. Follow manufacturer specs.
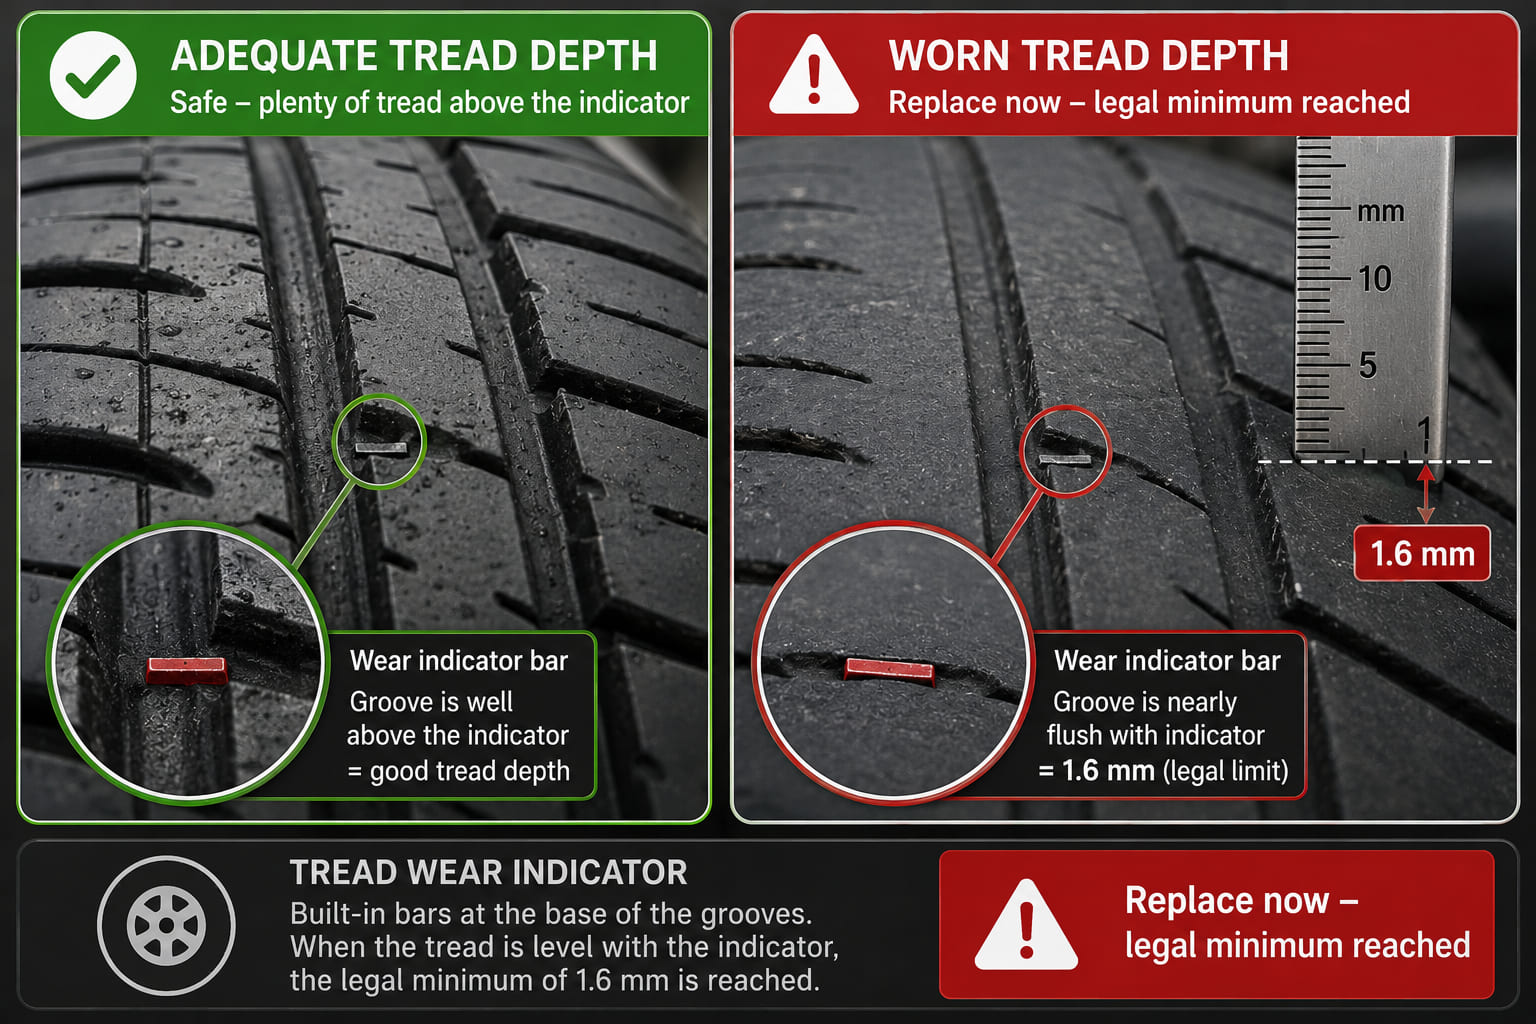
  • Tread depth: minimum legal depth is 1.6 mm. Use the wear indicators on tyres.
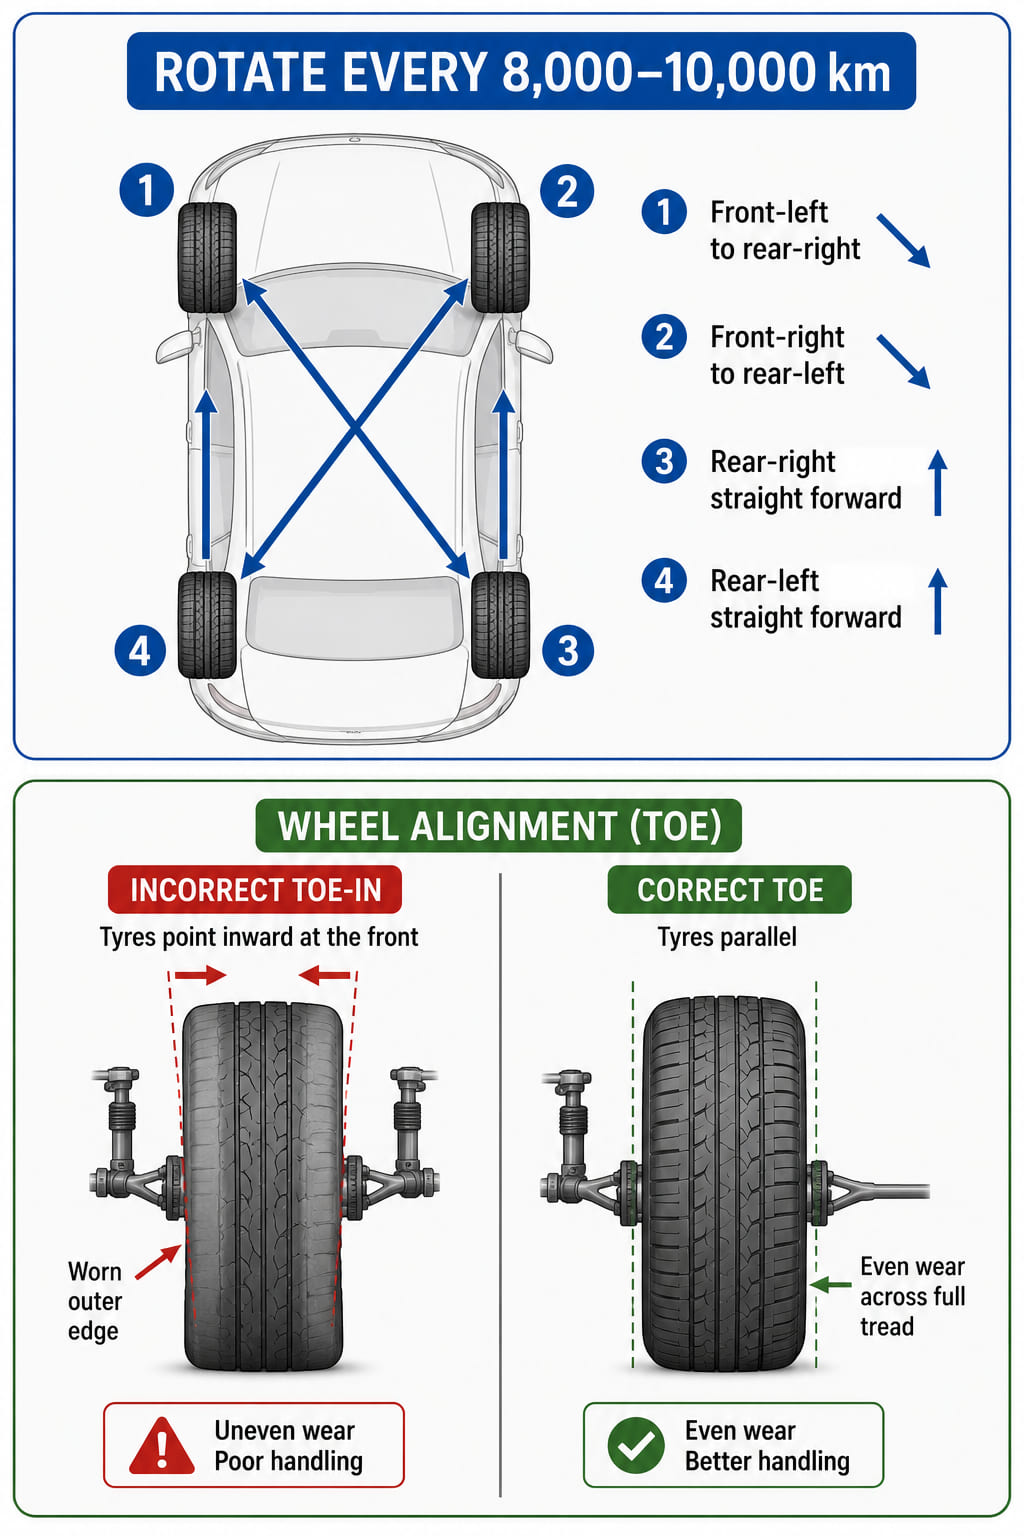
  • Rotation and alignment: rotate tyres regularly and align wheels to prevent uneven wear.
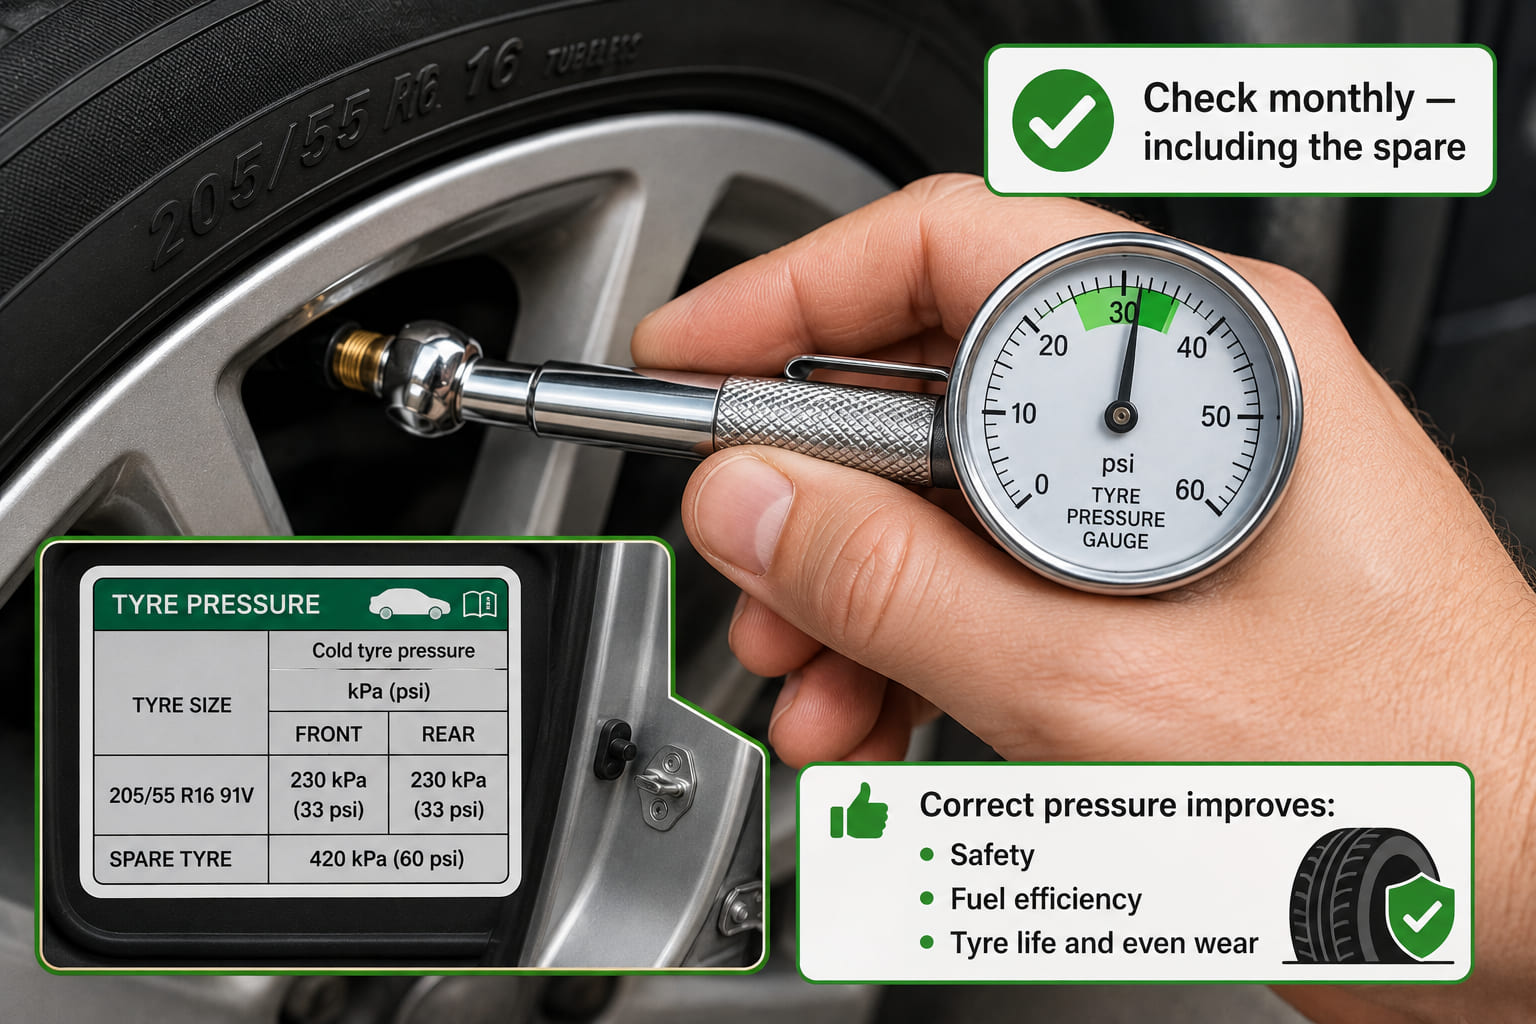
A close-up illustration of a tyre pressure gauge being pressed onto a tyre valve stem. The gauge dial shows a reading within the correct range, highlighted in green. The tyre sidewall is visible in the background. A callout badge reads "Check monthly - including the spare". A second small inset shows the tyre pressure sticker typically found inside the driver's door frame showing the manufacturer's recommended pressures for front and rear.
Check tyre pressure monthly with a gauge - including the spare. Follow the door-frame specification.
A close-up illustration of tyre tread from above and at an angle. The tread blocks are visible with the built-in wear indicator bar - a small raised plateau that sits 1.6 mm from the bottom of the groove - highlighted in red. Two states are shown side by side: adequate tread (groove well above the indicator bar, green) and worn tread (groove flush with the indicator bar, red - label "Replace now: 1.6 mm minimum reached"). A measurement ruler confirms the 1.6 mm mark.
The tread wear indicator bar sits at 1.6 mm - when the groove is flush with the bar, the tyre must be replaced.
Two sub-diagrams. Top: a tyre rotation pattern showing a car with numbered tyre positions (1-4). Arrows show the standard cross-rotation pattern: front-left goes to rear-right, front-right goes to rear-left, rear tyres move straight forward. A label reads "Rotate every 8,000-10,000 km". Bottom: a wheel alignment before/after comparison - left shows uneven tyre wear (outer edge worn, arrow showing toe-in misalignment); right shows even wear (correctly aligned wheel, parallel to road direction).
Rotate tyres regularly and check alignment - uneven wear is a sign the wheels need realigning.

17.6 Lights and Visibility

  • Regularly check all lights: low/high beams, brake lights, indicators, and rear fog lamps.
  • Replace any burnt-out bulbs immediately.
  • Keep lenses clean for optimal visibility.
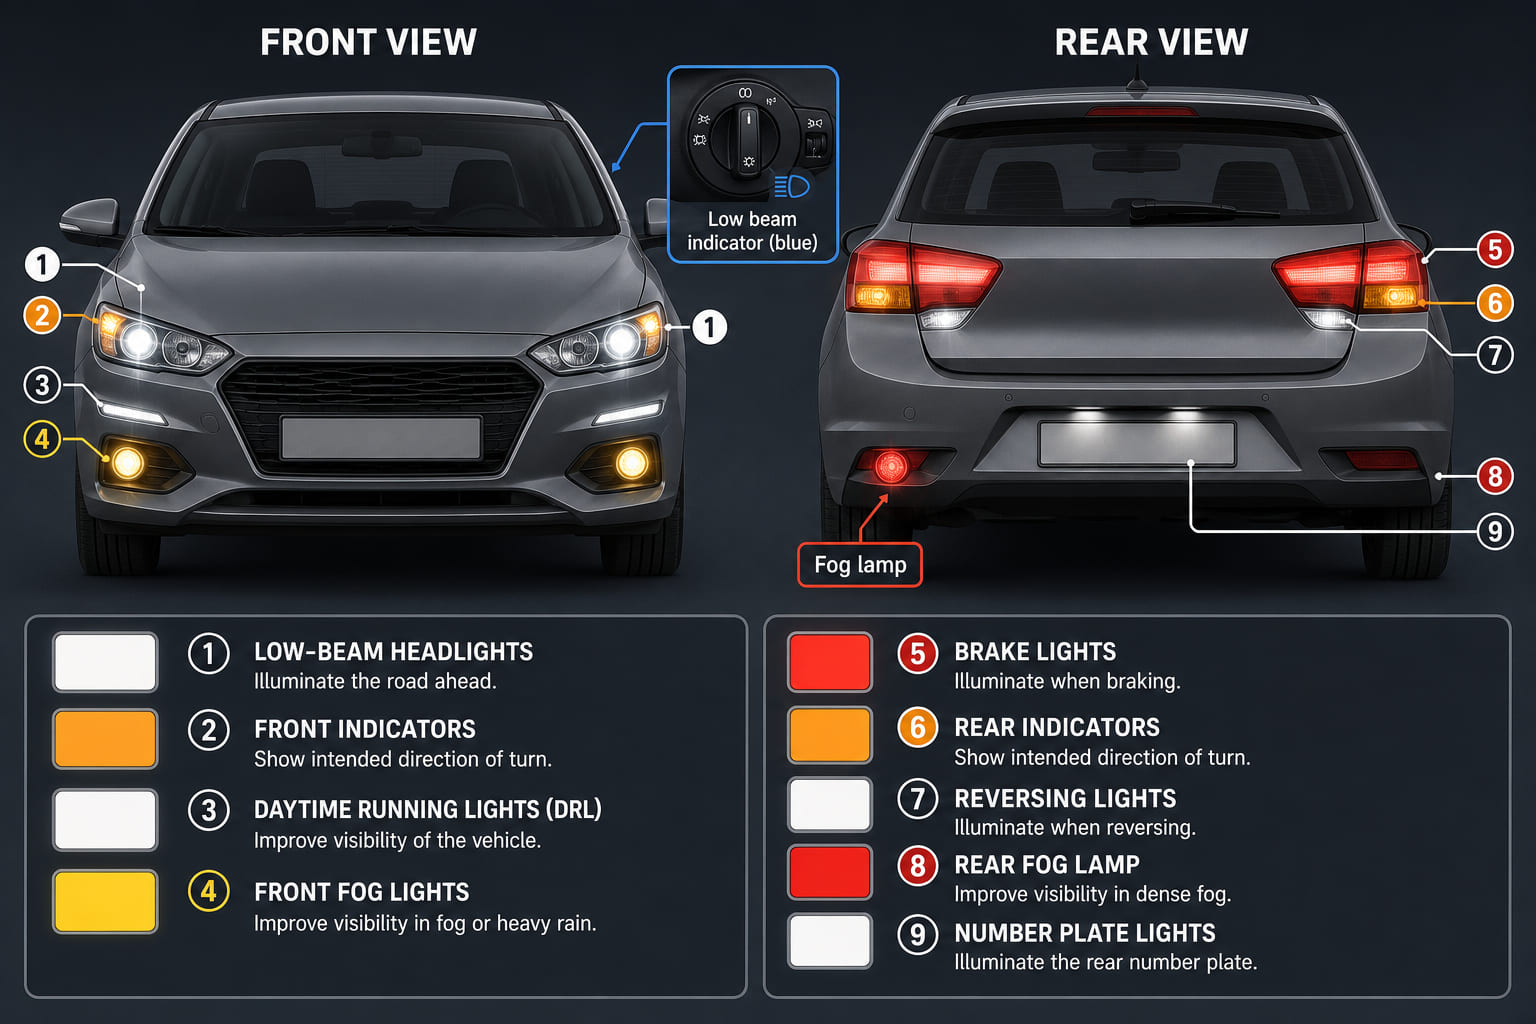
A combined front and rear car elevation diagram showing all light positions labelled and colour-coded. Front view: low-beam headlights (white), high-beam indicators (blue), front fog lights (yellow), front indicators (amber), daytime running lights (white). Rear view: brake lights (red), rear indicators (amber), rear fog lamp (red with distinctive "rear fog" label), reversing lights (white), number plate light (white). Each light type has a matching colour swatch and label.
Walk-around light check - know every light type, its colour, and where to find it on the car.

17.7 Wipers and Washer System

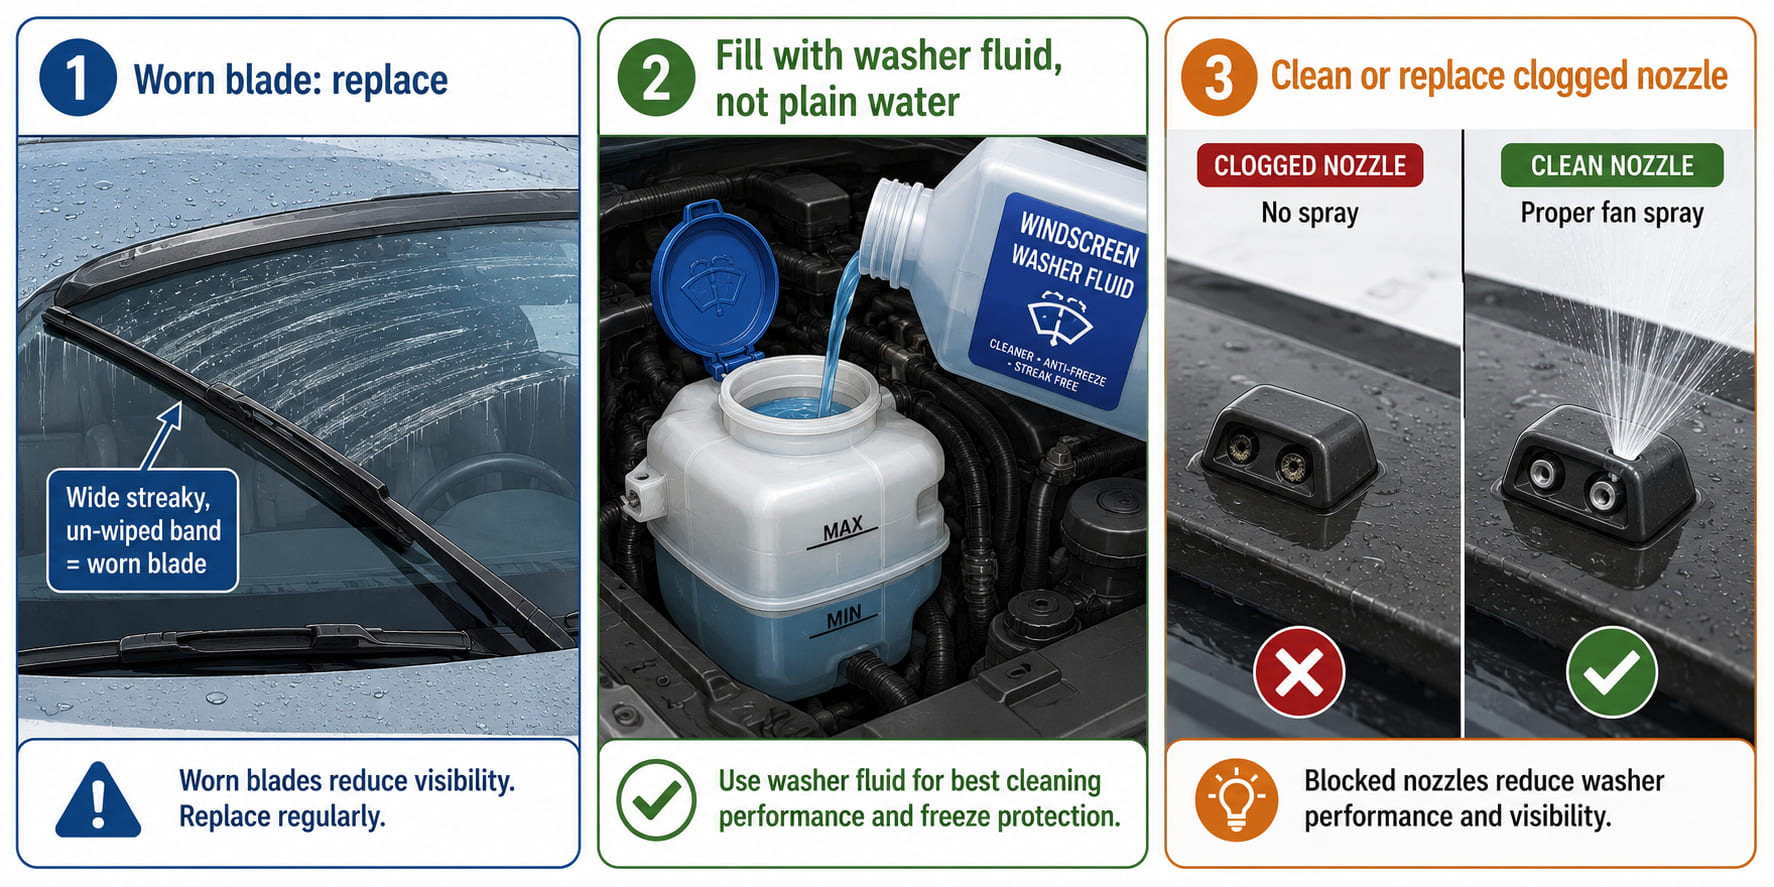
  • Replace blades if they streak or squeak.
  • Fill the reservoir with washer fluid.
  • Ensure nozzles are not clogged.
A three-panel wiper maintenance illustration. Panel 1: a wiper blade on a windshield leaving a streaky, un-wiped band of water - label "Worn blade: replace". Panel 2: an under-bonnet view of the washer fluid reservoir with a blue fluid bottle being poured in - label "Fill with washer fluid, not water". Panel 3: a close-up of a washer nozzle - left sub-panel shows a clogged nozzle with a blocked spray (red X); right sub-panel shows a clear nozzle spraying a proper fan pattern (green tick).
Streaky wipe = worn blade; no spray = clogged nozzle; empty reservoir = fill with proper washer fluid.

17.8 Belts and Hoses

Check regularly for cracks, leaks, or wear. Replace according to the manufacturer's schedule to prevent engine damage or overheating.
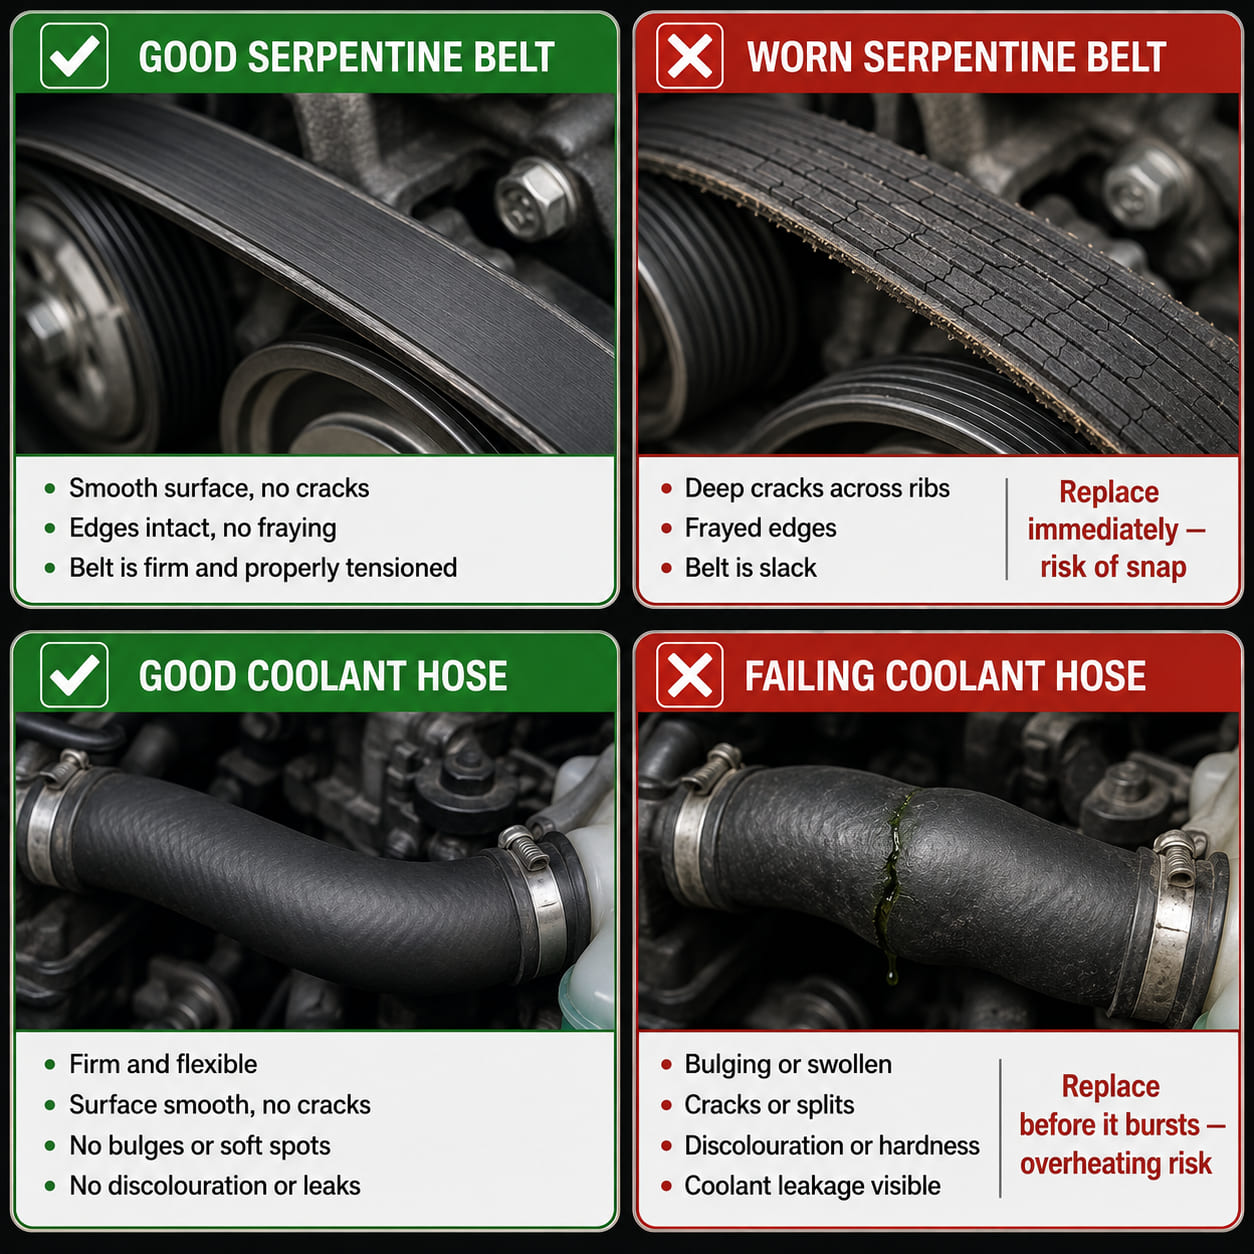
Two side-by-side comparison illustrations. Left illustration (belt): top panel shows a good belt - smooth, flexible, no cracks, correct tension (green checkmark); bottom panel shows a worn belt - deep transverse cracks, fraying on the edge, slightly slack (red X, label "Replace immediately"). Right illustration (hose): top panel shows a good coolant hose - firm, no bulges; bottom panel shows a failing hose - a visible bulge or crack leaking coolant (red X, label "Replace before it bursts").
Inspect belts for cracks and hoses for bulges - either can fail catastrophically with no warning.

17.9 Exhaust System

A malfunctioning exhaust increases pollution and noise. Inspect the muffler and pipes for corrosion or leaks.
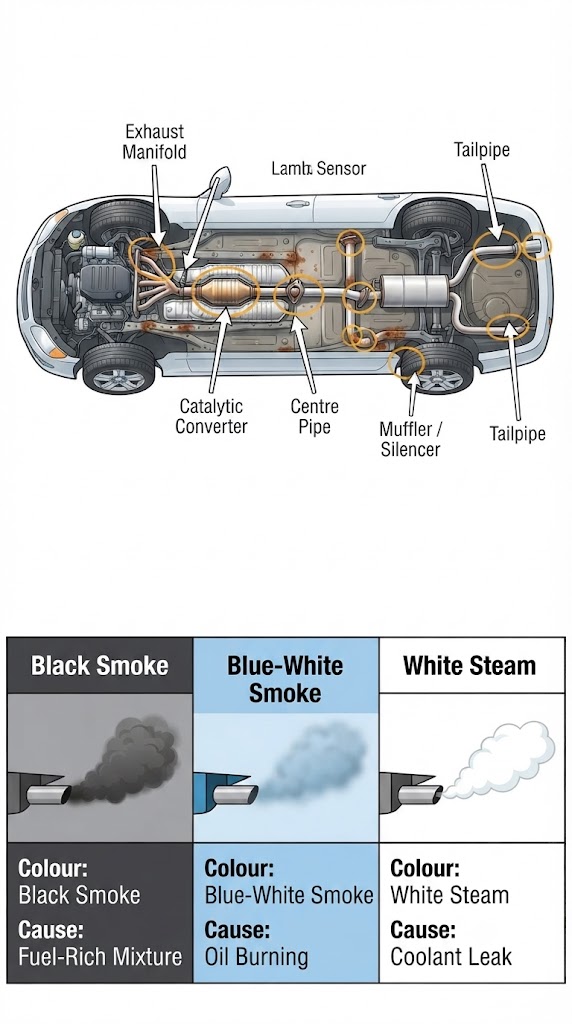
Two sub-images combined. Top: a side-profile exhaust system diagram from engine to tailpipe, with components labelled: exhaust manifold, lambda sensor, catalytic converter, middle pipe, muffler/silencer, tailpipe. Rust/corrosion hotspot zones are circled in amber (pipe joints and underside bends). Bottom: a three-cell smoke diagnostic quick reference - black smoke (rich mixture), blue/white smoke (oil burning), white steam (coolant leak) - each with its colour-matched smoke cloud icon.
Know your exhaust system and what your smoke colour is telling you.

17.10 Air and Cabin Filters

  • Air filter: keeps engine air clean. Replace as recommended to maintain performance.
  • Cabin filter: improves air quality inside the vehicle.
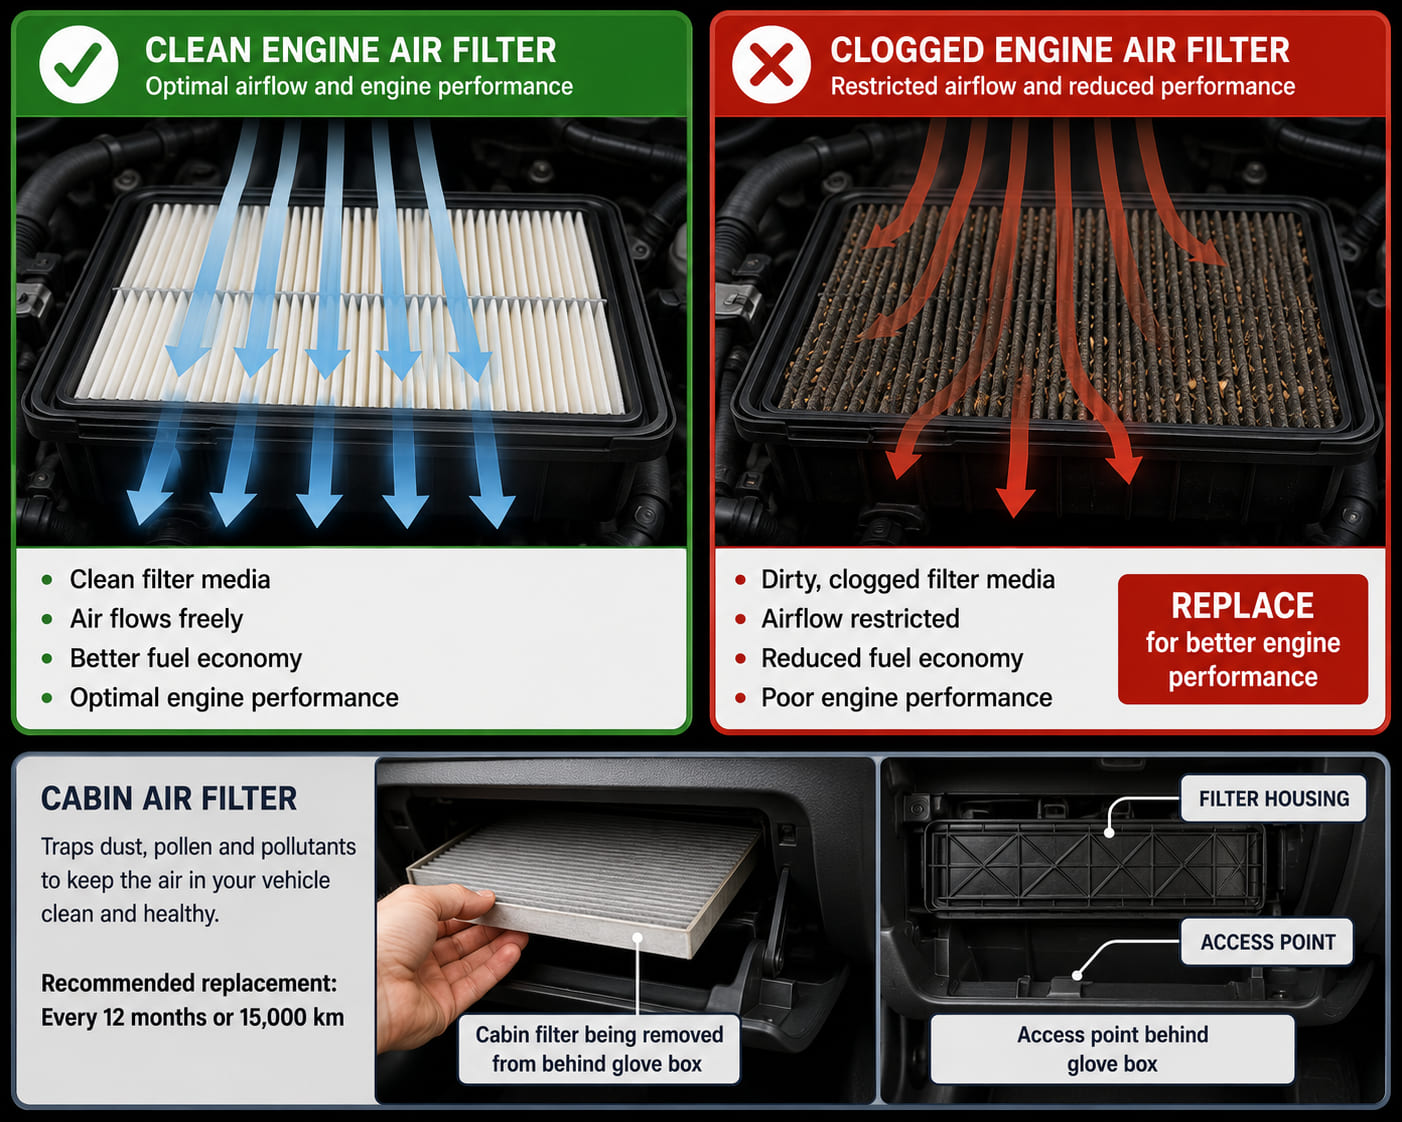
A two-panel filter comparison. Left panel: a clean engine air filter - white/light grey pleated paper element, clear airflow arrows passing through freely (green). Right panel: the same filter type clogged with dust and debris - dark grey/black pleated paper, airflow arrows blocked (red, label "Replace: restricted airflow reduces engine performance"). Below, a second sub-panel shows a cabin filter location: a hand pulling a cabin filter from behind the glove box, showing the filter slot position.
Clean vs. dirty filters - a clogged air filter reduces engine performance; a clogged cabin filter affects air quality inside.

17.11 Transmission and Steering Fluids

These fluids ensure smooth gear shifts and steering. Check levels regularly and top up with the correct fluid type.
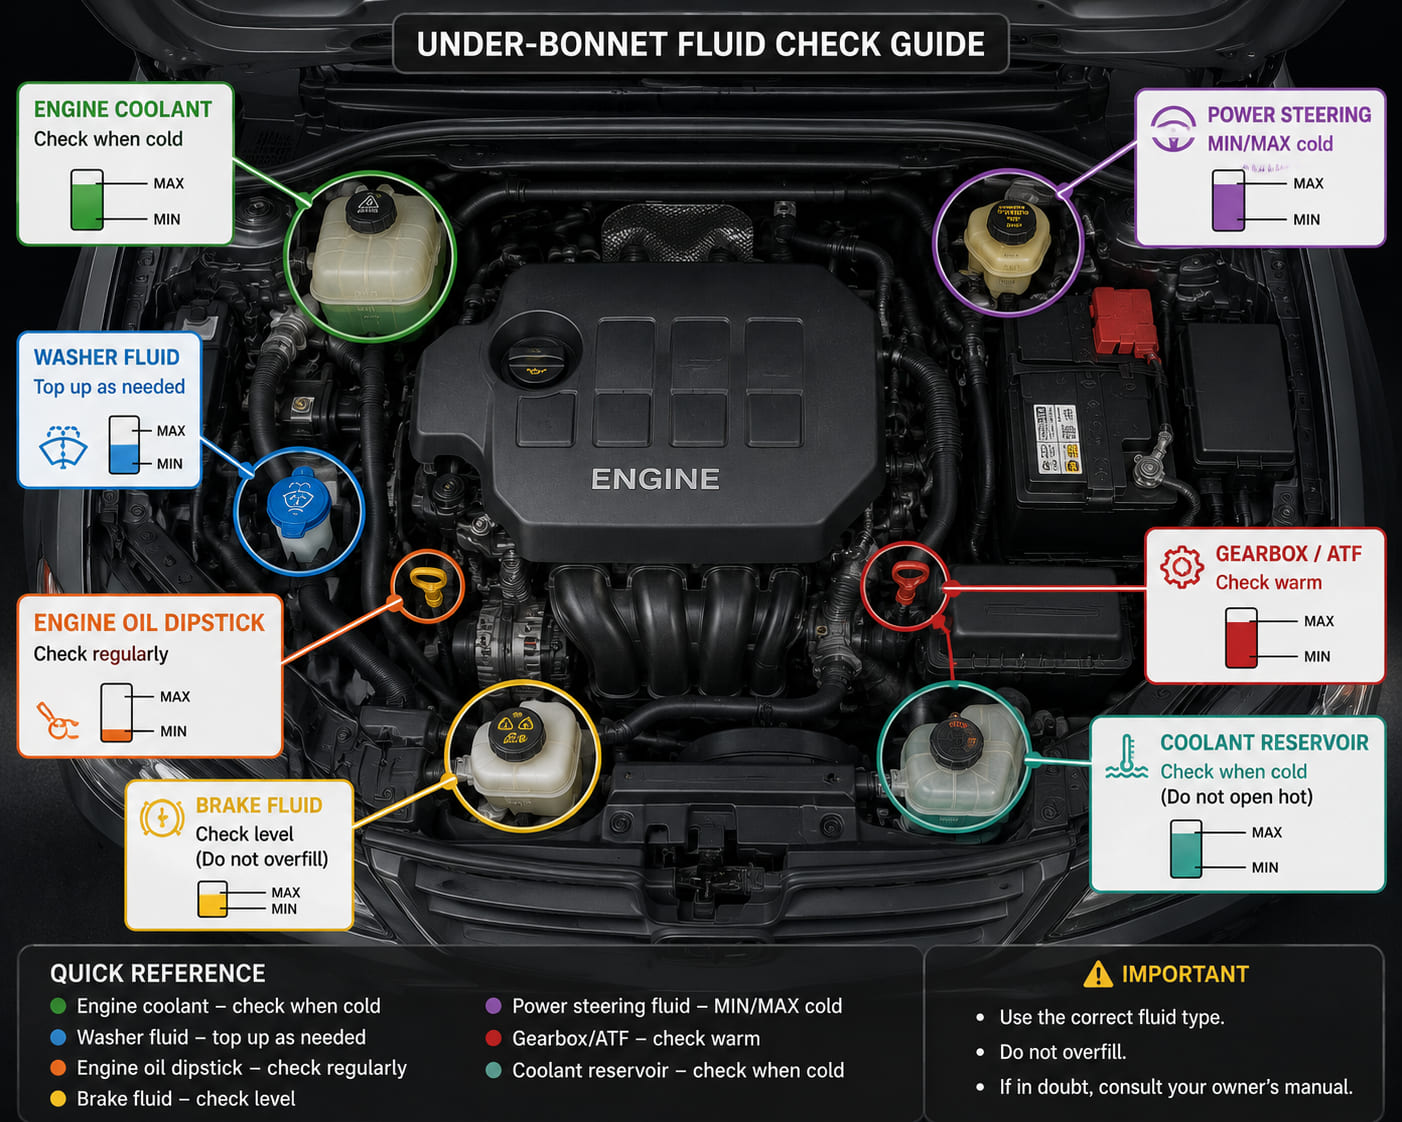
A top-down under-bonnet annotated map illustration. Key fluid reservoirs are highlighted with colour-coded circles and callout labels: transmission fluid dipstick (red circle, label "Gearbox/ATF"); power steering fluid reservoir (purple circle, label "Power steering - MIN/MAX"); brake fluid reservoir (orange, already shown in section 17.4 but repeated here for map context); coolant expansion tank (blue). Each reservoir has a MIN/MAX indicator shown in the inset. Clean infographic-map style.
Under-bonnet fluid check map - know where transmission and steering fluids live and how to check them.

17.12 Fuel System

Contaminated or poor-quality fuel can damage the engine. Use reputable fuel stations. Diesel vehicles may need water-separator drainage.
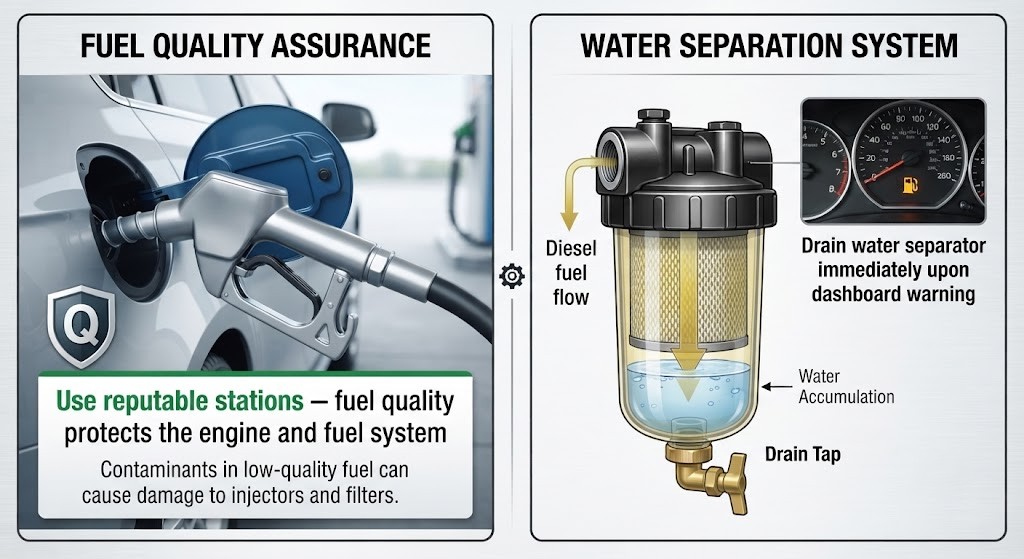
Two sub-images. Left: a fuel station pump nozzle being inserted into a car fuel filler, with a quality badge (brand pump logo area intentionally blank) and a label "Use reputable stations - quality fuel protects the engine". Right: a diesel water separator unit (a transparent bowl-shaped component on a fuel line under the bonnet), with a water accumulation visible at the bottom of the bowl and a drain tap indicator. A dashboard warning light inset shows the water-in-fuel warning symbol.
Use quality fuel and drain the diesel water separator when the warning light appears.

17.13 Seasonal Maintenance

Winter

Use antifreeze and winter-grade oil. Check battery health and tyre grip. Keep de-icer and gloves in the car.
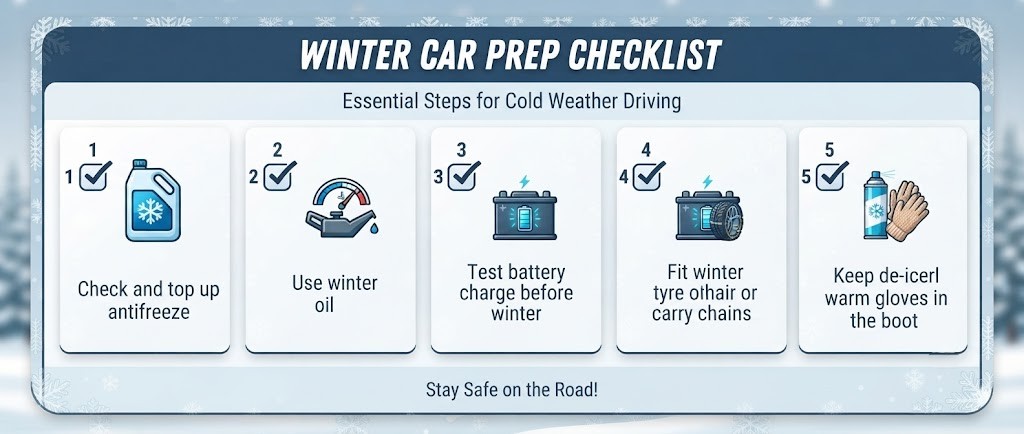
A winter-themed maintenance checklist card with a snowflake motif border. Five rows, each with a colour icon: (1) antifreeze bottle - "Check and top up antifreeze"; (2) oil can with a snowflake - "Use winter-grade oil"; (3) battery with a health check icon - "Test battery charge"; (4) winter tyre or snow chains - "Fit winter tyres or chains"; (5) de-icer can and gloves - "Keep de-icer and warm gloves in the boot". Cool blue-white colour palette.
Winter prep: antifreeze, winter oil, battery test, winter tyres, and a de-icer in the boot.

Summer

Prevent overheating: monitor coolant and radiator. Ensure air conditioning works properly. Avoid overinflated tyres due to heat.
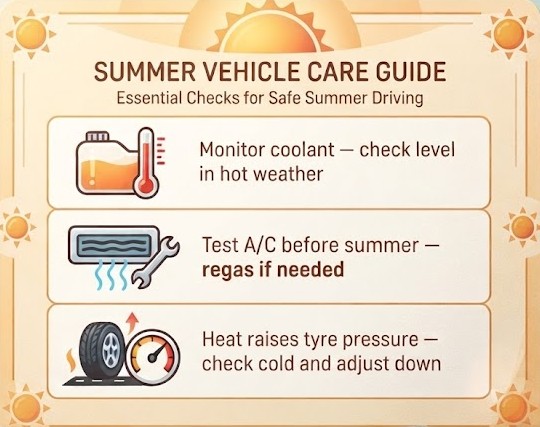
A summer-themed maintenance card with a warm orange/yellow sun motif. Three rows: (1) a coolant expansion tank with a high-temperature thermometer - "Monitor coolant in hot conditions"; (2) an air conditioning unit with a cold air flow symbol and a service spanner - "Test A/C before summer"; (3) a tyre with a heat arrow and an overinflation warning gauge - "Heat causes pressure rise - check cold and adjust". Warm amber-white colour palette.
Summer prep: coolant level, A/C function, and watch tyre pressure - heat raises it above recommended levels.

17.14 Maintenance Records

Keep a logbook of all inspections, replacements, and repairs. This helps plan maintenance and adds value when selling the car.
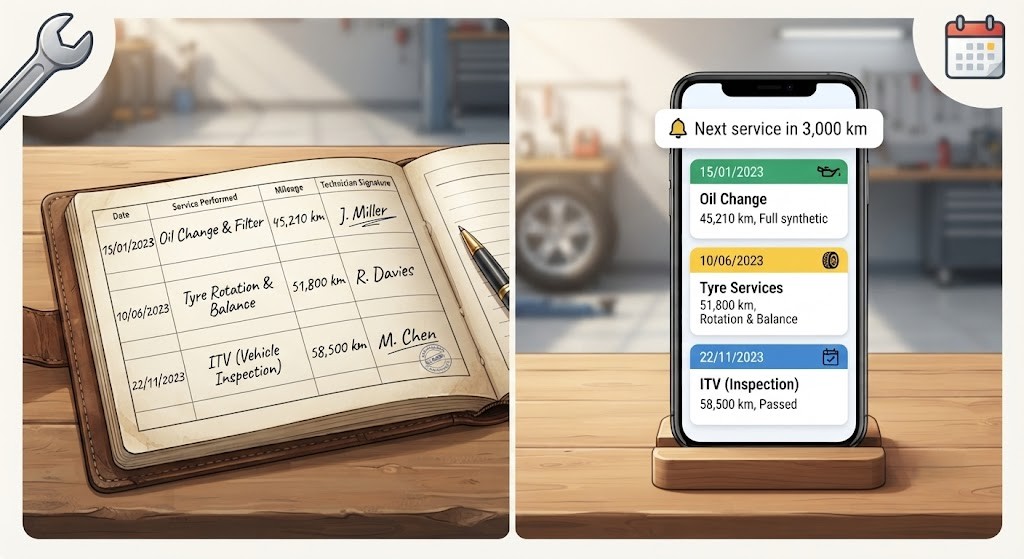
Two views side by side. Left: a physical maintenance logbook open to a filled page, with columns for date, mileage, service item, and technician signature. Several handwritten entries visible for oil change, tyre rotation, and ITV date. Right: a smartphone screen showing a digital service history app with the same entries in card format, plus a "Next service: 3,000 km" reminder notification. A spanner and calendar icon frame the composition.
A maintenance record - physical or digital - helps you plan ahead and proves care when selling the car.

17.15 Roadworthiness Test (ITV in Spain)

The ITV (Inspeccion Tecnica de Vehiculos) is mandatory in Spain and checks that vehicles are safe and comply with environmental standards. Good maintenance ensures your car passes this inspection with no issues.
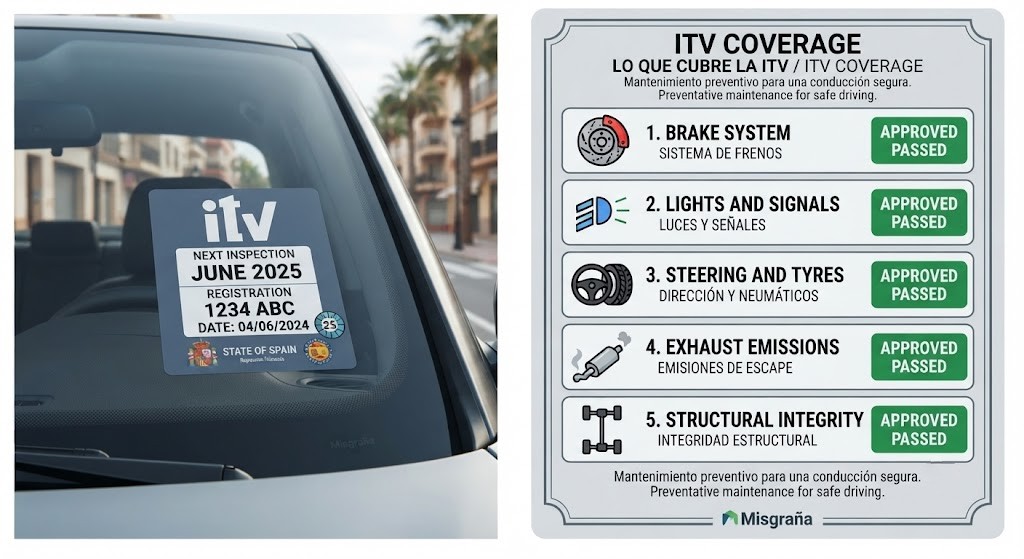
Two sub-images. Left: an illustration of a windscreen lower corner with an ITV inspection sticker showing a next-inspection date (month/year format) and a vehicle ID code - styled to match the Spanish ITV label colour scheme. Right: a checklist card of what the ITV covers: (1) braking system; (2) lights and signals; (3) steering and tyres; (4) exhaust emissions; (5) structural integrity / chassis. Each item has a corresponding icon and a pass/fail icon beside it.
The ITV tests five key areas - maintain these regularly and the test holds no surprises.

17.16 Tips for New Drivers

  • Get familiar with your car's maintenance schedule and user manual.
  • Never ignore warning lights on the dashboard.
  • Develop habits of checking levels and tyres weekly.
  • Ask a mechanic when unsure - preventive care is cheaper than repairs.
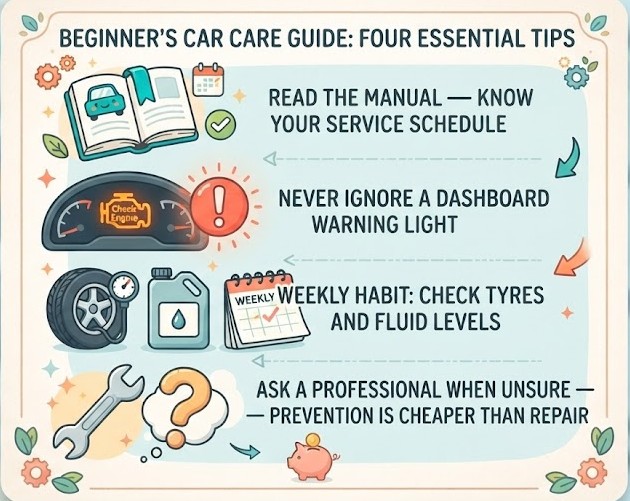
A friendly four-row tips card styled as a beginner's maintenance guide. Row 1: an open vehicle user manual / logbook icon - "Read the manual - know your service schedule". Row 2: a dashboard with a warning light icon illuminated - "Never ignore a dashboard warning light". Row 3: a tyre and a fluid drop beside a weekly calendar - "Weekly habit: check tyres and fluid levels". Row 4: a mechanic wrench icon - "Ask a professional when unsure - prevention is cheaper than repair". Approachable, clean flat design.
Four habits every new driver should build - the car manual, warning lights, weekly checks, and knowing when to ask.

17.17 Conclusion

Maintaining your vehicle is not optional - it is a critical part of being a safe and responsible driver. With regular care of the engine, fluids, tyres, brakes, and lights, you keep your car reliable, safe, and efficient for years to come.
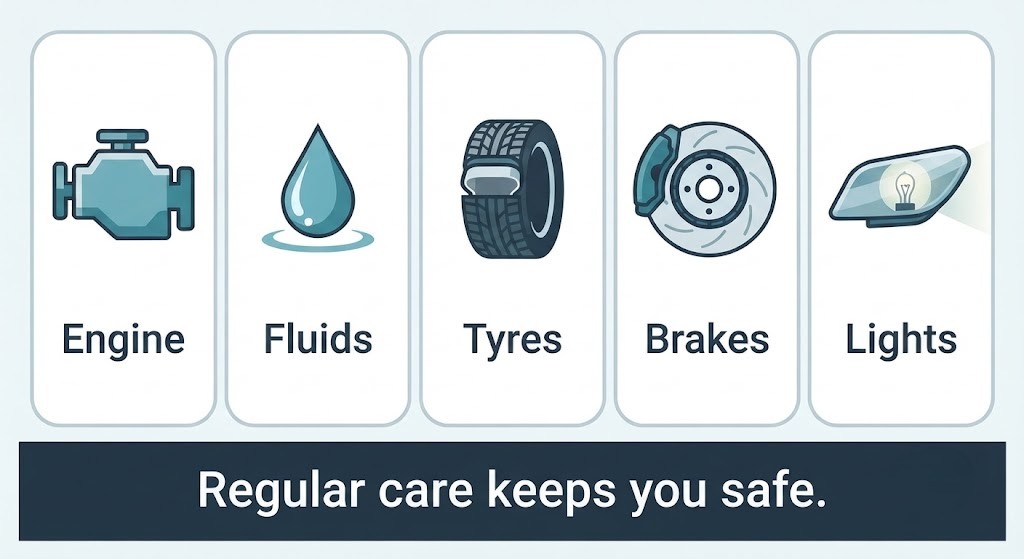
Regular care of engine, fluids, tyres, brakes, and lights keeps you safe.
A clean horizontal five-icon summary strip. Each icon sits in its own rounded cell: (1) engine block icon - "Engine"; (2) fluid drop icon - "Fluids"; (3) tyre icon - "Tyres"; (4) brake disc icon - "Brakes"; (5) light bulb icon - "Lights". Beneath all five cells, a full-width footer caption reads: "Regular care keeps you safe." Flat icon style, consistent colour palette, confident closing visual.
Five systems, one habit - engine, fluids, tyres, brakes, lights. Check them regularly.

Ready to test your knowledge?

Practice questions covering everything in Chapter 17 - Vehicle Maintenance.
Practice Chapter 17 →

Last updated: 2026-06-27

Practice the questions for this chapter

The theory is free to read. Create a free account to practice official-format questions and track your progress.