← Todos los capítulos
Driving Manual · Theory

Chapter 15 - Driver Assistance Systems (ADAS)

Advanced Driver Assistance Systems (ADAS) are electronic technologies designed to improve road safety, reduce accidents, and assist the driver. They use sensors, cameras, radars, and software to monitor the environment and support safe, comfortable, and efficient driving.
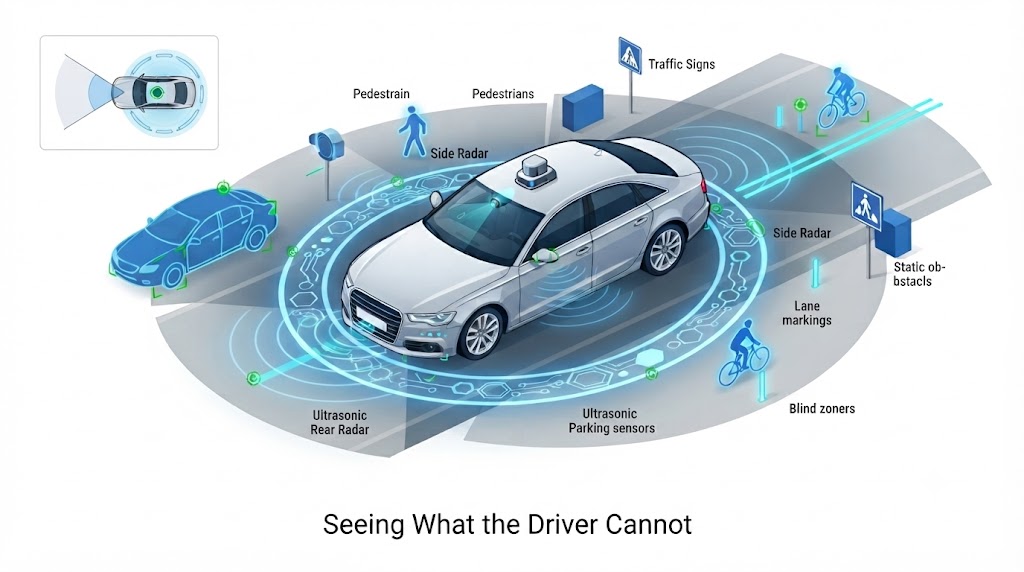
A modern car shown from a three-quarter front angle with sensor and camera overlay icons radiating outward in all directions: radar waves from the front bumper, camera cones from the windscreen, lidar pulses from the roof, and infrared beams from the rear corners - showing the vehicle sensing its full environment
ADAS turns the car into a 360° sensing platform - seeing what the driver cannot.

15.1 What Are ADAS?

ADAS are intelligent systems that provide alerts, assistance, or even intervention in dangerous driving situations. They are designed to minimise human error, which is responsible for over 90% of road accidents. Depending on their complexity, ADAS can offer passive alerts or actively control certain driving functions.
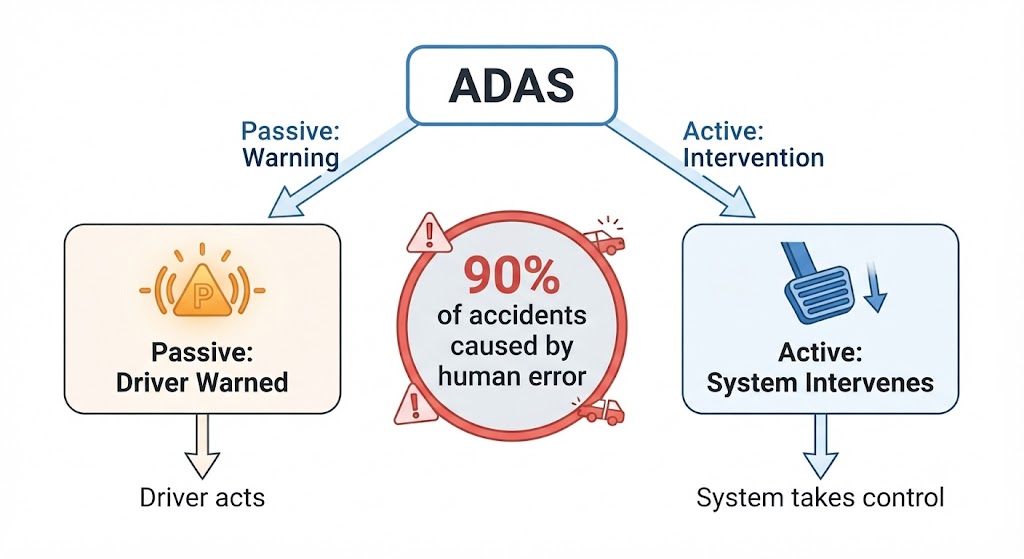
A two-branch diagram stemming from a central "ADAS" node. Left branch: "Passive ADAS" - a dashboard warning icon lights up, then an arrow to "Driver acts". Right branch: "Active ADAS" - a system intervention icon, then an arrow to "System takes control". A prominent callout badge in the centre reads "90% of accidents caused by human error".
Passive ADAS warns; active ADAS acts - both address the 90% of accidents rooted in human error.

15.2 Types of ADAS

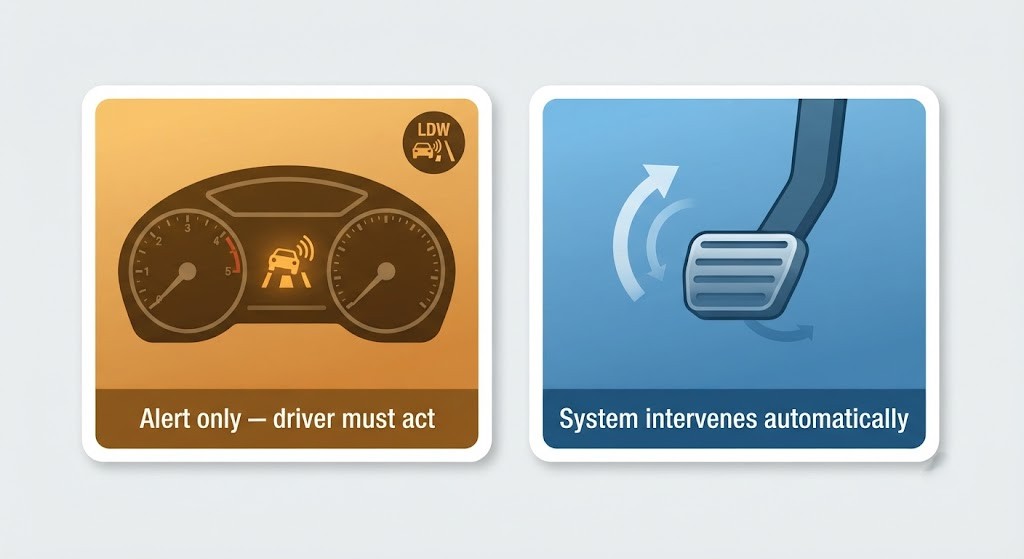
Passive systems Alert the driver to potential dangers without intervening (e.g., lane departure warning, traffic sign recognition).
Active systems Take control when necessary to prevent accidents (e.g., automatic emergency braking, adaptive cruise control).
Two side-by-side illustrated cards. Left card (Passive): a dashboard with a lane departure warning icon illuminated in amber, a driver alert symbol, and a label "Alert only - driver must act". An LDW icon is shown. Right card (Active): a brake pedal pressing itself downward with a motion arrow, and a label "System intervenes". An AEB icon is shown. Each card has a distinct background colour - amber for passive, blue for active.
Passive ADAS: alerts only. Active ADAS: the system steps in.

15.3 Main ADAS Features

Quick reference of the main systems:

SystemFunction
AEB - Automatic Emergency BrakingDetects obstacles and applies brakes if the driver does not react in time.
ACC - Adaptive Cruise ControlMaintains a safe distance from the vehicle ahead, adjusting speed automatically.
LDW - Lane Departure WarningAlerts the driver if the vehicle drifts out of its lane without signalling.
LKA - Lane Keeping AssistHelps steer the car back into the lane if an unintended departure is detected.
BSD - Blind Spot DetectionWarns of vehicles in the blind spot during lane changes.
TSR - Traffic Sign RecognitionReads and displays road signs such as speed limits or restrictions.
RCTA - Rear Cross Traffic AlertDetects vehicles approaching from the side when reversing.
Driver Drowsiness DetectionMonitors driver behaviour and alerts when signs of fatigue are detected.
Parking AssistAids parking with sensors, cameras, and in some vehicles automatic steering.
Night Vision AssistUses infrared to detect pedestrians or animals beyond the reach of headlights.
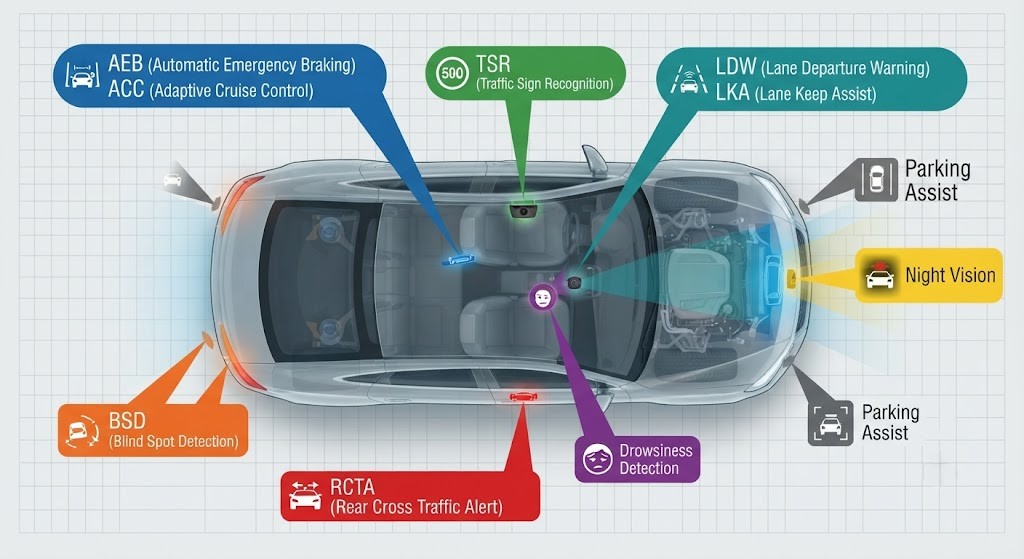
An annotated top-down car diagram with 10 labelled ADAS systems marked at their sensor locations using colour-coded arrows: AEB and ACC at the front radar (blue); TSR at the front camera (green); LDW and LKA at a front/roof camera (teal); BSD at both rear-corner radars (orange); RCTA at the rear bumper radar (red); Drowsiness Detection at a driver-facing camera (purple); Parking Assist at all four ultrasonic sensors (grey); Night Vision at an infrared sensor behind the grille (yellow).
Ten ADAS systems, each positioned at its sensor location on the car.

How Each System Works

Automatic Emergency Braking (AEB)

Activates the brakes on its own when the vehicle is about to hit something and the driver doesn't respond in time. Uses cameras, radar, or lidar to scan ahead - first warning the driver, then braking. Helps avoid or reduce rear-end collisions and can react to pedestrians, cyclists, and other obstacles.
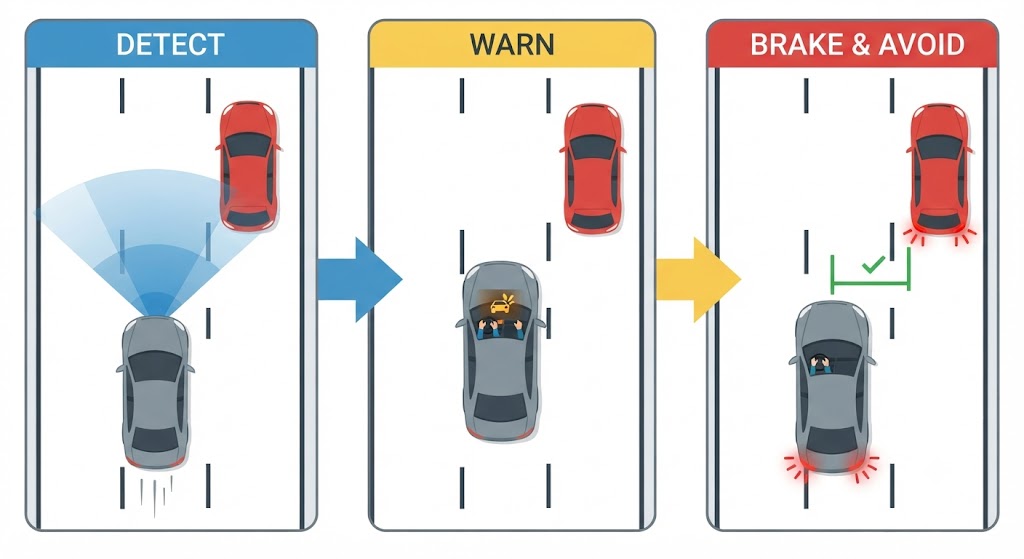
A top-down three-stage road sequence. Stage 1 - "Detect": a car approaching a stopped vehicle ahead, radar cone shown scanning forward, no action yet. Stage 2 - "Warn": the same car closer, a dashboard warning icon flashes and the distance narrows, driver still not responding. Stage 3 - "Brake": the car automatically braking, brake light indicators on, with a distance measurement showing the gap saved. Arrows connect each stage.
AEB: detect the hazard, warn the driver, then brake automatically - three stages before impact.

Adaptive Cruise Control (ACC)

Regulates speed automatically to keep a chosen gap from the vehicle ahead. Uses radar and camera sensors and can speed up or slow down with the situation. Eases workload on long trips or in congestion and helps prevent rear-end crashes.
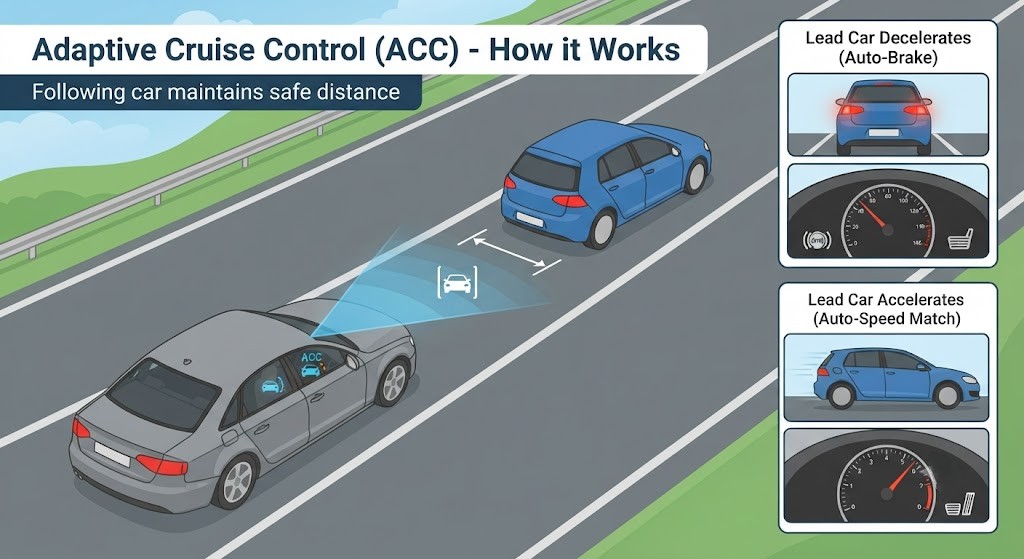
A motorway scene viewed from slightly above. Two cars are travelling in the same lane. The following car has a radar cone projecting forward (blue arc), maintaining a consistent gap to the car ahead - shown as a measurement bracket. Two inset panels: left - the lead car slows, the following car automatically reduces speed (speedometer needle dropping); right - the lead car accelerates, the following car matches it. A cruise control icon is visible on the dashboard.
ACC uses radar to hold a constant gap - automatically matching the speed of the car ahead.

Traffic Sign Recognition (TSR)

Detects speed-limit signs so the driver can adjust speed; the permitted speed is shown on the instrument cluster (and sometimes the head-up display). Some models can automatically reduce speed if exceeding the limit. Uses a front camera (and sometimes map data).
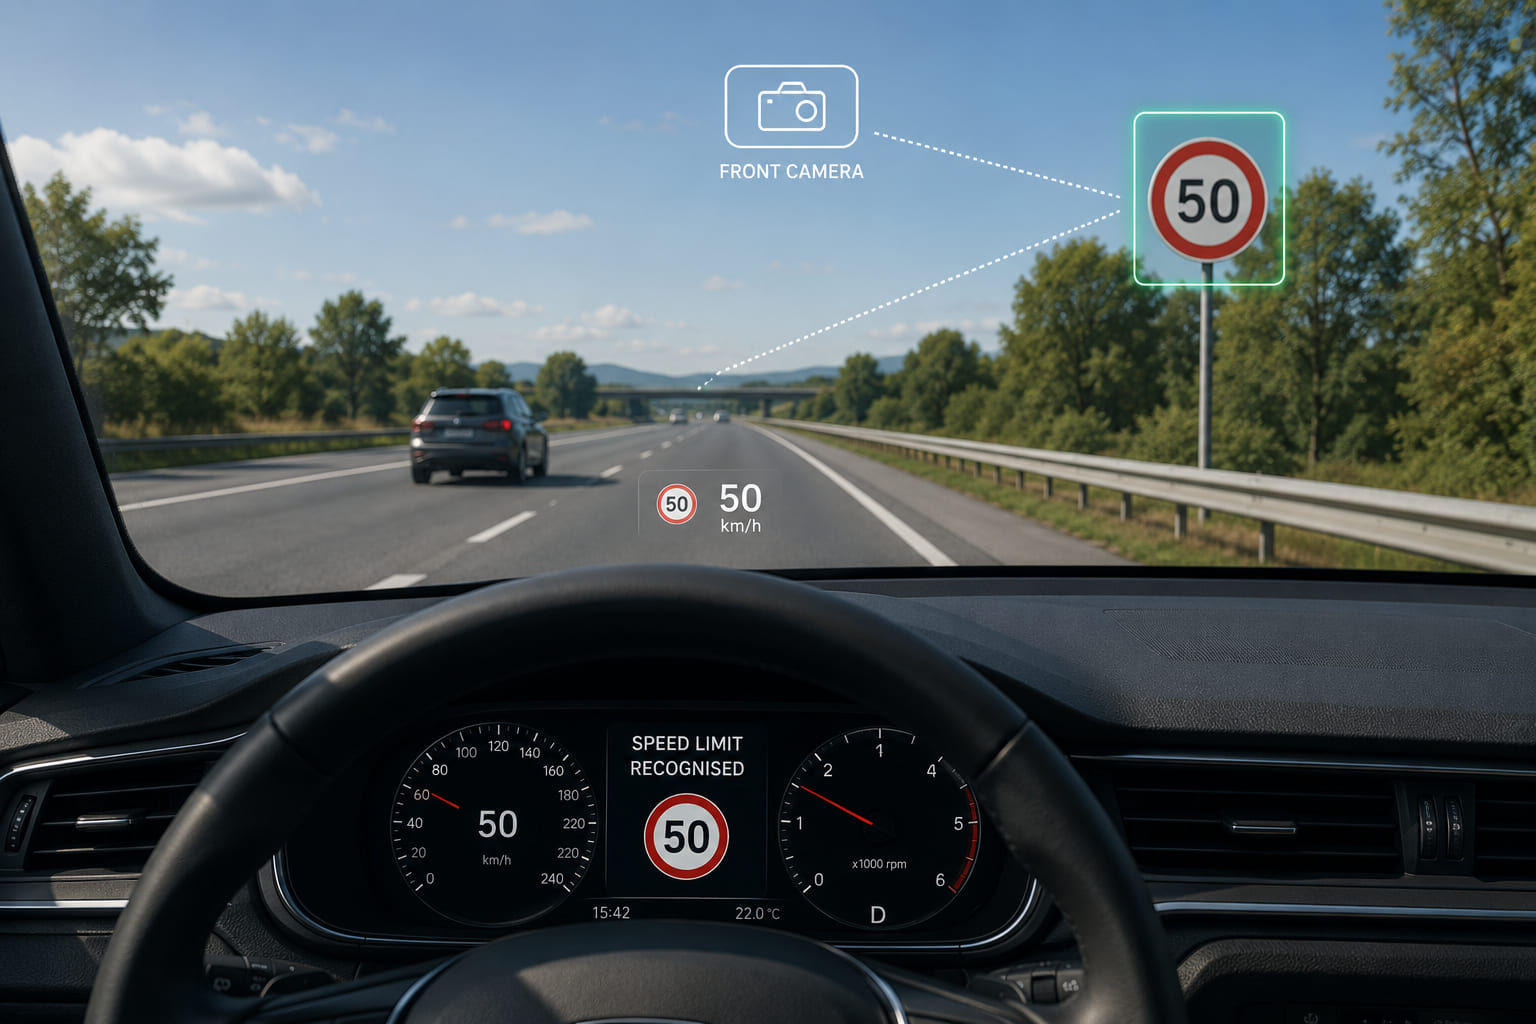
A first-person driver's-eye-view road scene. A 50 km/h speed limit sign stands at the roadside. A front-camera icon is overlaid on the windscreen with a capture cone pointing at the sign. On the instrument cluster in the foreground, the recognised limit "50" appears in a circular sign icon - matching the real sign. A small head-up display ghost shows the same limit projected on the windscreen glass.
TSR reads the speed limit sign and mirrors it on the instrument cluster in real time.

Blind Spot Detection (BSD)

Monitors areas the mirrors can't fully cover (sides and slightly behind), usually with radar sensors in the rear corners. A steady light appears in the side mirror when something enters the zone; if you signal toward that side, the alert intensifies (flashing or sound).
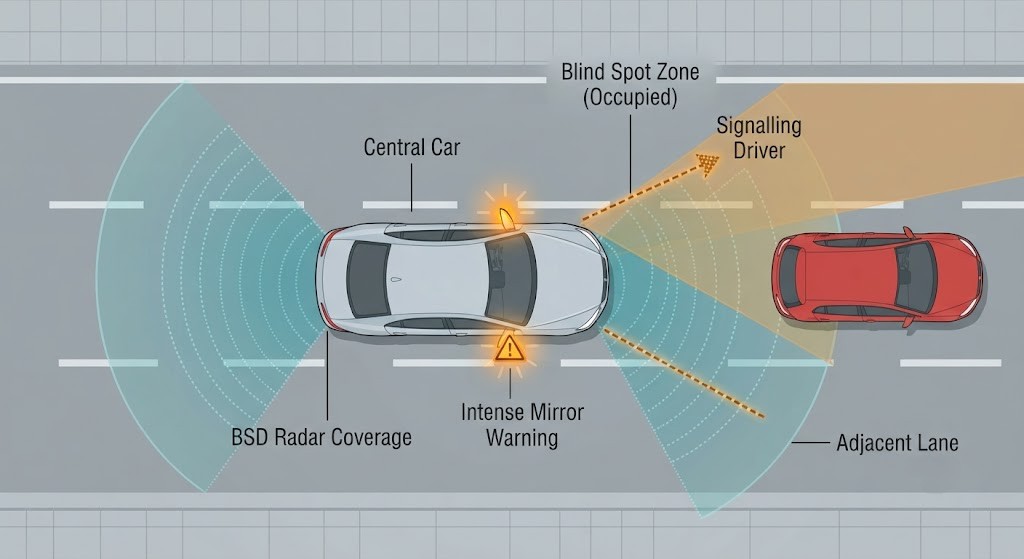
A top-down diagram of a car in the process of changing lanes. A second car is shown inside the right blind spot zone (amber shaded wedge). The right door mirror has a glowing amber warning triangle icon lit up. A dashed right-turn signal arrow indicates the driver is signalling toward the occupied blind spot - the mirror icon flashes brighter to signal danger. Radar sensor arcs from the rear corners sweep the blind zones.
BSD warns via the mirror light - if you signal toward a car in the blind spot, the alert intensifies.

Rear Cross Traffic Alert (RCTA)

Warns of vehicles approaching from the sides behind when reversing (e.g., backing out of a space). Issues an audible alert (and often a dashboard warning) so you can brake. Complements - but doesn't replace - proper rearward observation and slow reversing.
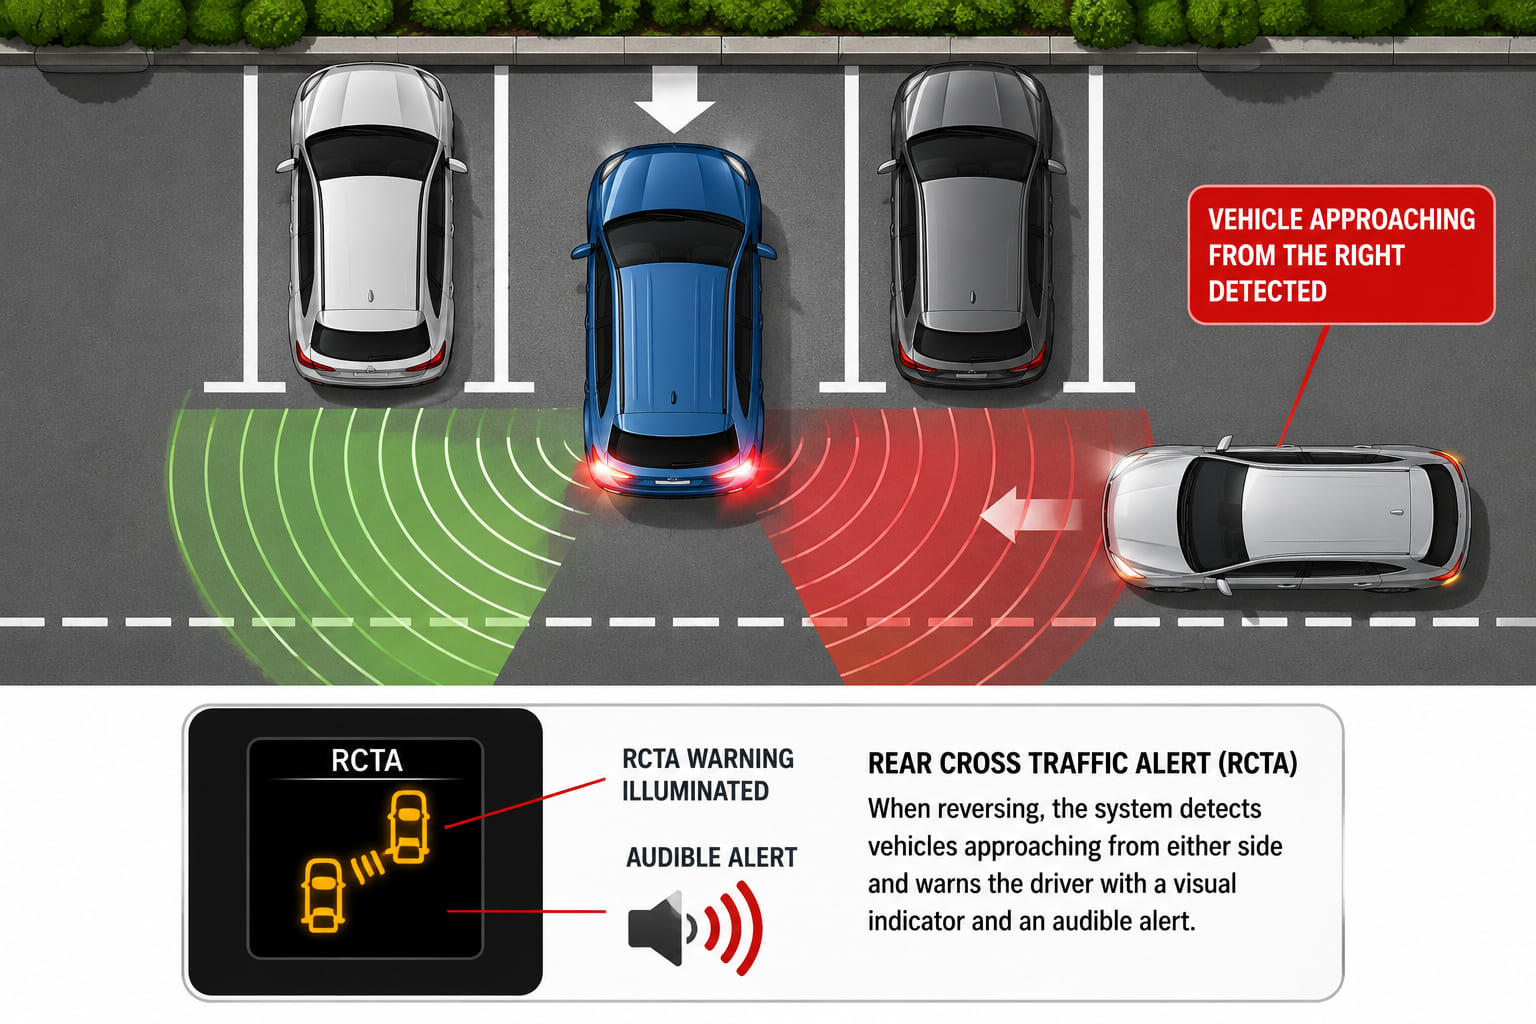
A rear-view diagram of a car reversing out of a parking space. Ultrasonic/radar sweep arcs project outward from the rear bumper in both lateral directions. From the right, another car is approaching along the lane - shown entering the radar sweep zone. A dashboard warning icon (rear cross alert symbol) lights up on an inset instrument cluster, and speaker sound wave icons indicate an audible alert. The reversing car's brake lights are on.
RCTA sweeps behind the car while reversing - alerting you to cross-traffic you cannot see.

Lane Departure Warning (LDW)

Warns when the vehicle unintentionally drifts out of its lane (typically due to distraction or drowsiness) via a dashboard light, chime, or steering-wheel/seat vibration, prompting you to correct your path.
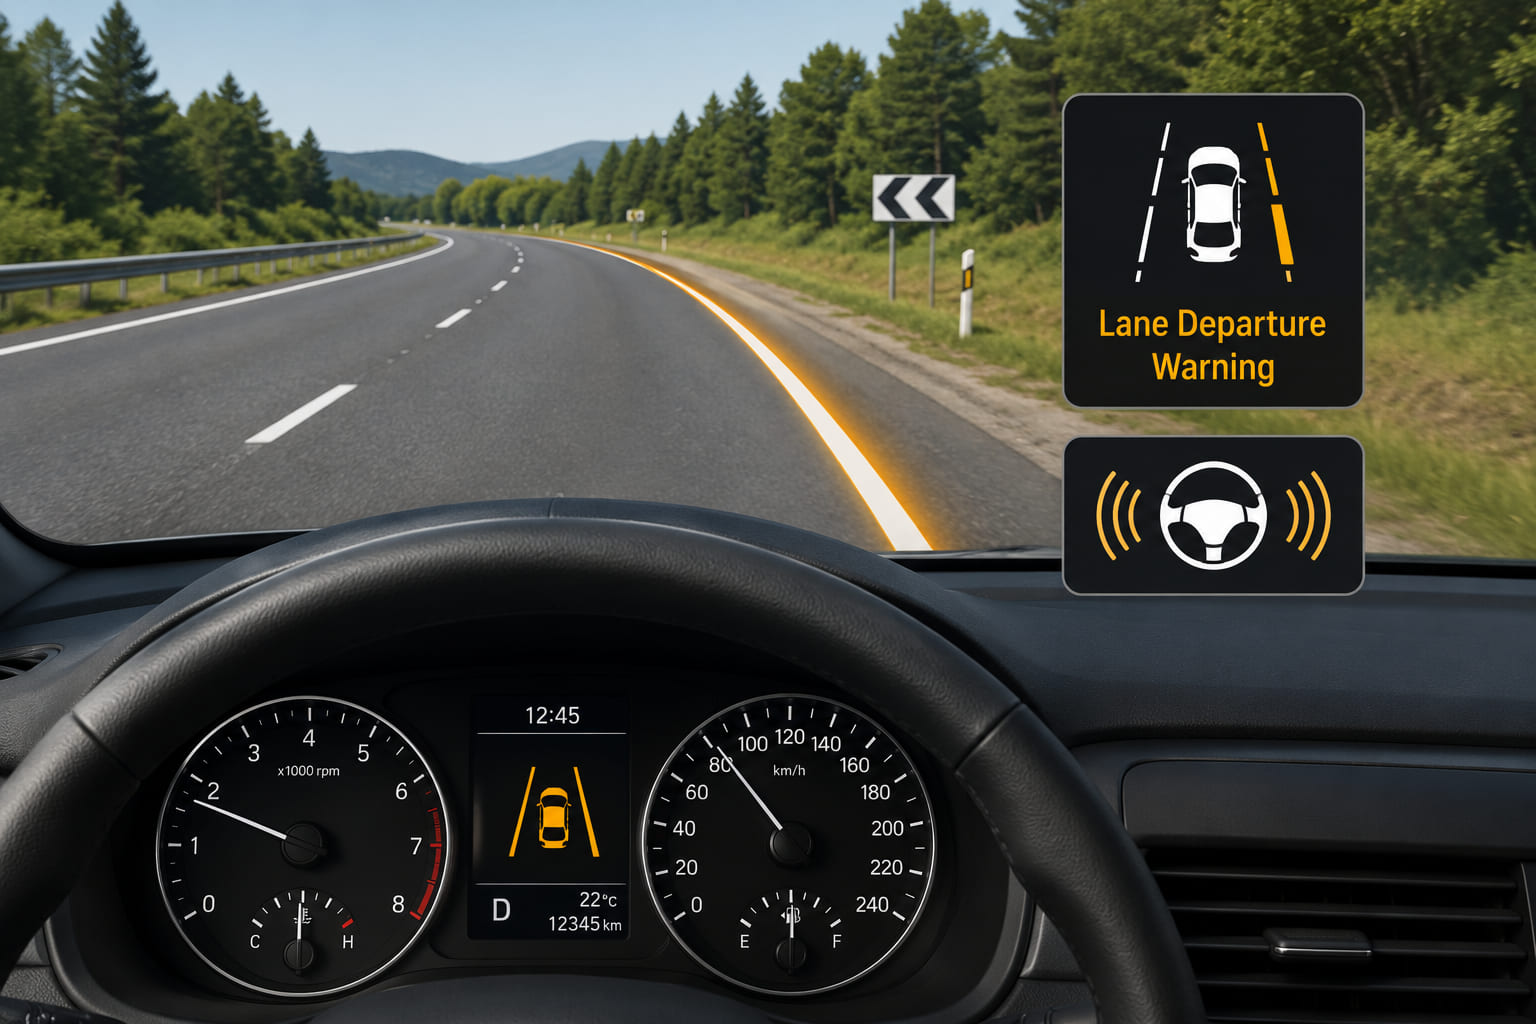
A driver's-eye-view road scene. The car is drifting to the right, crossing the right lane marking without a turn signal active. The right lane line is highlighted in amber as the tyre crosses it. On the instrument cluster in the foreground, a lane departure warning icon (car between two lines) illuminates in amber. A small steering-wheel icon shows vibration lines indicating haptic feedback. No active correction is applied - only the alert.
LDW alerts via dashboard, chime, or vibration - the driver must correct the drift.

Lane Keeping Assist (LKA)

Uses cameras to track lane lines and keep the vehicle centred. On unintended drift without the turn signal, it can warn or apply a small steering correction (sometimes light braking) to guide the car back. A support tool, never a replacement for attention.
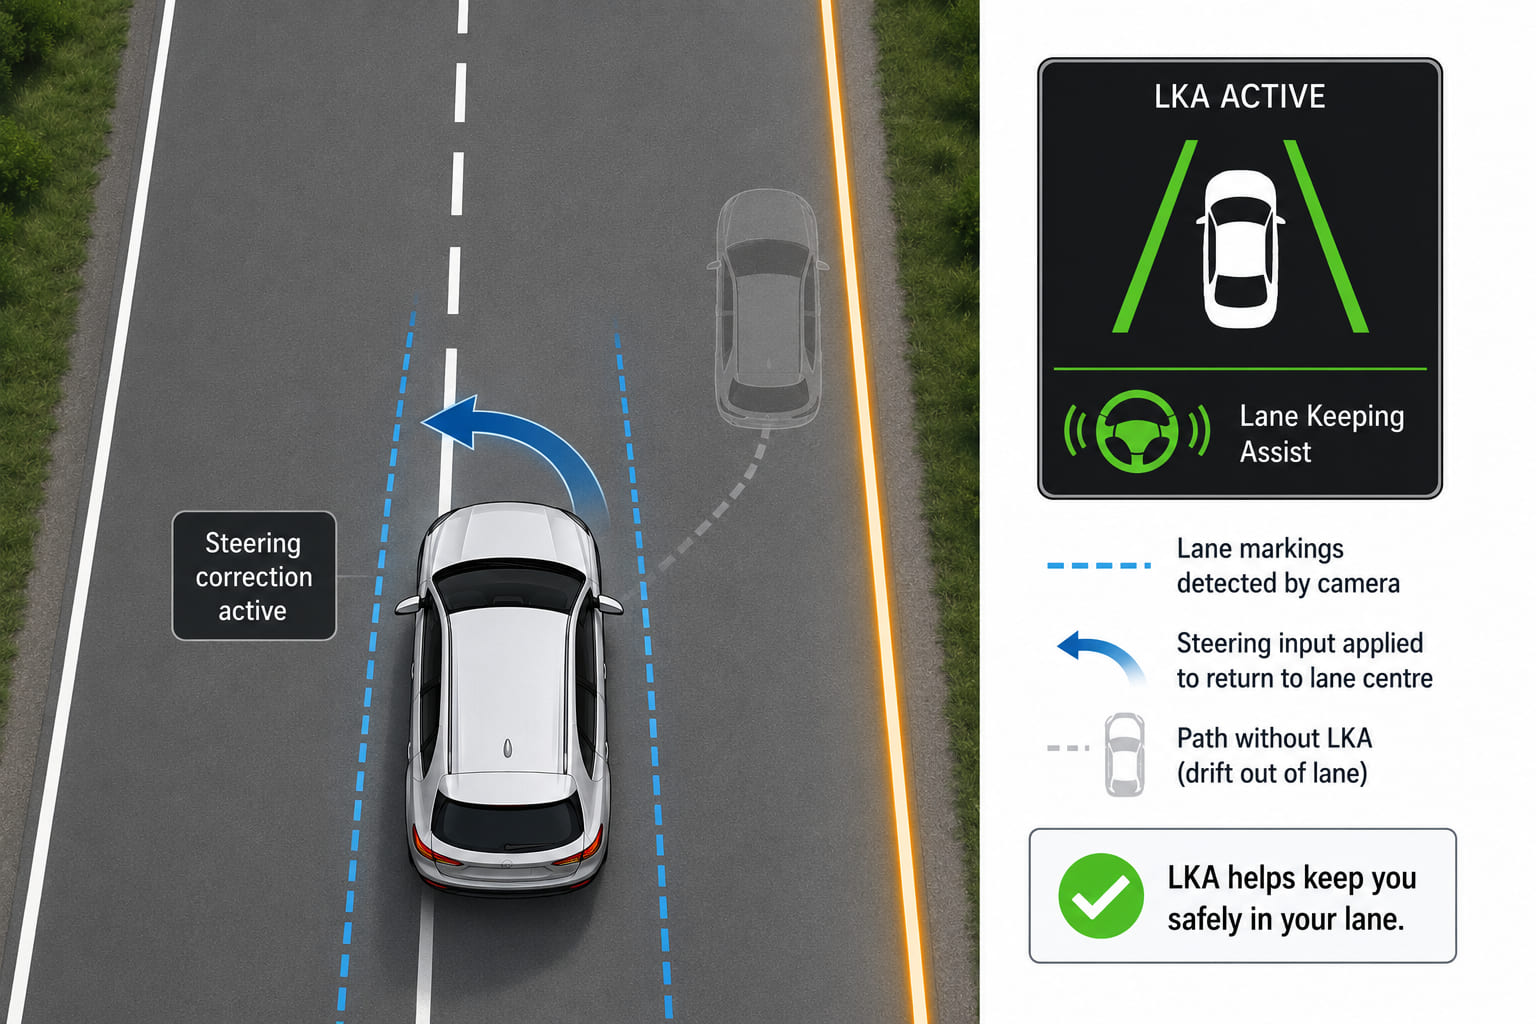
A top-down road diagram. A car is shown drifting toward the right lane line without a turn signal. The camera icon on the roof is tracking both lane lines (shown as dashed detection lines). A curved steering correction arrow is overlaid on the car, gently steering it back toward the lane centre. The lane line it was approaching is highlighted in blue. An inset dashboard shows the LKA icon active (green).
LKA goes one step further than LDW - it applies a gentle steering correction to bring the car back.

Parking Assist

Helps you park or exit: finds suitable spaces (scanning gaps as you pass), displays surroundings with cameras/sensors, and can steer automatically. The driver must stay attentive, check mirrors and surroundings, control speed/gears/braking as instructed, and interrupt the manoeuvre if unsafe.
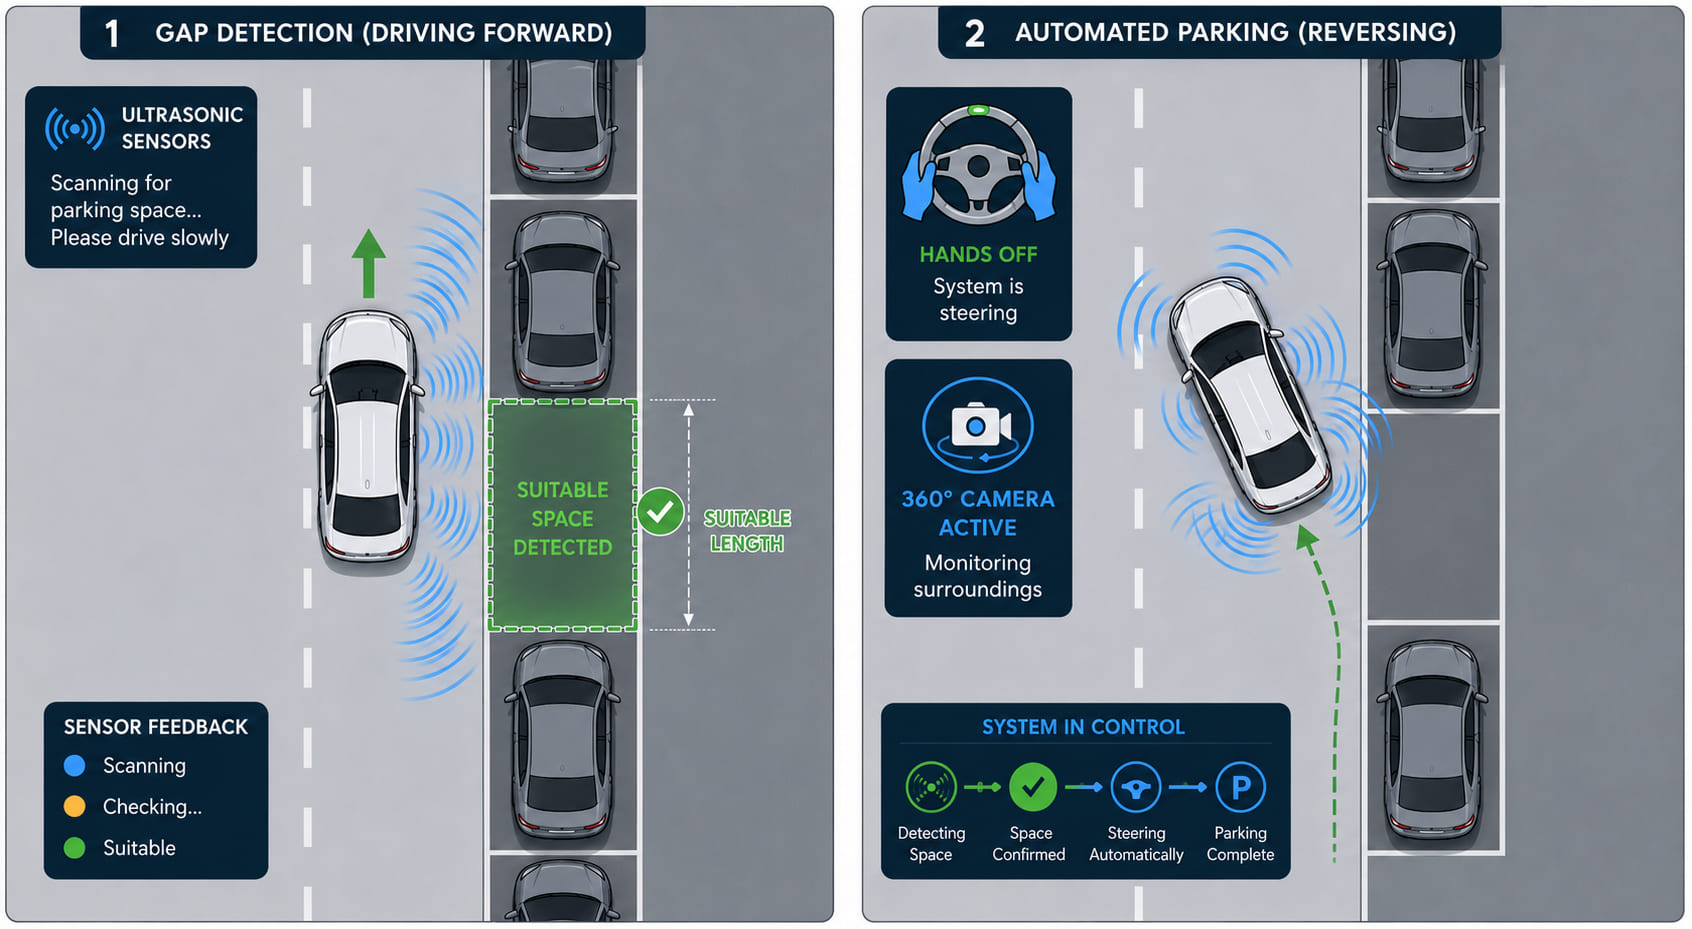
A top-down sequence diagram. Left: a car driving slowly past a row of parked cars, ultrasonic sensor arcs sweeping the side to measure gap length - a gap large enough is highlighted green. Right: the same car now automatically steering into the space (curved steering path arrow shown), while the driver's hands are off the wheel. Four sensor rings on all bumpers show the active detection zones. A camera icon shows the 360° surround view active.
Parking Assist finds the gap, plans the trajectory, and steers - the driver controls speed and brakes.

Hill Start Assist (HSA)

Prevents the vehicle rolling backward when setting off on a steep incline. Holds the brakes briefly (about 1-2 seconds) while you move from brake to accelerator (or clutch). Activates on uphill starts and often reversing uphill - accelerate promptly and with control.
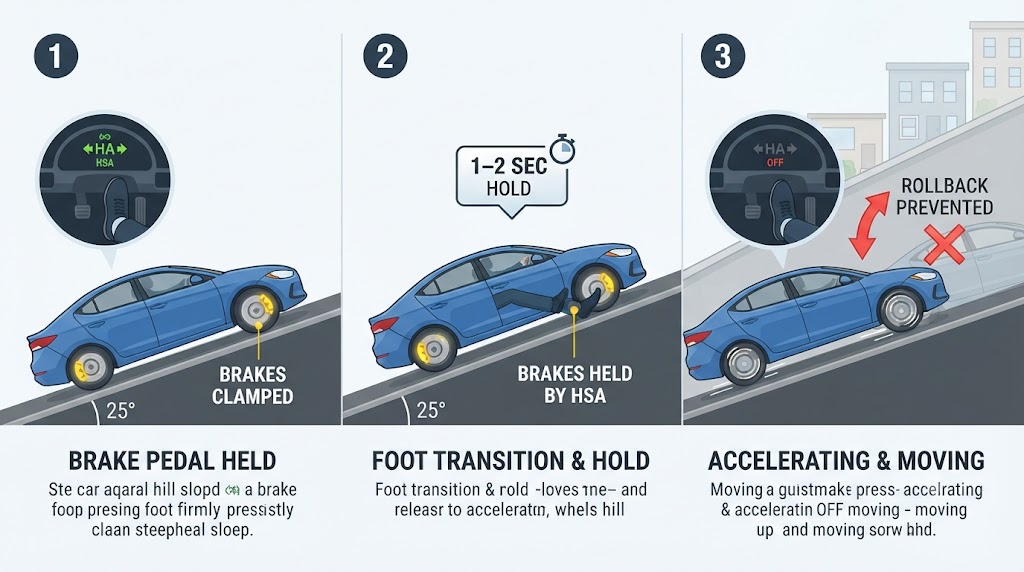
A side-view diagram of a car on a steep uphill slope. Three sequential frames: Frame 1 - driver's foot on brake, HSA active indicator on, brakes holding (brake caliper icon glowing). Frame 2 - foot moving from brake to accelerator, a 1-2 second timer badge visible, brakes still held automatically. Frame 3 - foot on accelerator, car moving forward up the hill without rollback. A red X with a rolling-back car icon shows what HSA prevents.
HSA holds the brakes for 1-2 seconds while you move your foot from brake to accelerator - no rollback.

Driver Drowsiness Detection

Uses sensors or cameras to observe steering corrections, facial cues, and eye activity to identify fatigue, then triggers visual or sound warnings to keep the driver alert.
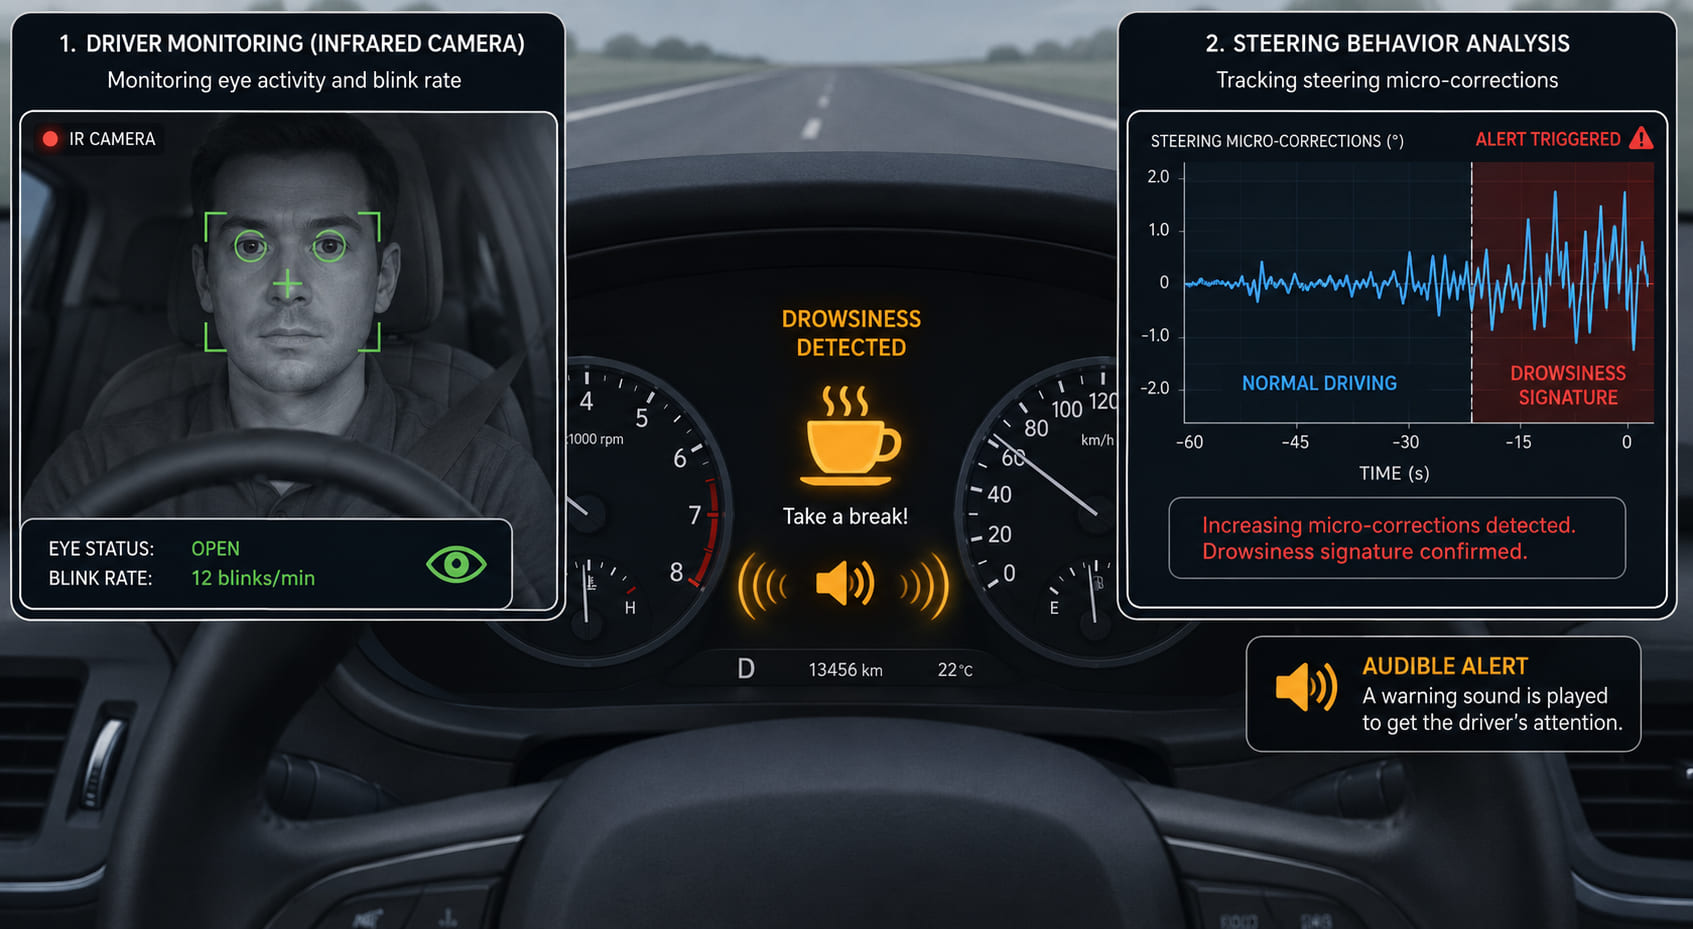
A dashboard view with two inset panels. Main panel: instrument cluster showing a drowsiness alert icon (coffee cup symbol) illuminated in amber, with a sound wave indicating an audible warning. Left inset: a driver-facing camera behind the steering column showing a blinking eye-tracking overlay monitoring blink rate and head position. Right inset: a steering corrections graph showing increasing micro-corrections (a drowsiness signal) just before the alert fires.
Drowsiness Detection monitors eyes, head position, and steering patterns - then wakes you up with an alert.

Night Vision Assist

Improves visibility in darkness or bad weather, far beyond headlights. Uses infrared sensors to capture heat signatures from pedestrians, animals, or obstacles, projecting an enhanced view onto the instrument or head-up display so dangers are spotted earlier.
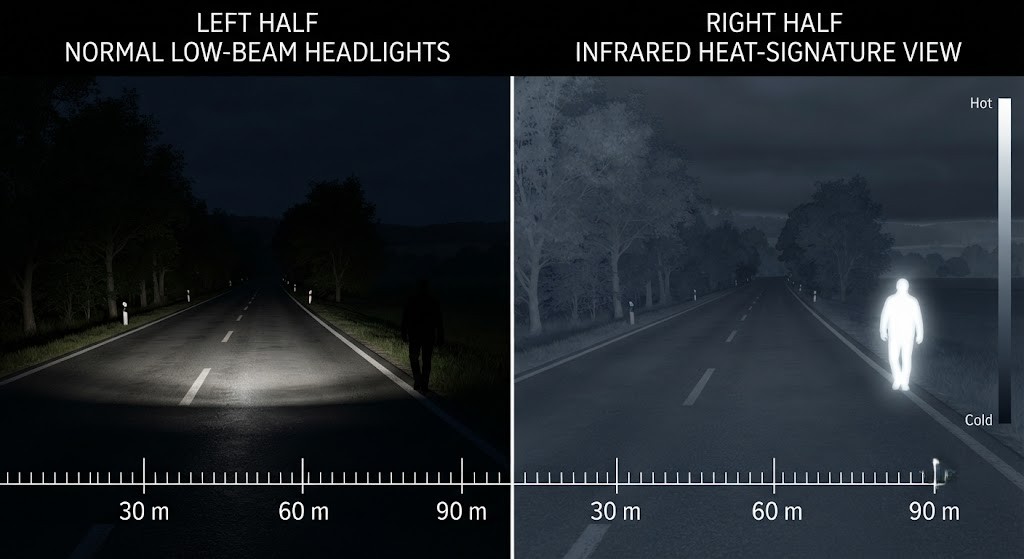
A split-screen comparison. Left side: a realistic night road scene illuminated only by low-beam headlights - visibility ends about 50 m ahead, a pedestrian at 90 m is invisible. Right side: the same scene shown as an infrared heat-signature view - the pedestrian glows bright white against a dark background at 90 m, clearly visible. A distance ruler runs along the bottom of both panels for comparison.
Night Vision extends detection far beyond headlights - the infrared view reveals what the eye cannot see.

15.4 Benefits of ADAS

  • Accident prevention: systems like AEB and LKA can avoid or reduce the severity of crashes.
  • Driver comfort: less stress in heavy traffic or long-distance driving.
  • Fuel efficiency: smooth driving supported by adaptive systems reduces fuel consumption.
  • Protection for vulnerable users: detects pedestrians and cyclists, improving urban safety.
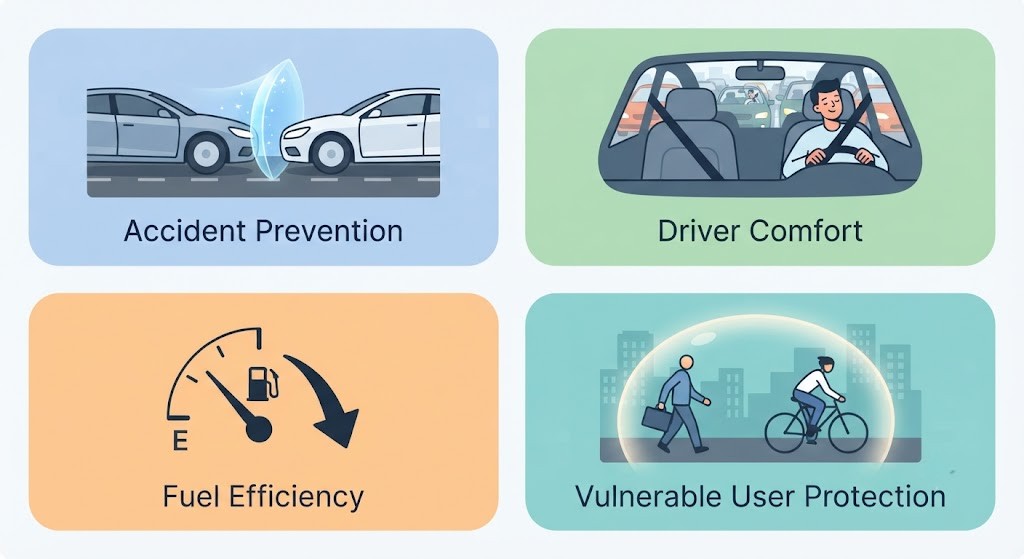
A 2×2 icon benefits grid with a clean flat design. Top-left: a crash being avoided (two cars with a shield blocking impact) - "Accident Prevention". Top-right: a relaxed driver leaning back in traffic - "Driver Comfort". Bottom-left: a fuel gauge with a downward arrow - "Fuel Efficiency". Bottom-right: a pedestrian and cyclist inside a protective halo - "Vulnerable User Protection". Each cell has a soft pastel background.
Four clear benefits of ADAS - safety, comfort, efficiency, and protection for all road users.

15.5 Limitations of ADAS

  • Weather interference: heavy rain, snow, fog, or dirt may impair camera and sensor function.
  • Maintenance dependency: sensors and cameras must be clean, calibrated, and maintained.
  • Driver complacency: over-reliance can lead to inattention and reduced driving skill.
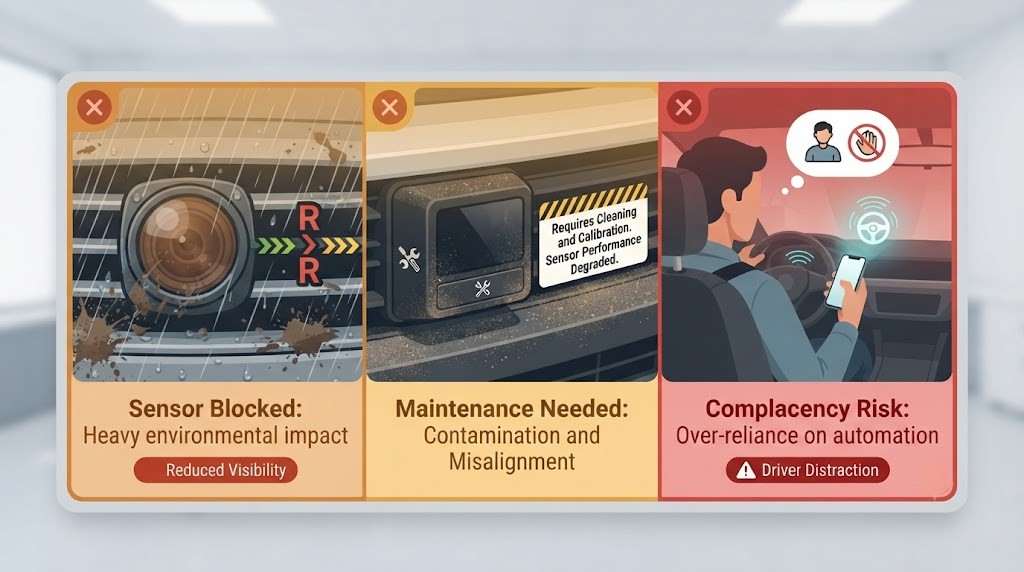
A three-cell horizontal limitations card with a slightly cautionary red-amber colour palette. Cell 1: a camera lens obscured by rain and mud splatter, sensor signal broken - "Weather interference". Cell 2: a dirty sensor with dust and a warning maintenance label - "Requires cleaning and calibration". Cell 3: a driver with hands off the wheel, eyes looking at a phone, an ADAS icon doing the driving - "Complacency risk". Each cell has a red X badge in the corner.
Three key limitations: ADAS cannot see through mud, needs maintenance, and must never replace driver attention.

15.6 ADAS and EU Regulations

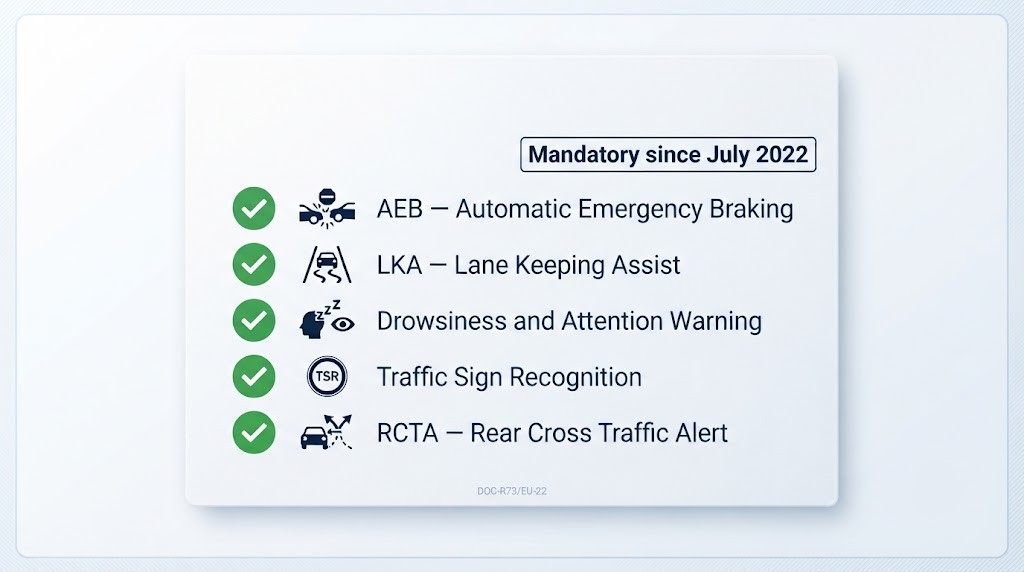
As of July 2022, the European Union requires several ADAS technologies in all new vehicles sold within the EU:

  • Automatic Emergency Braking (AEB)
  • Lane Keeping Assist (LKA)
  • Driver drowsiness and attention warning systems
  • Traffic sign recognition systems
  • Rear cross traffic alert (RCTA)
A compliance checklist card with a blue EU flag badge in the top-right corner and a "Mandatory since July 2022" date stamp. Five rows, each with a green checkmark: (1) AEB - Automatic Emergency Braking; (2) LKA - Lane Keeping Assist; (3) Drowsiness Warning; (4) Traffic Sign Recognition; (5) RCTA - Rear Cross Traffic Alert. Clean legal/regulatory document style with a white background and subtle border.
Five ADAS systems are now EU-mandatory in all new vehicles - mandatory since July 2022.

15.7 ADAS and Driving Tests

In Spain, drivers undergoing the practical test for the Class B licence may use vehicles equipped with ADAS systems, as long as the candidate demonstrates complete awareness and control of the vehicle. Fully automated systems are not permitted during tests.
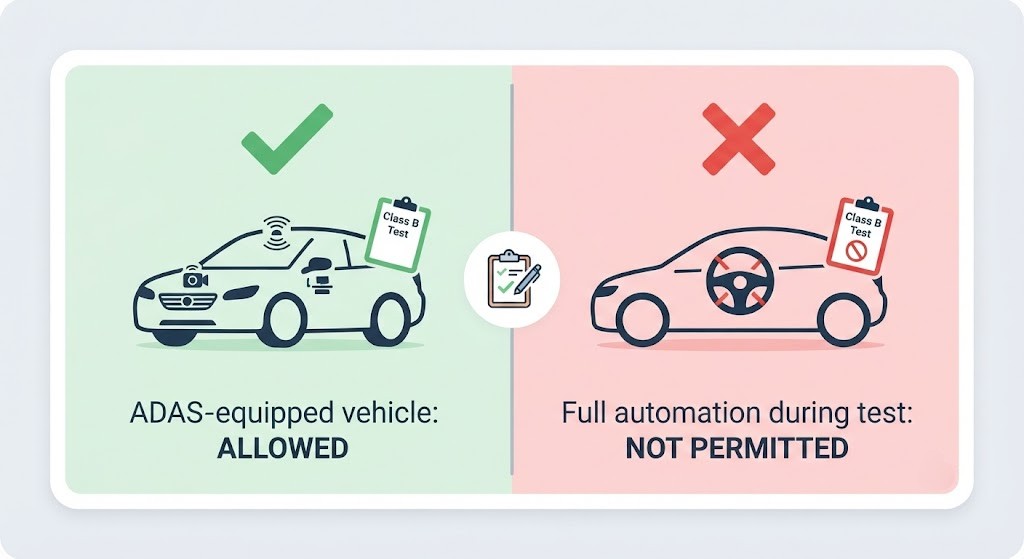
A clean two-cell info card. Left cell (green background): a green checkmark above a car with ADAS sensor icons and a "Class B test" label - "ADAS-equipped vehicle: ALLOWED". Right cell (red background): a red X above a car with an autopilot/self-driving icon - "Full automation during test: NOT PERMITTED". A small driving examiner clipboard icon sits between the two cells.
ADAS vehicles are allowed in the Class B test - but the driver must remain in full control.

15.8 The Future of ADAS

ADAS are expected to evolve with advances in AI, vehicle-to-vehicle (V2V), and vehicle-to-infrastructure (V2I) technologies. These will let vehicles interpret traffic in real time, predict hazards, and communicate with other road users and traffic systems, paving the way for autonomous driving.
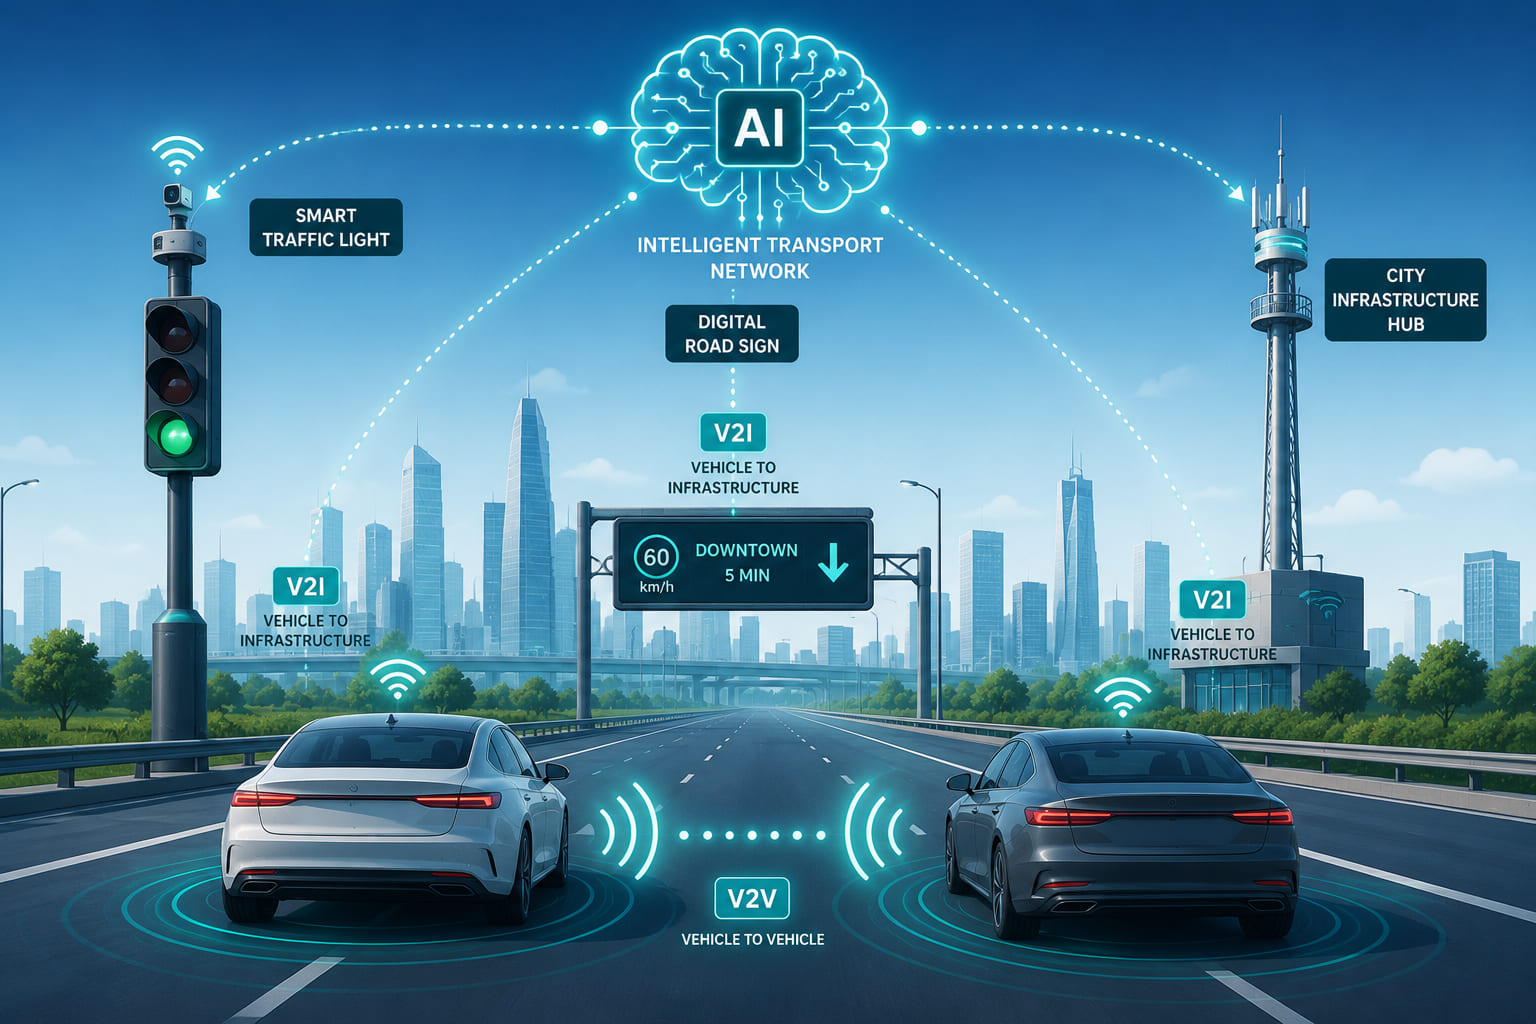
A forward-looking concept illustration. Two cars on a road exchange wireless signal arcs between each other - labelled "V2V". Each car also sends signals upward to a traffic light, a road-sign post, and a city infrastructure hub tower - labelled "V2I". An "AI" brain icon floats above the network. In the distance, a city skyline represents the fully connected smart-city endpoint. Futuristic but clean flat infographic style.
V2V and V2I connect cars to each other and to road infrastructure - the foundation of autonomous driving.

15.9 Best Practices When Using ADAS

  • Always stay alert - ADAS are support tools, not replacements for responsible driving.
  • Familiarise yourself with each system's operation and limitations in your vehicle's manual.
  • Keep cameras, radars, and sensors clean and calibrated.
  • Do not disable safety systems unless recommended by a technician.
  • Update system software regularly as advised by the vehicle manufacturer.
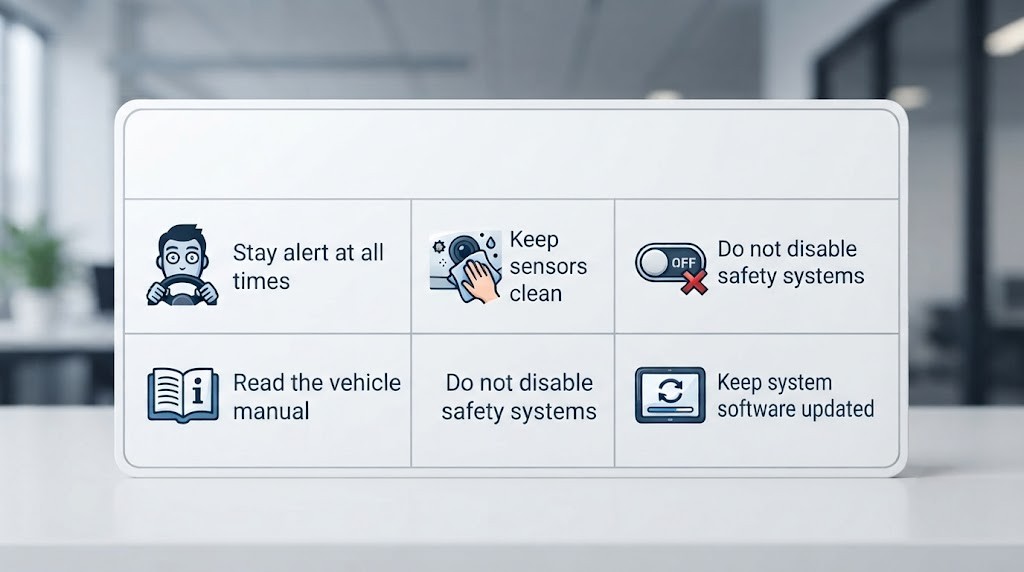
A vertical 5-point icon checklist card styled as an "ADAS Care Card". Row 1: alert driver icon (eyes open, hands on wheel) - "Stay alert at all times". Row 2: open vehicle manual / book icon - "Read the manual". Row 3: clean camera/sensor icon with a cloth - "Keep sensors clean". Row 4: a disable switch with a red X - "Don't disable safety systems". Row 5: a software update progress bar icon - "Keep software up to date". Clean flat checklist design.
Five best practices: stay alert, read the manual, clean sensors, never disable, keep updated.

15.10 Summary

  • ADAS improve safety, efficiency, and comfort for drivers and all road users.
  • They provide real-time alerts, corrections, and preventive interventions.
  • They must be used responsibly and never substitute the driver's attention.
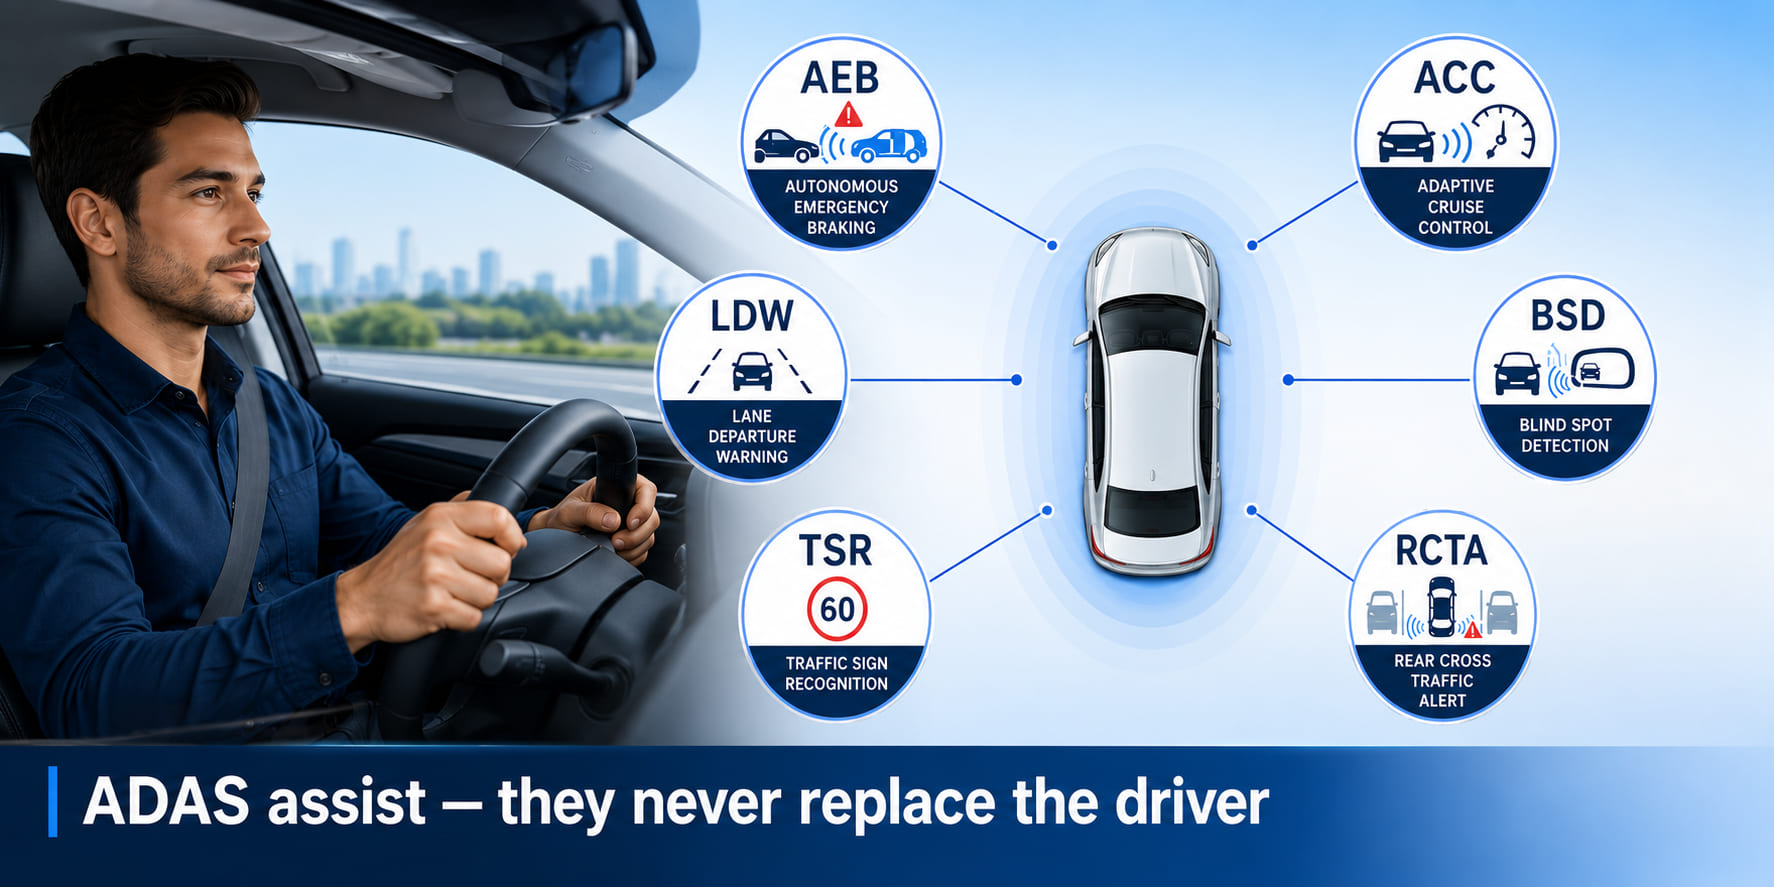
ADAS assist the driver - they never replace the driver.
A wide banner illustration. A driver sits at the wheel of a modern car, hands on the wheel, eyes on the road - alert and in control. Surrounding the car, six ADAS system icons radiate outward as labelled orbiting badges (AEB, ACC, LDW, BSD, TSR, RCTA). Below the car, a bold caption zone reads "ADAS assist - they never replace the driver" in a prominent clean sans-serif. Colour palette is confident blue and white.
Every ADAS system in orbit around a driver who remains in control - the core message of the chapter.

Ready to test your knowledge?

Practice questions covering everything in Chapter 15 - Driver Assistance Systems (ADAS).
Practice Chapter 15 →

Última actualización: 2026-06-27

Practica las preguntas de este capítulo

La teoría es gratis. Crea una cuenta gratis para practicar preguntas con formato oficial y seguir tu progreso.