Chapter 14 - Safety and Economical Driving
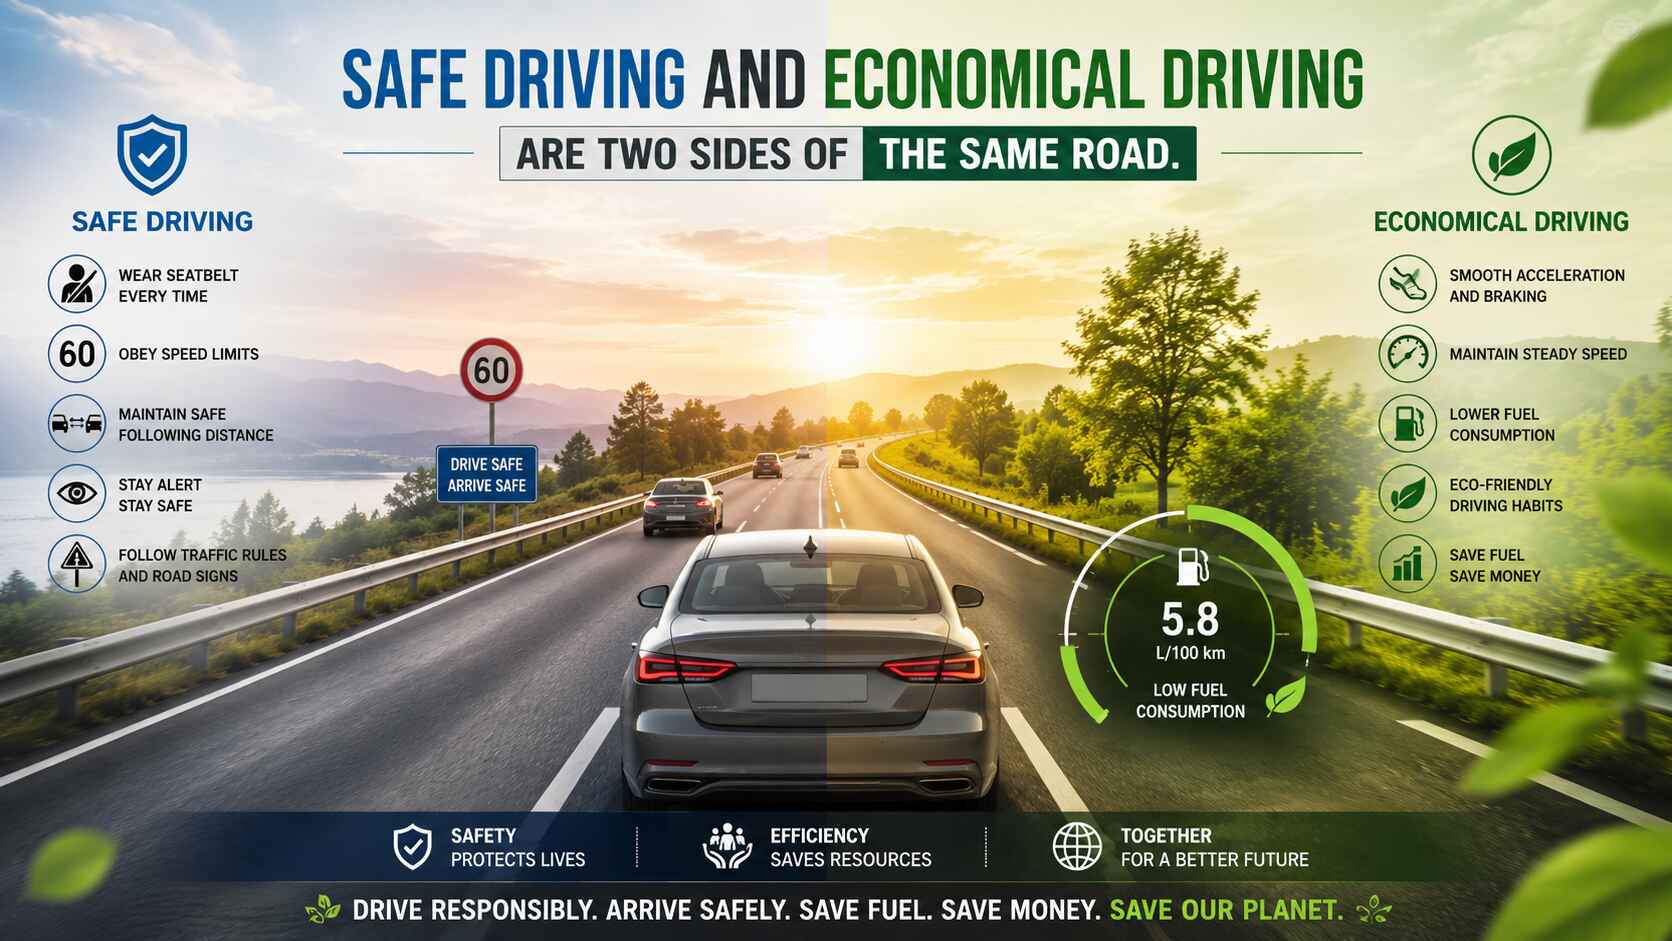
Safe and economical driving go hand in hand. Efficient driving habits improve road safety, reduce environmental impact, and save money on fuel and maintenance. This chapter explores preventive driving principles, fuel-saving techniques, and passive and active safety systems.
14.1 Introduction
Safe and economical driving are not separate concepts - they go hand in hand. Practicing efficient driving habits contributes to road safety, reduces environmental impact, and saves money on fuel and maintenance. This chapter explores preventive driving principles, fuel-saving techniques, and passive and active safety systems in vehicles.
14.2 Benefits of Economical Driving
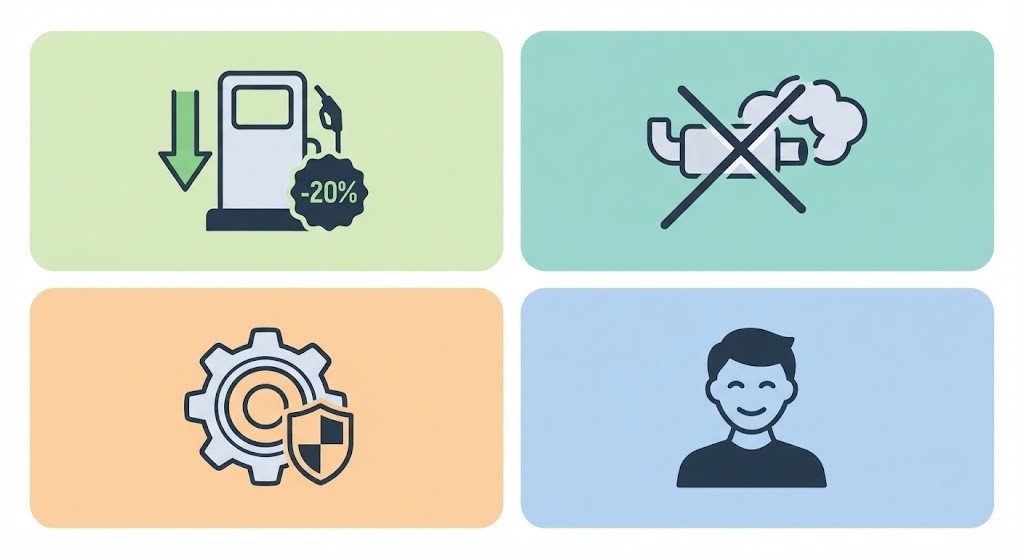
- Lower fuel consumption (up to 20% savings).
- Reduction of polluting emissions.
- Less wear and tear on vehicle components.
- Increased safety and driving comfort.
14.3 Techniques for Fuel-Efficient Driving
14.3.1 Starting the Engine
- Do not press the accelerator pedal while starting.
- Start driving immediately with petrol engines. In diesel engines, wait a few seconds.
14.3.2 Gear Shifting
Use high gears as early as possible:
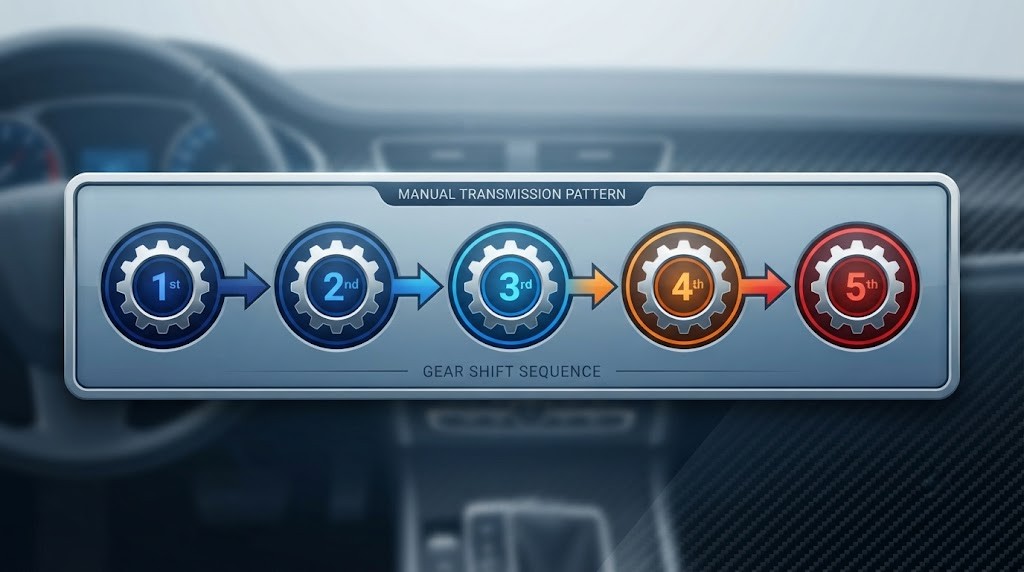
- Shift at 1,500-2,000 rpm (diesel) or 2,000-2,500 rpm (petrol).
- If possible, skip gears: from 2nd to 4th, or 3rd to 5th.
- Examples: 2nd gear at 6 metres or 2 seconds, 3rd gear from 30 km/h, 4th at 40 km/h, 5th at 50-60 km/h.
14.3.3 Deceleration and Stops
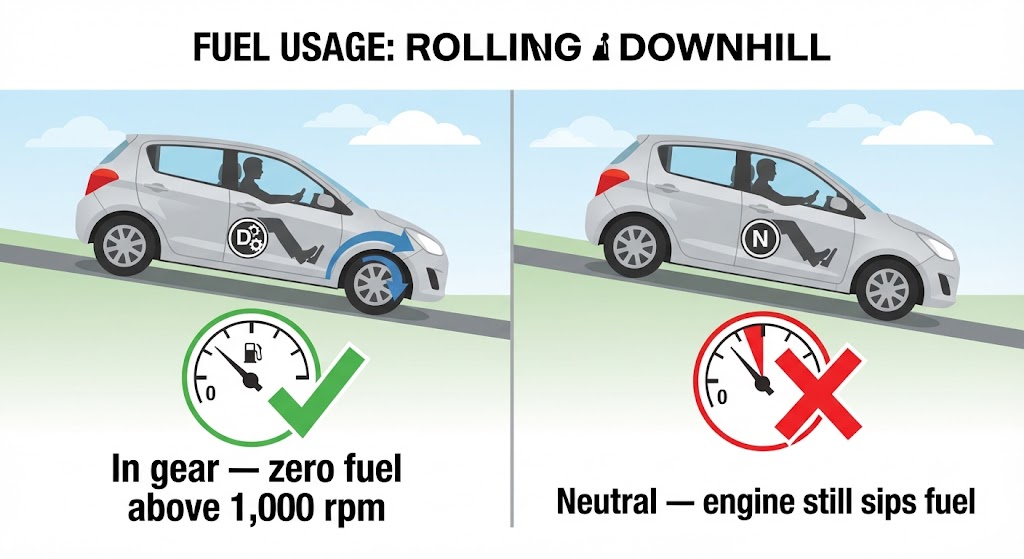
- Release the accelerator and coast in gear to use engine braking.
- Fuel consumption drops to zero when coasting in gear above 1,000 rpm.
- Brake smoothly and progressively.
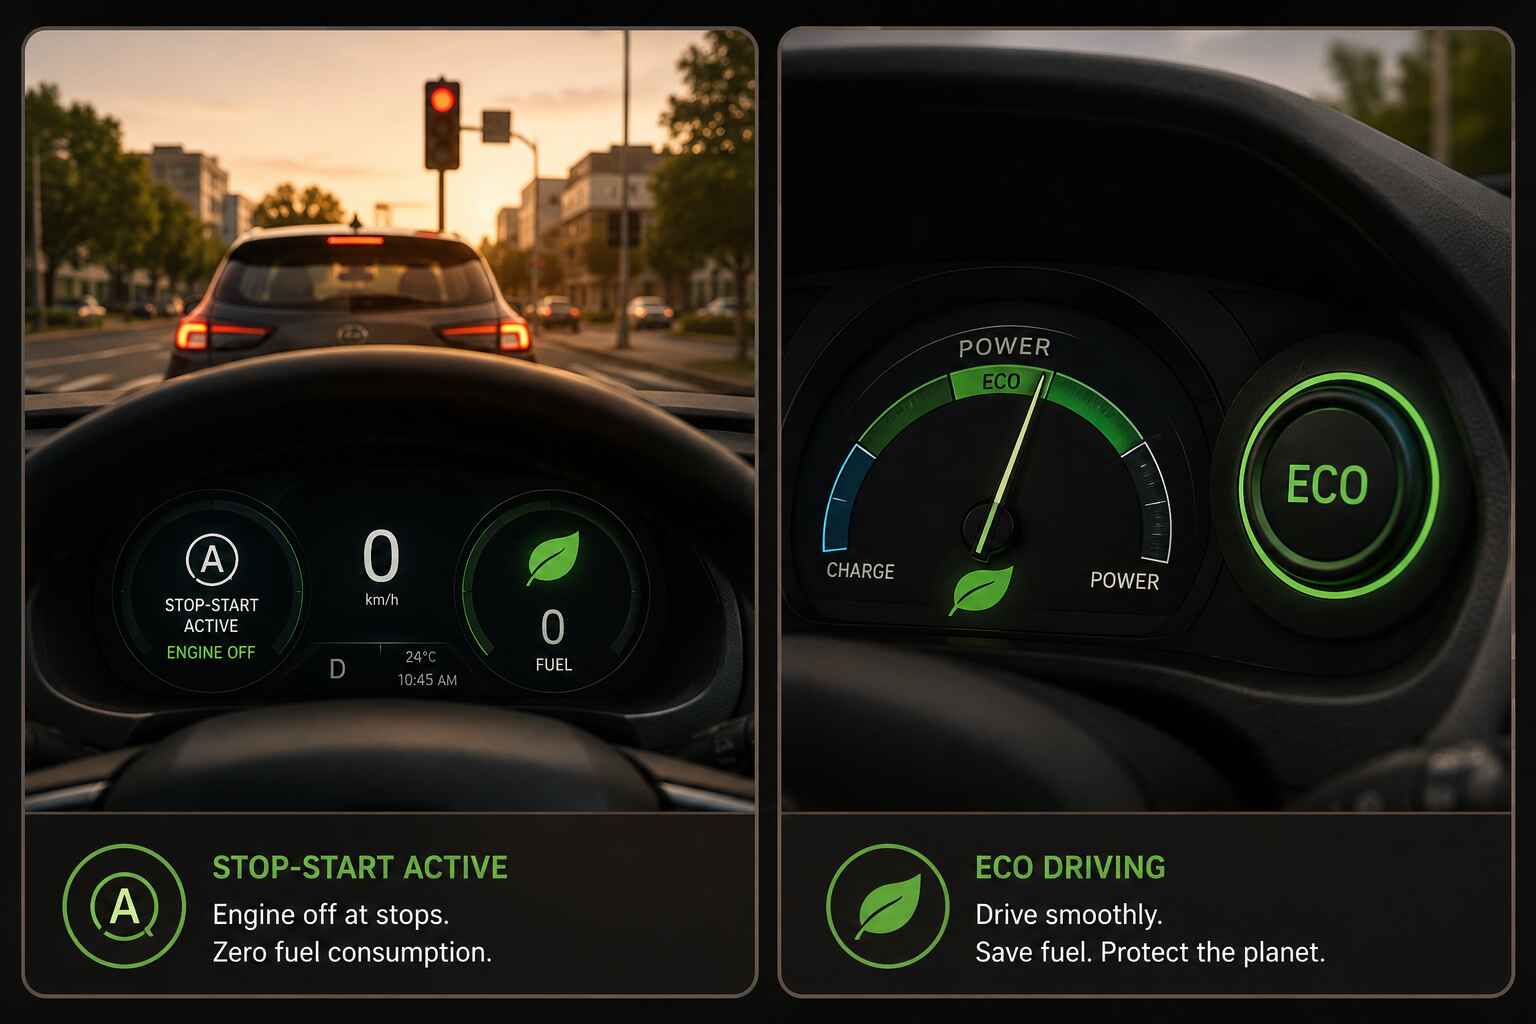
- Turn off the engine during stops of more than one minute.
14.3.4 Speed Management
- Maintain a steady speed to avoid unnecessary acceleration and braking.
- Drive at moderate and consistent speeds.
- Apply preventive driving to anticipate traffic situations.
14.3.5 Additional Factors Affecting Consumption
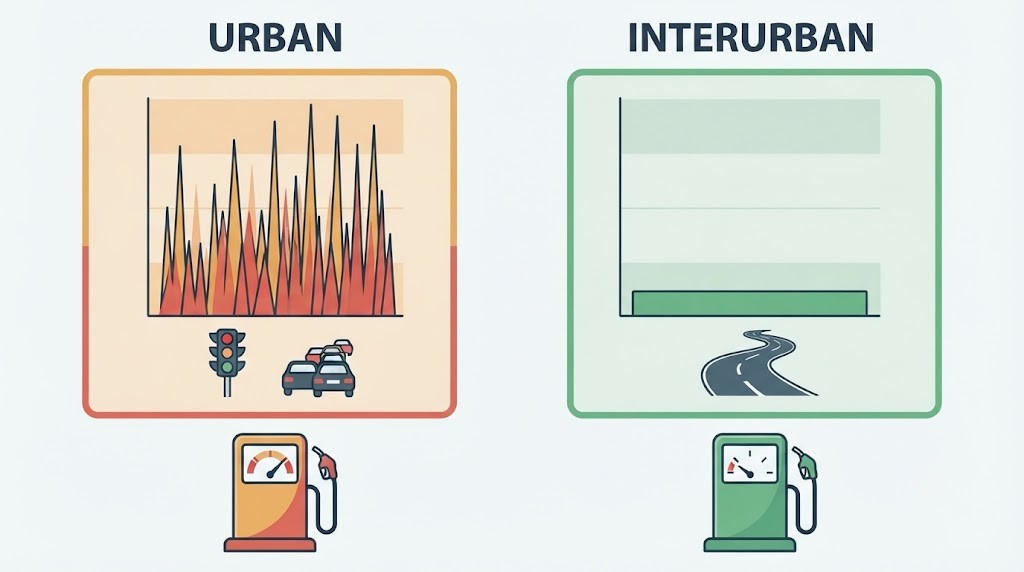
- Urban vs. interurban roads: urban driving requires more stops and starts, increasing consumption.
- Air conditioning: increases consumption; keep the cabin at around 23 °C.
- Vehicle condition: maintain the engine, tyres, and filters for optimal efficiency.
14.3.6 What Makes a Vehicle Use More Fuel
The main factors are: outside air resistance, not servicing the vehicle, driving in towns/cities, using the air conditioning, and carrying a lot of weight.
The air outside (air resistance)
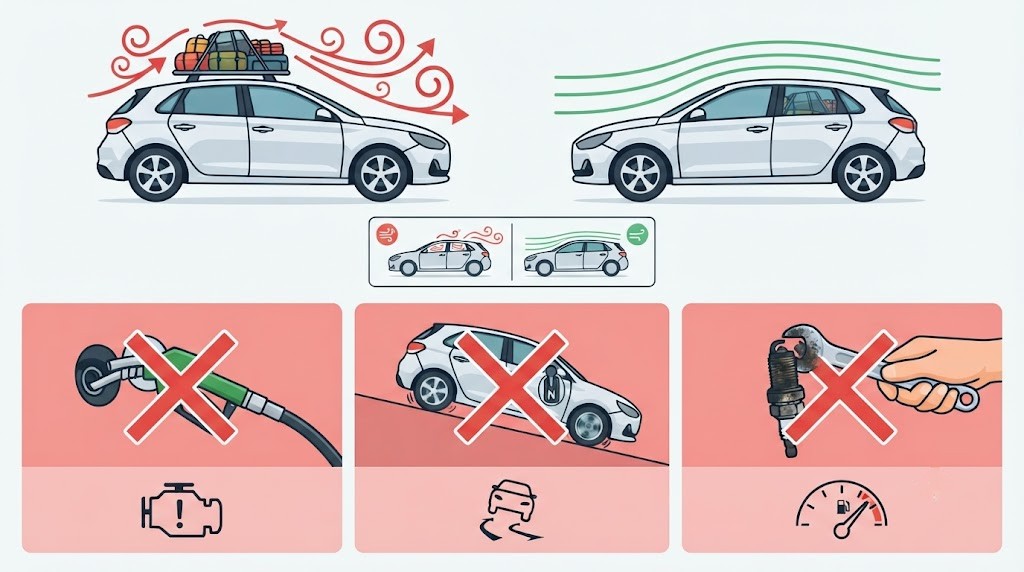
Most of the fuel a vehicle uses goes into fighting the air resistance pushing against it. Accessories like roof racks or wind deflectors increase that resistance, so the engine works harder. To reduce it:
- Avoid fitting a roof rack - carry luggage in the boot instead.
- Do not drive with the windows down while moving.
- Avoid towing a trailer or caravan, especially if wider or taller than the vehicle.
Not servicing the vehicle
Regular servicing reduces fuel consumption. To save fuel, check:
- The ignition system - inspect and replace spark plugs per the manufacturer's recommendations.
- The cooling and lubrication systems.
- The tyre pressure - tyres must always be correctly inflated.
- The fuel system - replace the air filter when needed and keep idling speed correct (too-high idling uses more fuel).
Driving in towns and cities
In built-up areas vehicles use more fuel despite lower speeds, because of traffic jams, frequent stops, frequent speed changes, and the engine working harder. To save fuel:
- Don't use the vehicle for very short journeys.
- Use public transport whenever possible.
- Avoid peak traffic hours.
- Choose the route with least traffic, even if a bit longer.
Using the air conditioning
Air conditioning increases fuel consumption; keep the interior at about 23-24 °C.
Carrying a lot of weight
A heavily loaded vehicle uses more fuel. Carry only necessary luggage and goods, and distribute the load correctly inside the vehicle.
14.3.7 False Fuel-Saving Measures
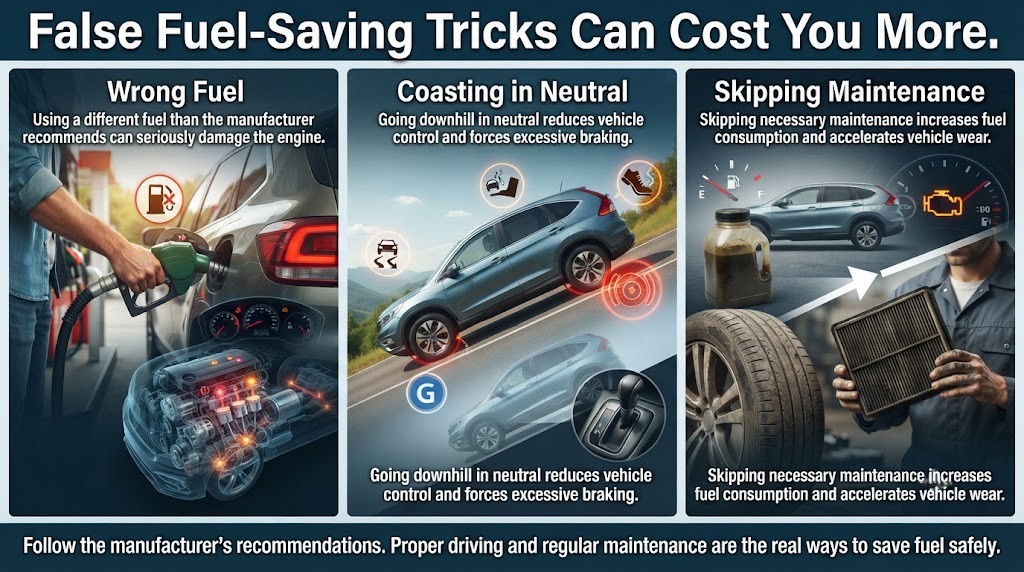
- Using a different fuel than the manufacturer recommends - the wrong fuel can seriously damage the engine.
- Going downhill in neutral - the vehicle can lose stability and you'll be forced to brake excessively.
- Skipping necessary maintenance - worn parts and faults actually increase fuel consumption.
14.3.8 New Techniques to Reduce Fuel Consumption
14.4 Preventive Driving
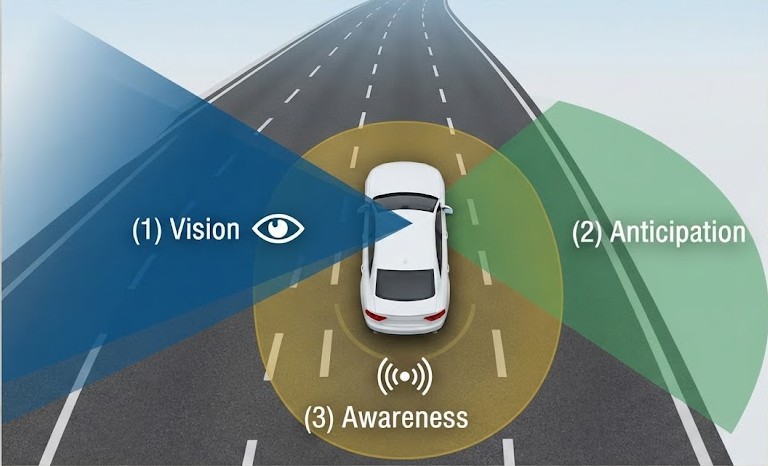
Defensive (preventive or anticipatory) driving is an attitude aimed at travelling more safely by gathering all necessary information from the surroundings, so you're ready to react quickly to the unexpected. It involves identifying risks early and acting in advance. Its three pillars are vision, anticipation, and space management.
14.4.1 Vision
- Look as far ahead as possible - about 20 seconds forward. The faster you drive, the farther ahead you must look.
- Scan the sides at intersections and crosswalks.
- Check mirrors every 5-10 seconds in cities, every 10-15 seconds on highways.
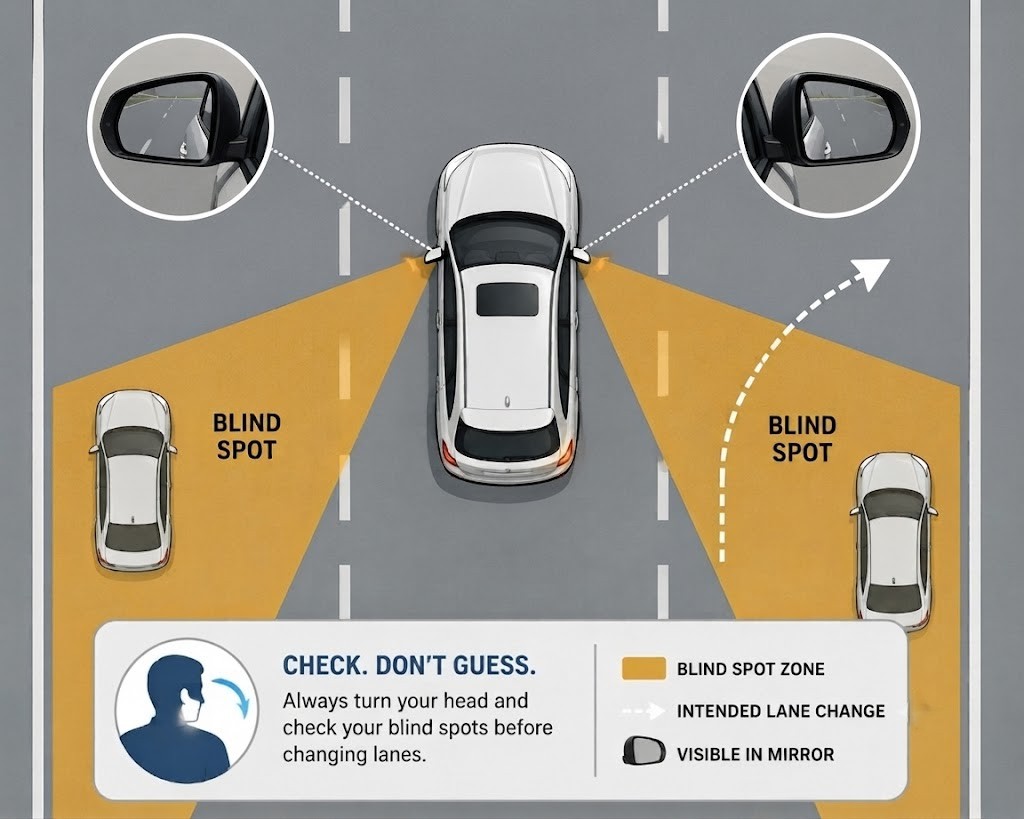
- Turn your head slightly to eliminate blind spots.
Look far ahead to monitor the space your vehicle will cover over the next 20 seconds - this helps you anticipate hazards and avoid sudden braking or sharp acceleration.
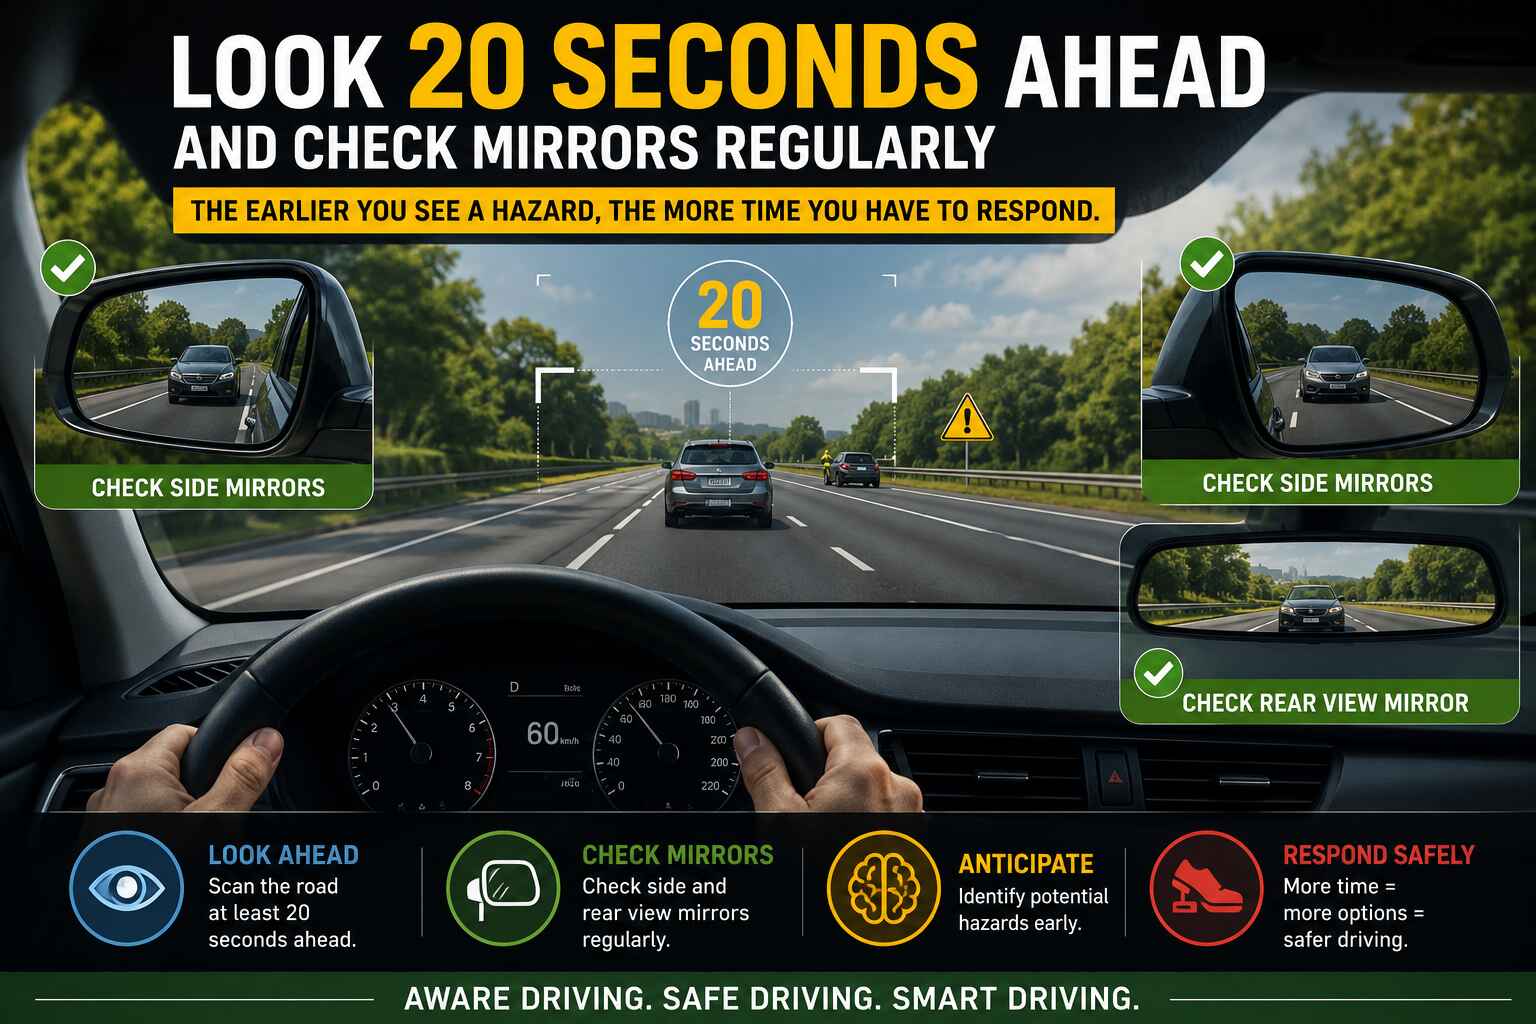
Look to the sides. We take longer to notice what happens at the sides, so keep checking left and right throughout the journey using the mirrors. Glance quickly and briefly so your main attention stays on the road. Check regularly even when not about to manoeuvre; how often depends on the type of road.
14.4.2 Anticipation
- Adapt your speed to road conditions and potential hazards.
- Switch on the necessary lights so others can see you and anticipate your moves.
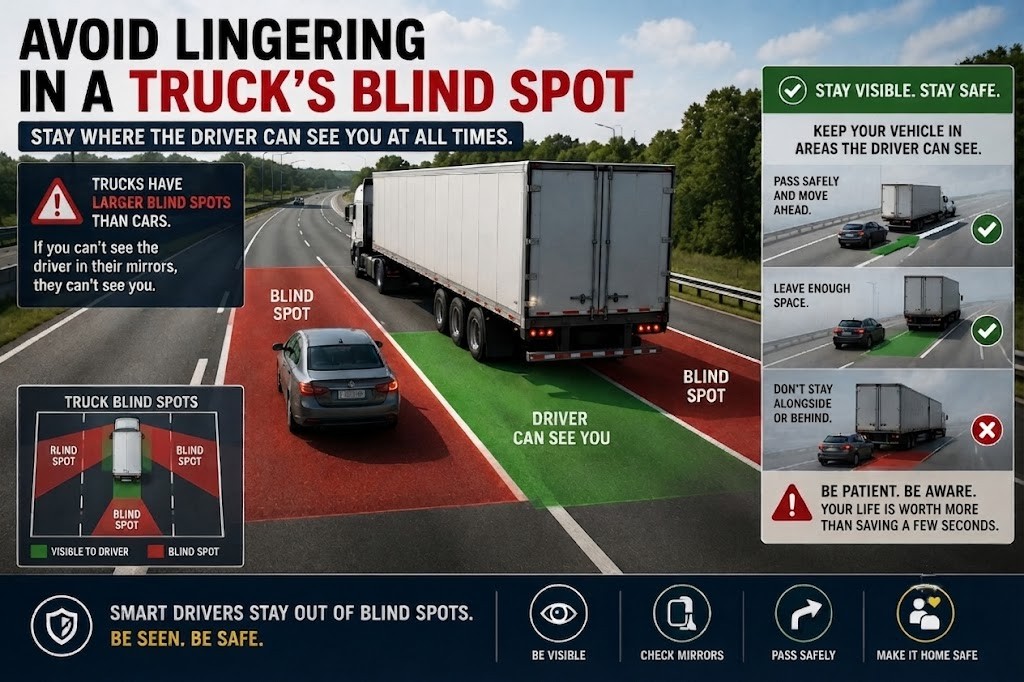
- Avoid lingering in another vehicle's blind spots, especially alongside or behind large vehicles.
- Don't trust other road users blindly.
- Make yourself visible and clearly signal your intentions.
- Always signal your manoeuvres for as long as necessary.
14.4.3 Space Management
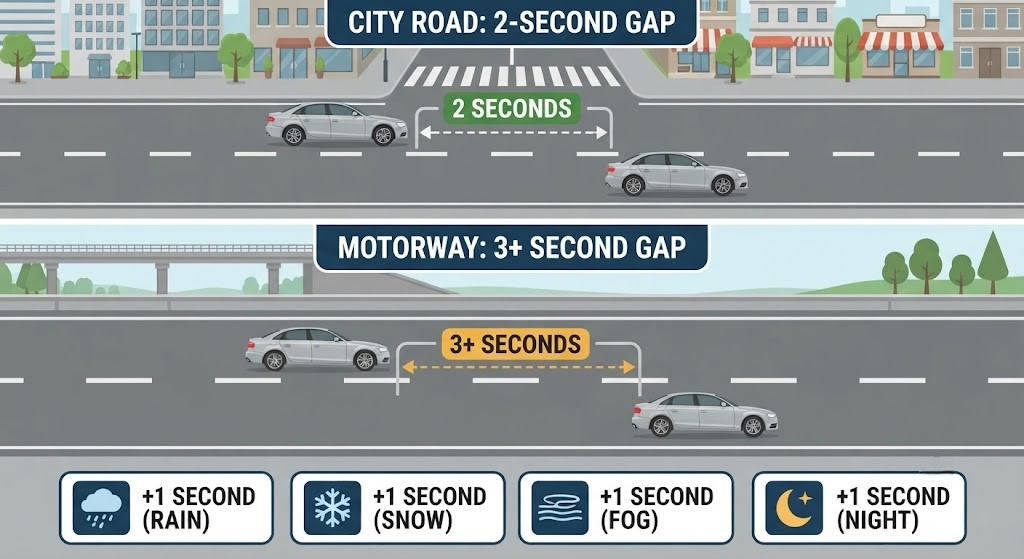
Maintain a 2-second gap in cities and 3 seconds on highways; increase if visibility or grip is poor. If followed too closely, increase your own gap with the vehicle ahead. At stops, leave 2-3 metres from the vehicle in front, and 5-6 metres if you are at the end of the line.
Front space
Keep a two-to-three-second gap to the vehicle ahead. Leave at least one extra second when it's raining, snowing, foggy, or at night, or when the vehicle behind is following too closely.
Rear space
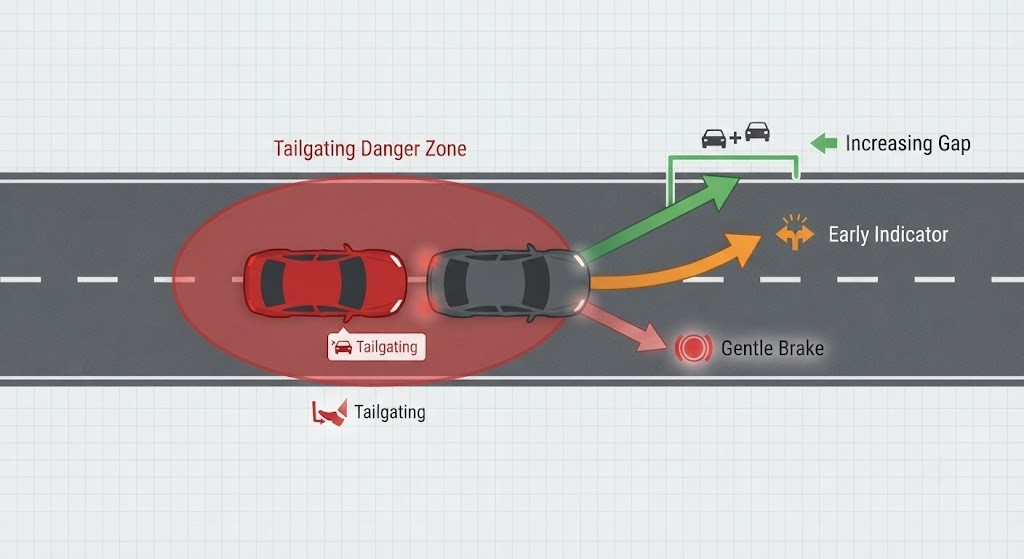
If the vehicle behind gets too close: increase your distance from the vehicle in front (so you don't brake sharply), signal manoeuvres earlier than usual, and brake gently with enough time for the driver behind to react.
Side space
Drive at an appropriate speed and keep enough lateral clearance when overtaking, passing alongside, or meeting oncoming traffic. Take extra care changing lanes or opening the door to exit. Stay out of other vehicles' blind spots.
Space when stopping
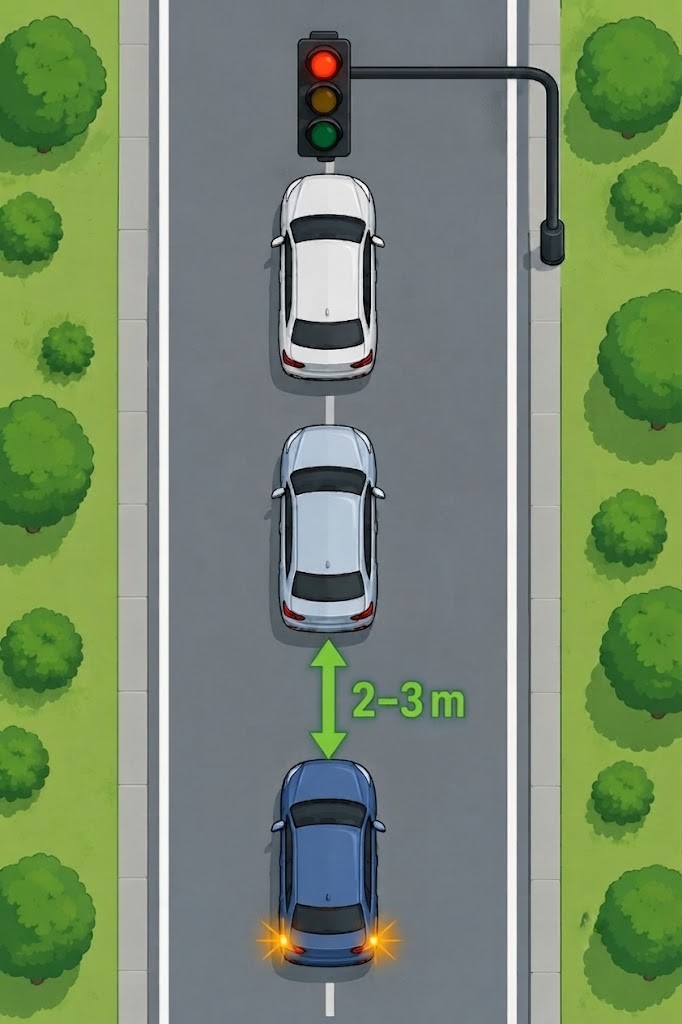
When stopped (traffic light, jam), keep at least 2-3 metres from the vehicle in front. This lets you warn a driver ahead if they roll backward, pass them if they stay stopped, and avoid hitting them if you're rear-ended. The last vehicle in the line can also: keep 5-6 metres from the vehicle in front; keep the brake pedal pressed with hazard lights on in a jam to be more visible; and watch vehicles approaching from behind in the mirror.
14.5 Efficient Driving
What is it? A way of driving that uses less fuel, reduces pollution, and makes travelling safer.
What does it achieve? It improves air quality (fewer polluting gases), saves money (less fuel and lower maintenance costs), increases safety (techniques similar to defensive driving), makes the ride more comfortable (avoiding sudden braking and large speed changes), and reduces vehicle noise.
14.5.1 Efficient Driving Techniques
Starting the engine and setting off
- Start the engine without pressing the accelerator.
- Move off immediately after starting; don't leave the engine idling.
- Begin at low speed and increase gradually as the engine warms up - driving fast with a cold engine increases consumption and accelerates wear.
Accelerating and changing speed
- Accelerate gradually, pressing the pedal gently.
- Set off in first gear (high torque, very low speed), then shift to second after a few seconds (slightly less power, a bit faster).
- Continue increasing speed smoothly. The vehicle uses less fuel in 4th and 5th gear (engine faster but delivering less power).
- In town, drive in the highest suitable gear whenever possible, always respecting speed limits.
Choosing your driving speed
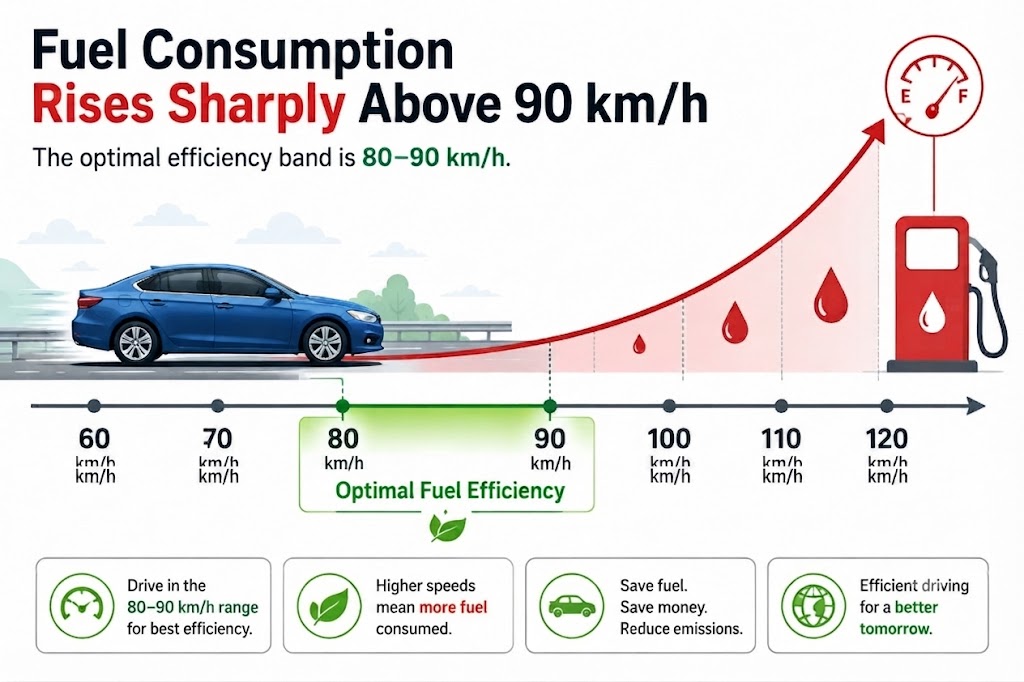
Once you exceed about 80-90 km/h, the vehicle uses significantly more fuel and pollutes more. Frequent speed changes also increase consumption and tire the driver. Travel at a steady, consistent speed, avoiding sudden braking or abrupt acceleration.
Reducing speed and stopping
- Lift your foot off the accelerator and let the vehicle roll.
- Use the brakes gently to reduce speed gradually.
- Switch off the engine if stopping for more than one minute.
14.5.2 Pollution
Vehicles pollute by emitting toxic gases into the atmosphere. To reduce pollution:
- Service the engine regularly so it doesn't emit clouds of smoke.
- Avoid hard acceleration when moving off.
- Use the horn only when necessary.
- Secure any load so it doesn't shift or bang against the vehicle.
- Prevent oil or other fluids from leaking onto the road.
- Do not wash the vehicle on the roadway - only in designated facilities.
- Do not throw objects onto the road that could dirty it, start fires, or cause accidents.
- Do not create unnecessary noise or emit more gases or smoke than permitted.
14.6 Passive Safety Systems
These systems protect vehicle occupants in the event of a crash.
14.6.1 Vehicle Body
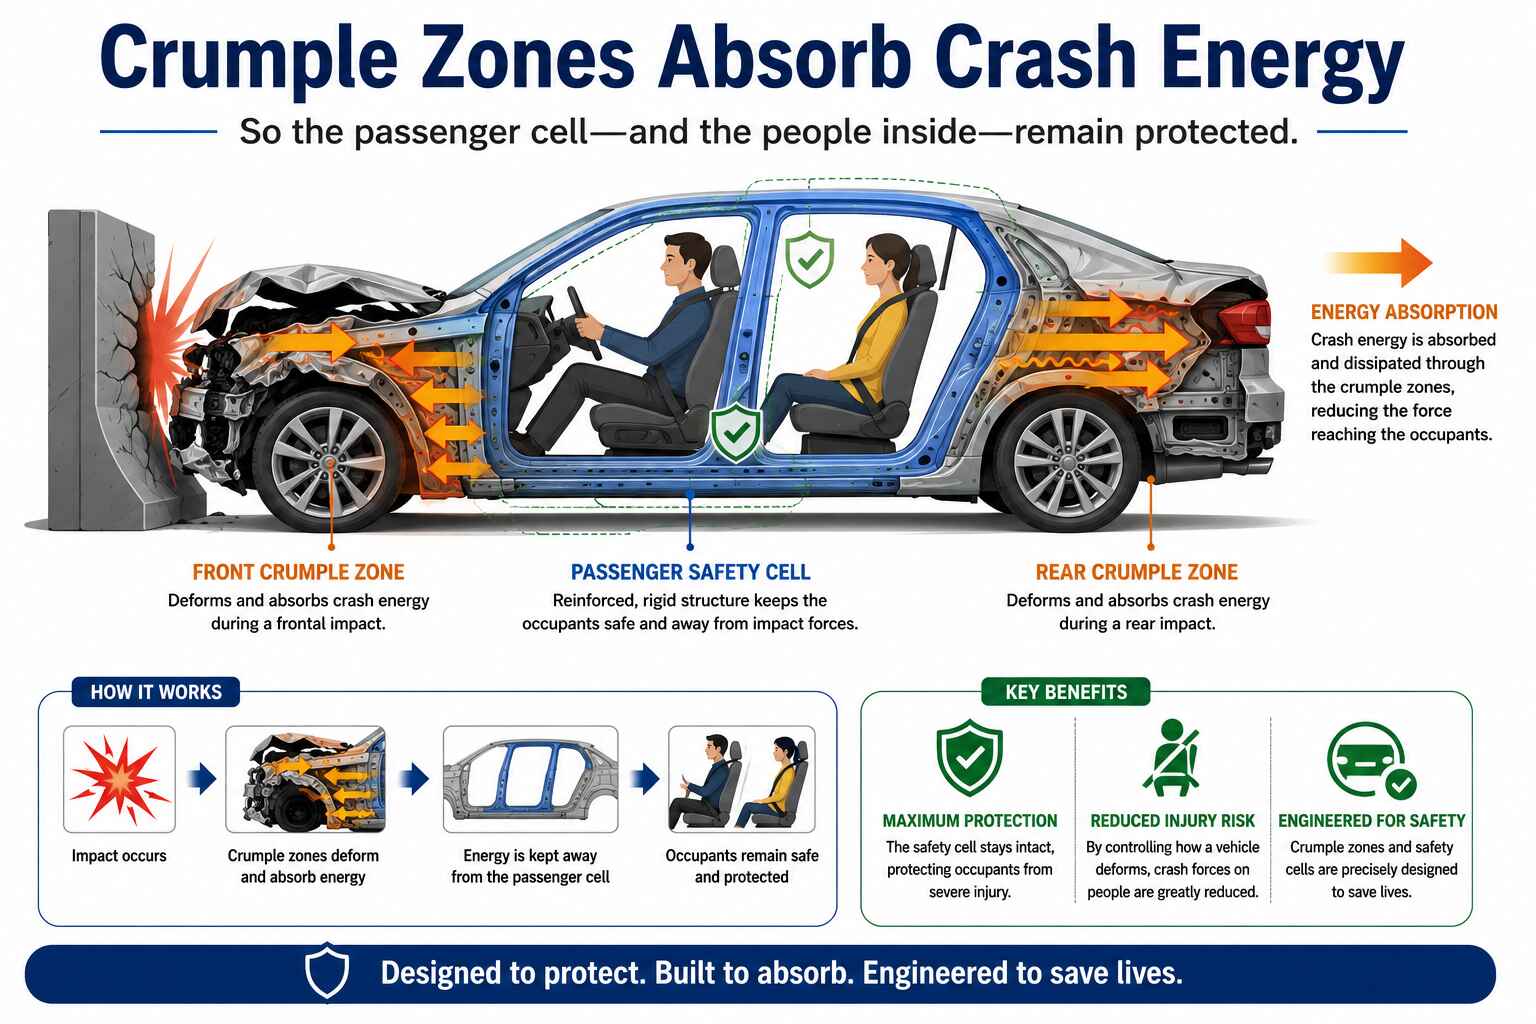
The chassis is designed with crumple zones that absorb crash energy through controlled deformation.
14.6.2 Seat Belts
- Reduce the risk of death by nearly 50% in a crash.
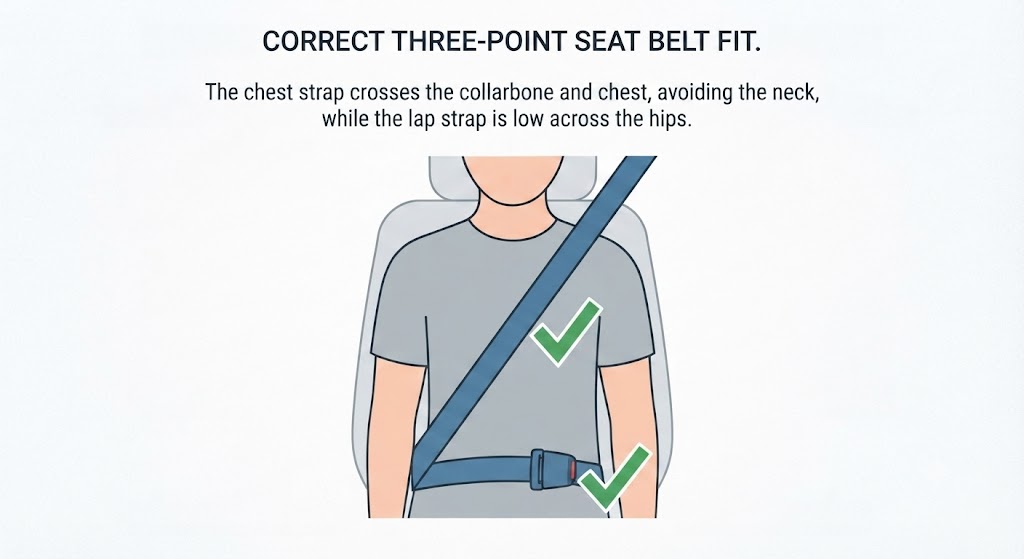
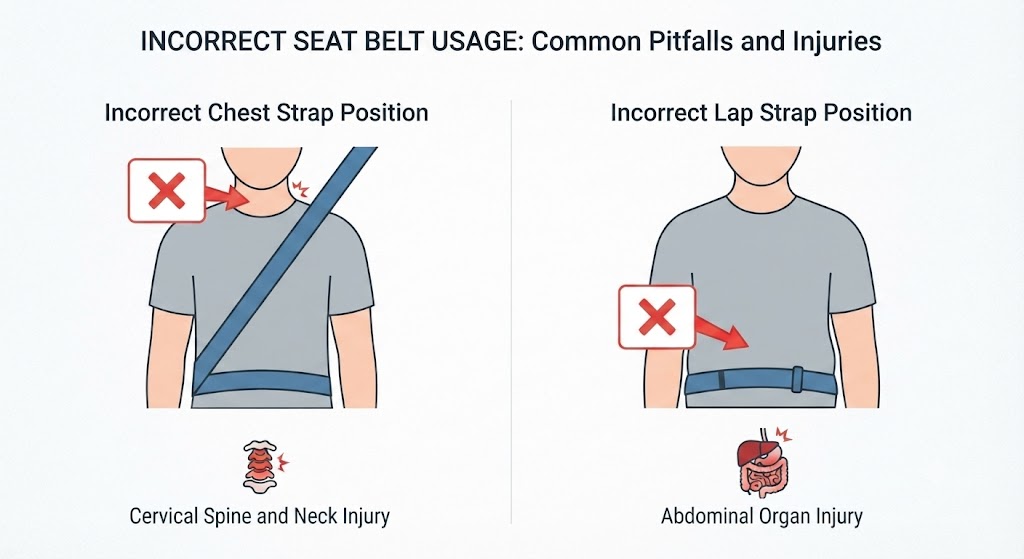
- Wear tightly, with the chest strap over the clavicle and the lap belt across the pelvis.
- Avoid bulky clothing or clips that reduce effectiveness.
- Replace belts after an accident.
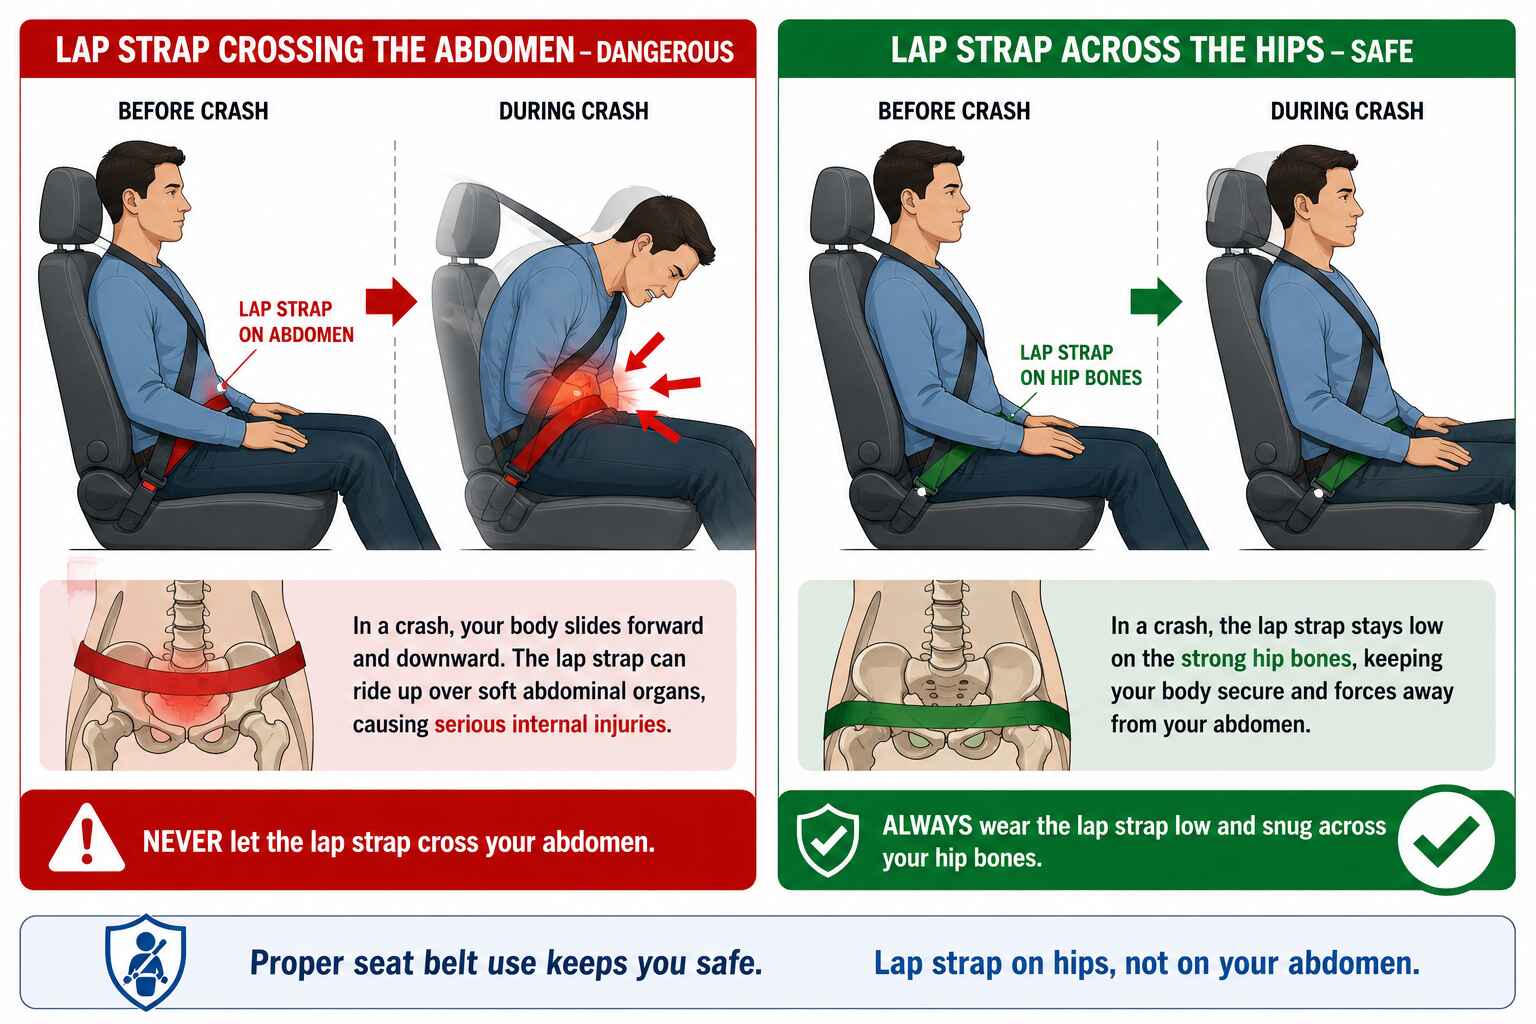
- Avoid seat accessories that cause the "submarine effect," where the body slides under the belt.
What is it for? To protect everyone in the vehicle in a sudden impact or rollover - keeping occupants in their seats and preventing ejection. Worn correctly it doubles a person's chances of surviving a crash; traffic fatalities have fallen since seat belts were introduced. A belt must meet quality standards, be securely anchored, be inspected regularly, and be repaired/replaced if damaged.
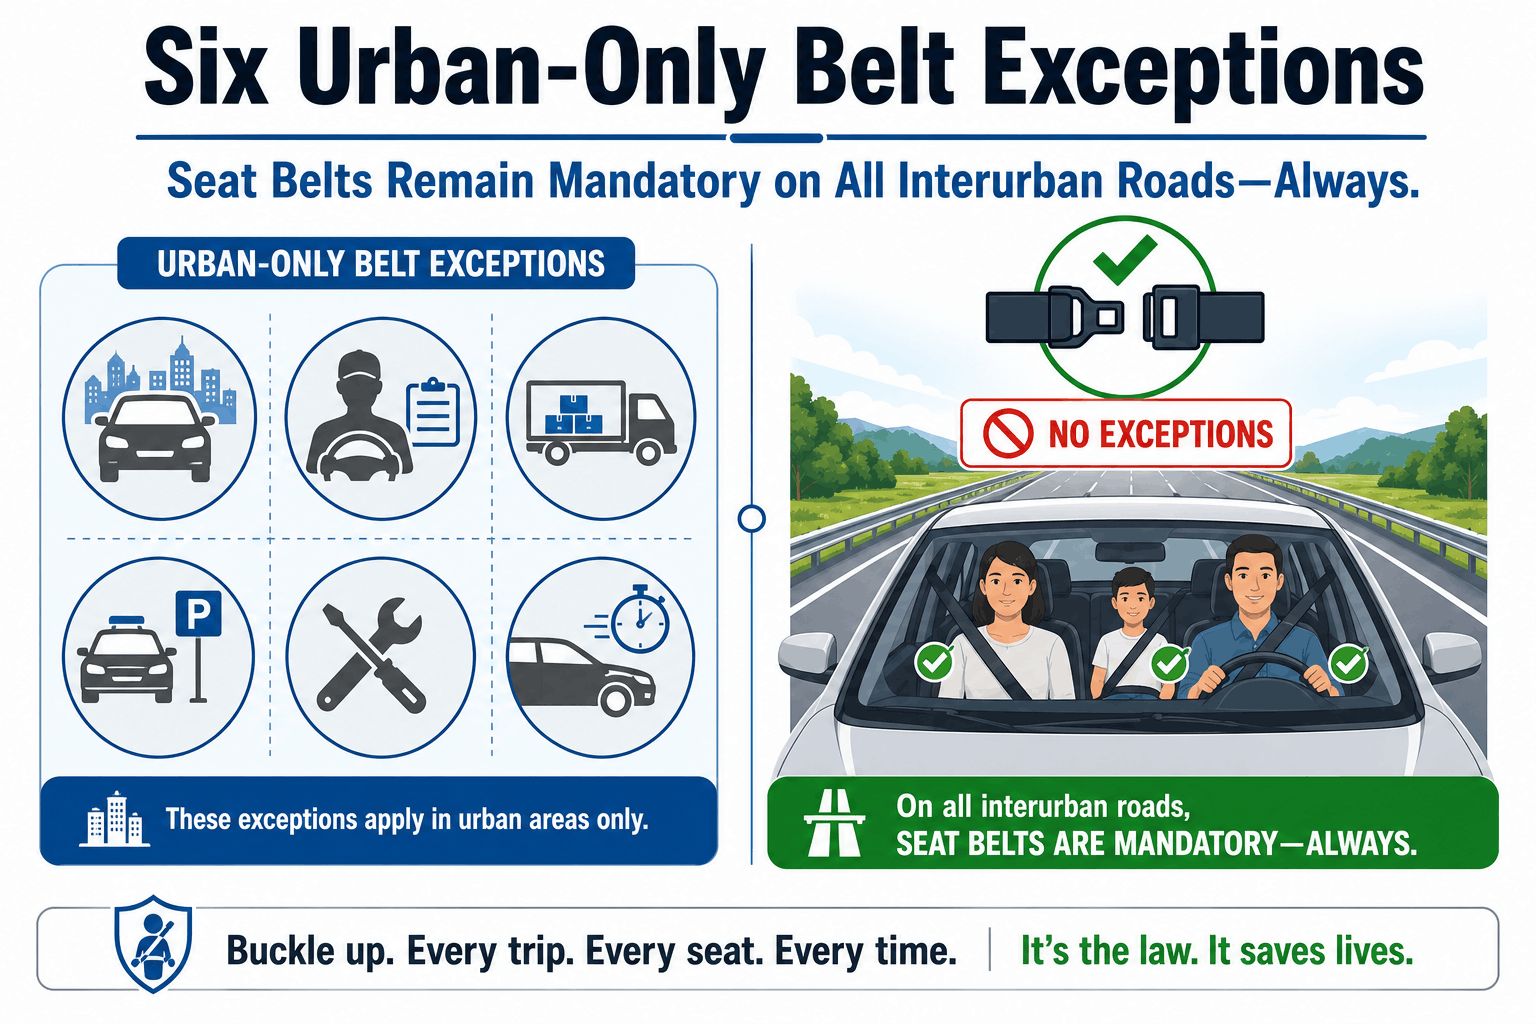
Who must wear it? Everyone (driver and all passengers) in a vehicle equipped with seat belts, on every road and street.
- Drivers parking and manoeuvring in reverse.
- On-duty taxi drivers.
- Children under 135 cm in a taxi without child restraints - they must sit in the rear and use the seat belt there.
- Delivery drivers who repeatedly get in and out for pick-ups and drop-offs.
- Drivers and passengers of emergency-service vehicles (e.g., ambulances).
- Driving instructors supervising a student and responsible for the dual controls.
How to fasten it. Wear it properly fastened and snug - neither too loose nor too tight. The two straps must be positioned correctly:
- Chest strap: over the collarbone, between shoulder and neck, down the centre of the chest. Placing it on the neck or across one breast can cause serious injuries; if it sits only on the shoulder edge it can slip and offer less protection.
- Abdominal strap: on the hip bones, always below the stomach. Higher up, it can cause serious internal injuries in a crash.
After fastening, pull it gently upward to check it's snug, and make sure it isn't caught or twisted.
Submarining effect: in a crash the body slides downward, slipping beneath the lap belt - usually from a too-reclined seat and incorrect belt position. To prevent it: fasten the belt correctly; keep it snug; don't place towels, cushions, or seat covers that make you slide; and keep a proper posture without reclining too much.
14.6.3 Child Restraint Systems (CRS)
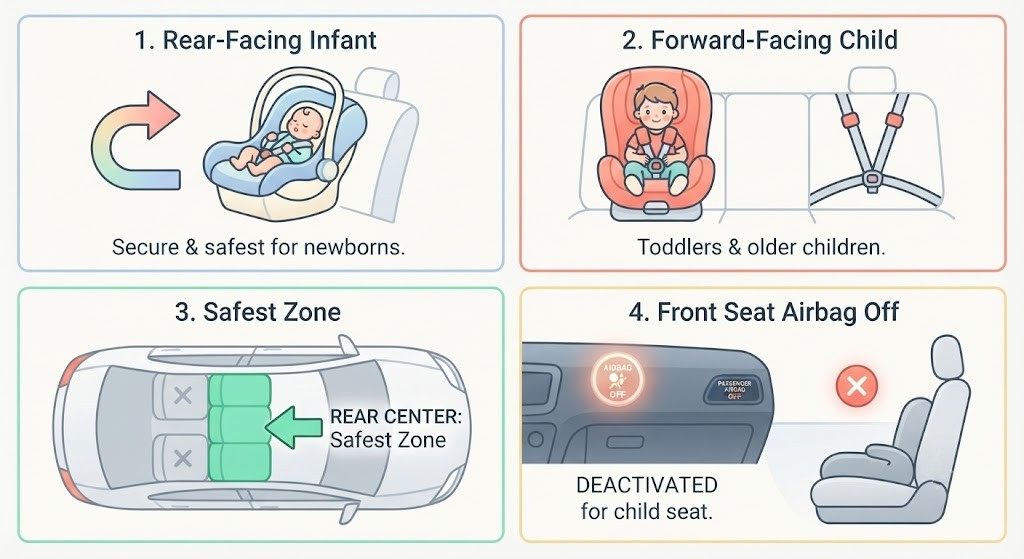
- Children must use seats appropriate for their weight and height.
- Never hold a child in your arms while driving.
- Rear-facing seats are safest for children under 2 years.
- Deactivate the front airbag when placing a child seat in the front.
- The safest place for children is the rear centre seat.
14.6.4 Airbags
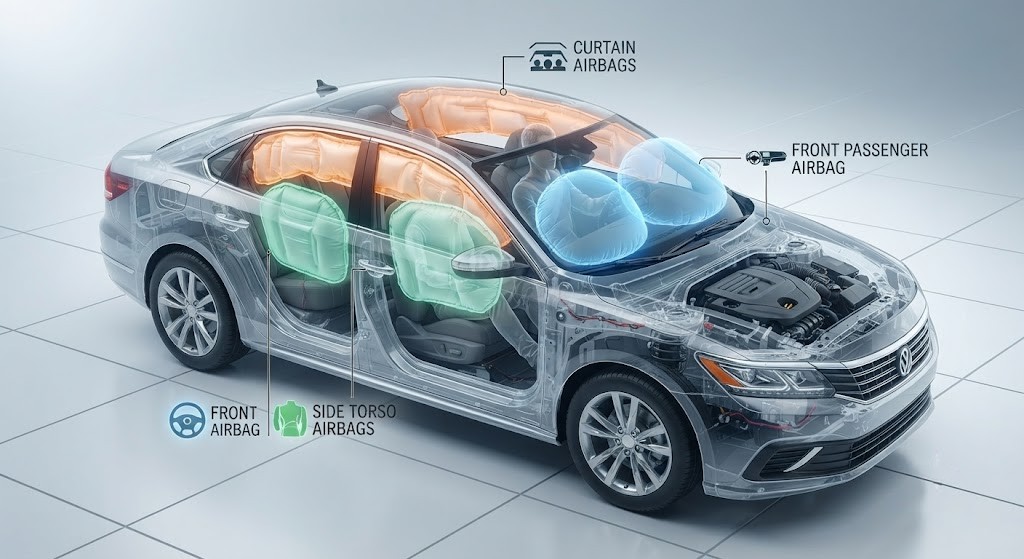
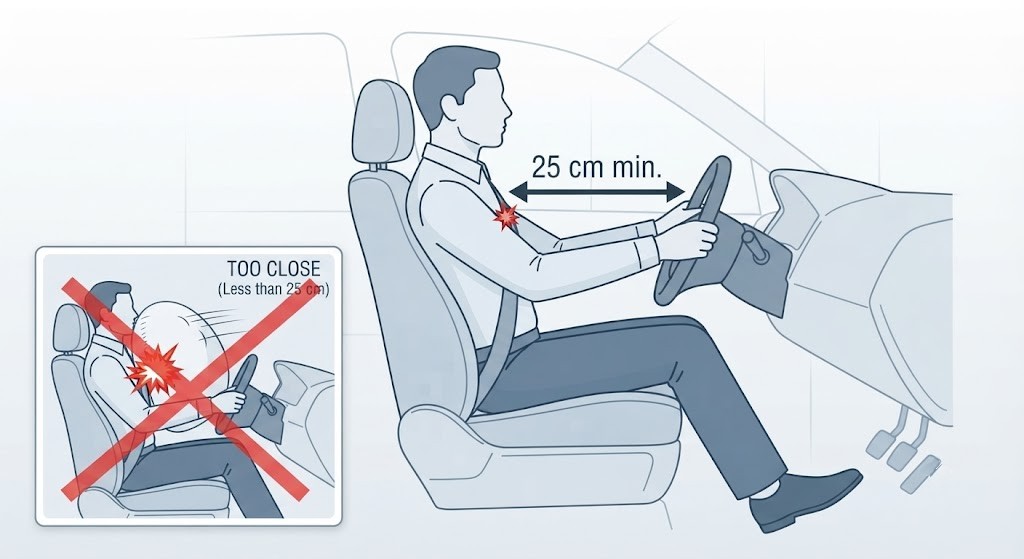
A safety device - an air-filled bag that inflates automatically to prevent occupants from hitting the car's interior. Types:
- Front airbags (driver and passenger).
- Side airbags for torso protection.
- Curtain airbags to protect the head in side impacts.
What are they for? To slow the body's sudden movement, prevent violent impacts with the vehicle, and protect the face and eyes from broken glass and debris.
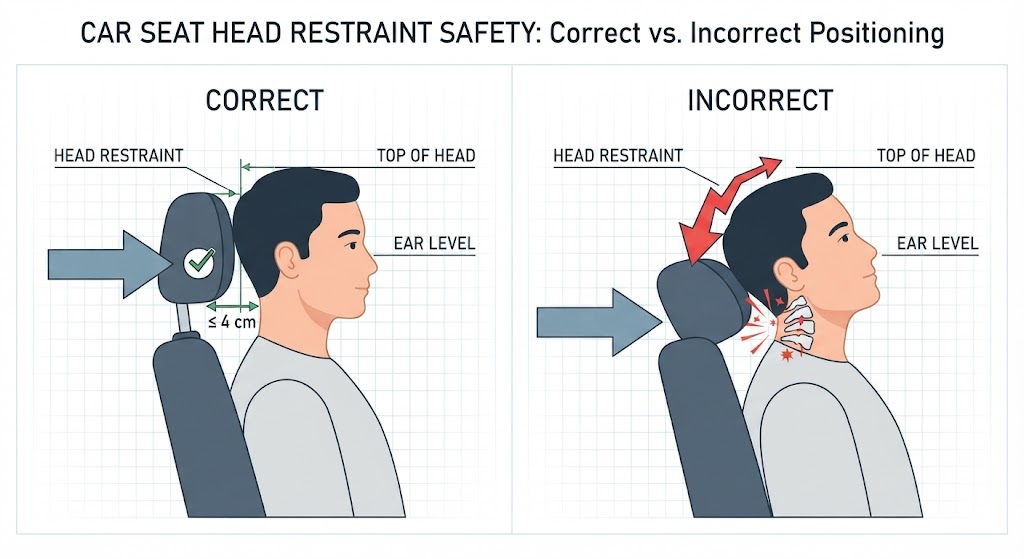
14.6.5 Headrest
Protects the neck and cervical spine in a sudden impact. Position it at the height of the occupant's head, for both front and rear seats - the top of the head restraint level with the top of your head, and the gap between head and restraint four centimetres or less.
14.6.6 Helmet
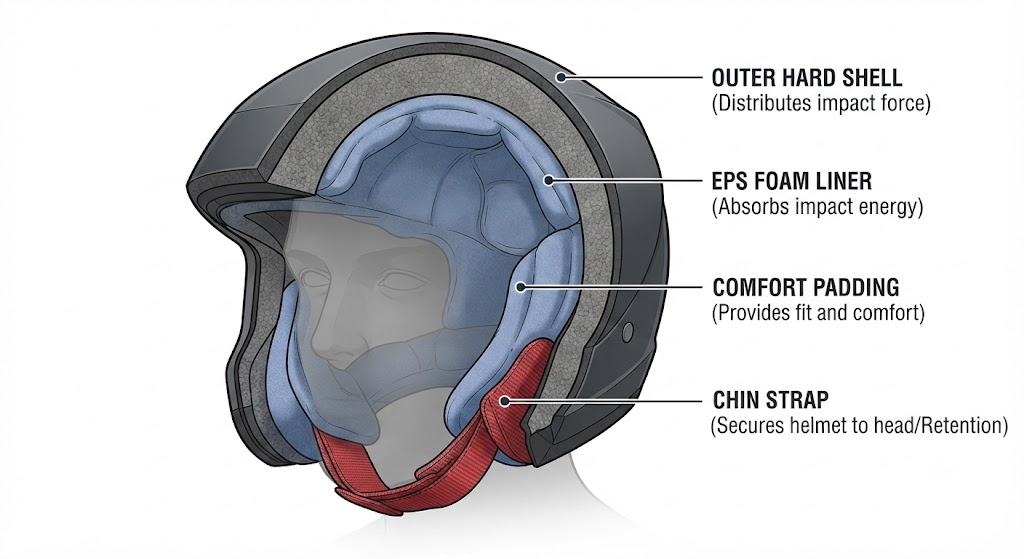
Head injuries are the leading cause of death in crashes involving two-wheeled vehicles; three out of ten people in such accidents survive because they wore a helmet. In a crash a helmet:
- Protects your head from impacts with the ground, vehicles, or roadside objects.
- Prevents stones, metal, or sharp objects from penetrating the head.
- Distributes impact force across the whole shell so it doesn't concentrate on one spot.
- Helps prevent burns and abrasions when sliding along the road after a fall.
14.7 Active Safety Systems
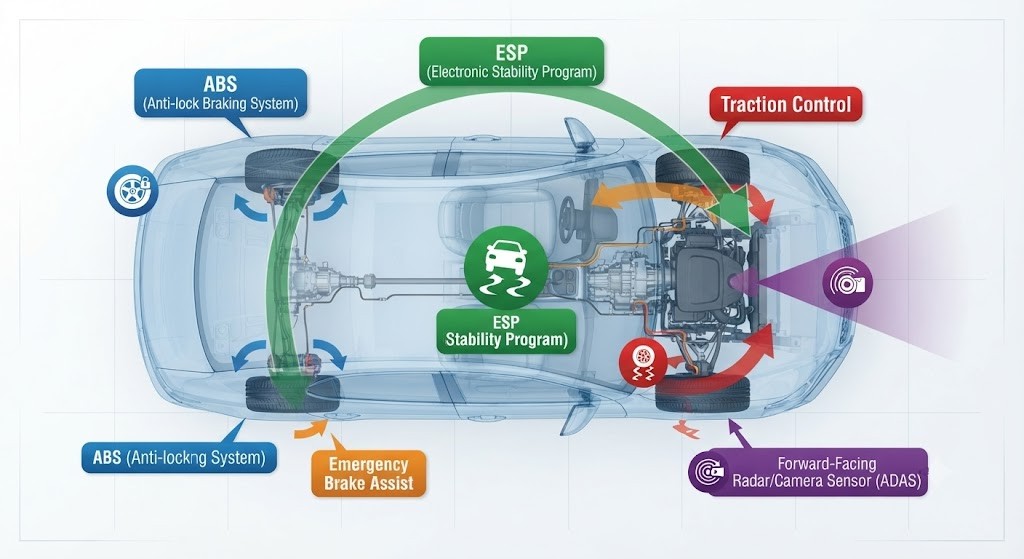
These systems help the driver avoid accidents altogether:
- ABS - prevents wheel lock during braking.
- ESP - maintains stability during sharp manoeuvres.
- Emergency Brake Assist - increases braking force in emergency stops.
- Traction Control - prevents wheel spin on slippery surfaces.
- ADAS (Advanced Driver Assistance Systems) - lane keeping, emergency braking, adaptive cruise control.
14.8 How to Prepare a Trip
14.8.1 Safety Checks
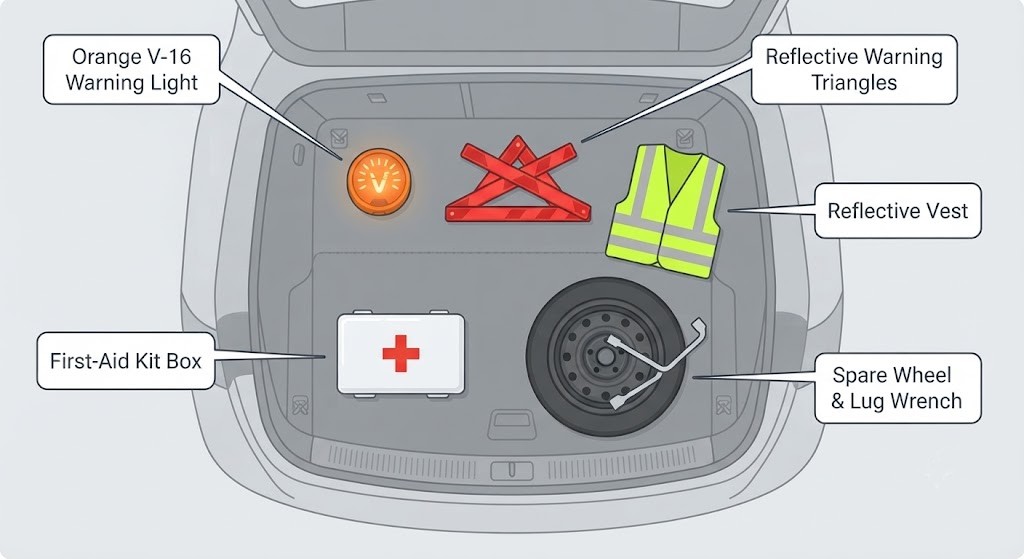
Before starting a trip in a car or goods vehicle, make sure you have:
- A warning light (V-16) or reflective triangles to place on the road in case of breakdown or accident.
- A high-visibility reflective vest.
- A spare wheel and the tools to replace it, or a puncture repair kit.
- It's also advisable to carry a first-aid kit.
- Drivers who wear glasses or contact lenses should carry a spare pair.
14.8.2 Choosing the Route
Plan your route with a map or GPS, choosing the safest and most comfortable option considering roadworks, weather, and traffic. Schedule breaks (recommended every 2 hours or 200 km).
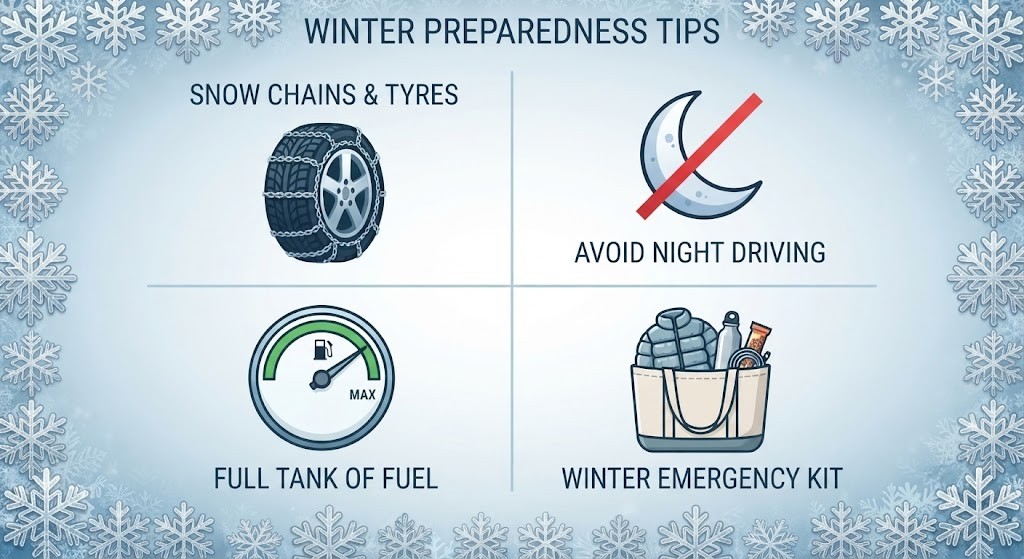
- Carry snow chains or use winter tyres.
- Avoid driving at night if possible.
- Travel with a full fuel tank.
- Bring warm clothing, water, food, and a mobile phone with a full battery.
14.9 Environmental Labels
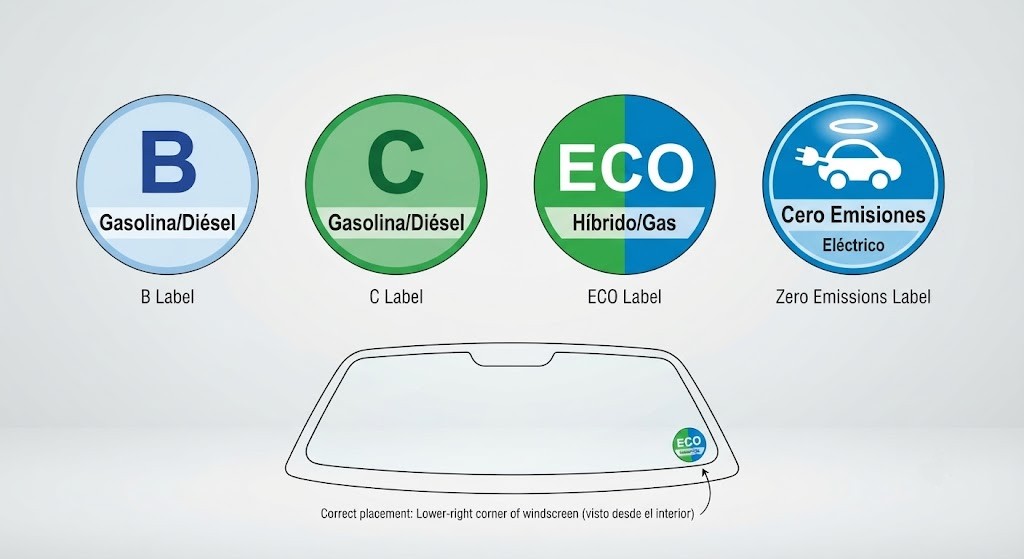
Environmental labels classify vehicles by their exhaust emissions and environmental impact. There are four types - B, C, ECO, and Zero emissions - and each shows the emission level and the vehicle's fuel type. The aim is to give priority to less harmful vehicles. City authorities can:
- Create Low-Emission Zones (ZBE): areas only certain labels may enter, to improve air quality.
- Mark these zones with vertical signs: only vehicles with the required label may enter.
- Restrict traffic on days with high pollution levels.
- Provide advantages, such as letting "Zero Emissions" vehicles use HOV (Bus-VAO) lanes regardless of the number of occupants.
Environmental labels must be placed on the lower right-hand corner of the front windscreen. On vehicles without a windscreen (like motorcycles), the label must be placed where it is clearly visible.
Ready to test your knowledge?
Practice questions covering everything in Chapter 14 - Safe and Economical Driving.Última actualización: 2026-06-27
Practica las preguntas de este capítulo
La teoría es gratis. Crea una cuenta gratis para practicar preguntas con formato oficial y seguir tu progreso.